Antipyretics for children are prescribed by a pediatrician. But there are situations of emergency care for fever, when the child needs to give the medicine immediately. Then the parents take responsibility and apply antipyretic drugs. What is allowed to give to infants? How can you bring down the temperature in older children? Which medications are the safest?
All the warm summer greetings from Taganrog!
In my new article, we will consider the replacement of the socket block with a double switch of the old type, which was installed earlier in all panel "Khrushchev" houses. The replacement will be carried out on a new switch box with a socket under one frame.
As usual, there will be a lot of pictures, a connection diagram, recommendations for installing and connecting this device.
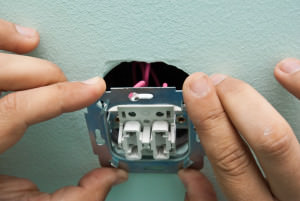
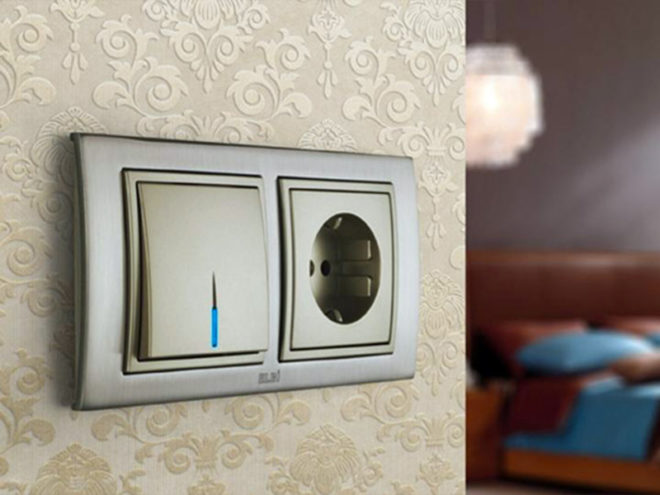
How this miracle of Soviet design and technology looks - shown in the photo on the left.
Such a unit consists of one outlet (of course, without grounding) and two or three switch keys. Switches include light in the bathroom, toilet, and kitchen.
In principle, the idea is not bad, but eventually it all comes into disrepair, because these switches are used in an apartment much more often than all the others combined.
Scheme for connecting switches with a socket in one unit
The scheme in general is simple, but I will cite.
In the replaced block come such wires: phase, zero, and "leave" two wires to power lamps bathroom and toilet. The phase is used to power the sockets and switches. Zero - only for the outlet.
Wiring diagram of circuit breakers with socket
Strictly speaking, when installing wiring, the lighting groups are usually separated. That is, the switches and sockets should go to different supply wires with, and turn off at the same time different in the electrical switchboard. But this was done before, because of poverty.
Dismantling of the old unit
Practically every day we have to deal with the concept of "PIPETS". Another pipets - at the end of the article.
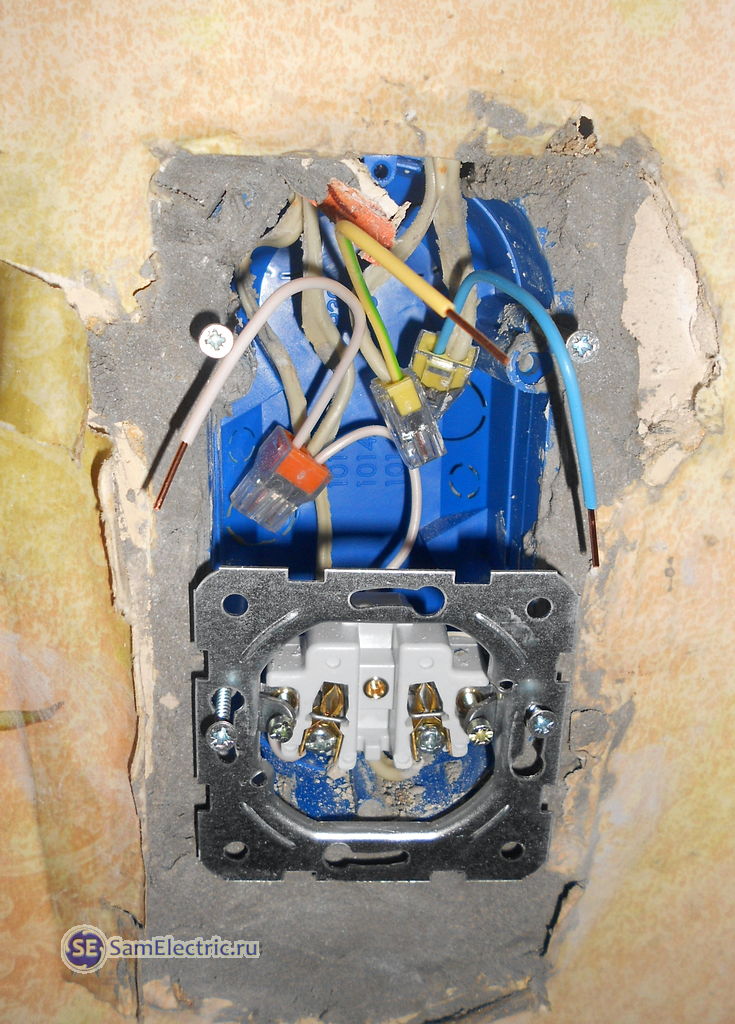
So, we remove the lid, we see:
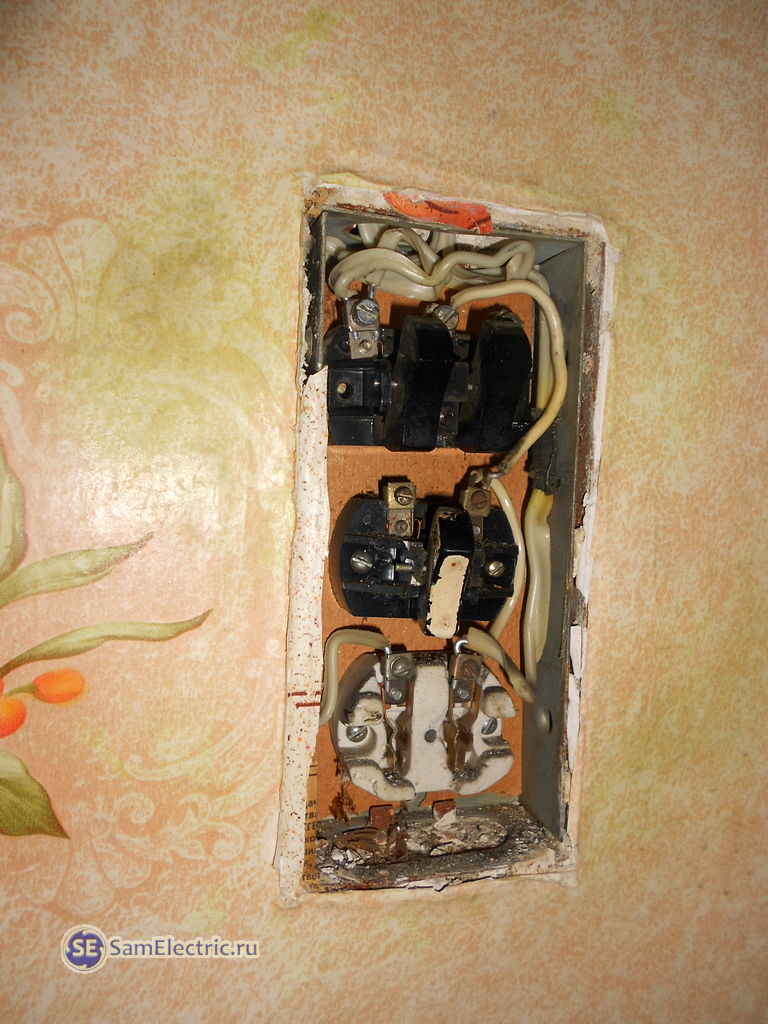
What do we see? Everything is shattered and staggered, the two top switches in completely killed condition, the third one is not connected, and according to the mistress, never worked. Rosette compared with them more or less, given that in such a place it is almost not used.
The panel house is 40 years old. The day includes light in the kitchen and bathroom at least 10 times. 40x365x10 = 146 thousand times. They did a good job.
At this stage we analyze the wires, check where the phase is, and turn off the power. In this case, there must necessarily be a headlamp, without it.
We take out the insides. The main thing - do not break the wires and notice where it comes from.

3. Take out all the insides - an old outlet, switches, a metal box
The bad ends that went to the switches had to be cut off - they were still short.
The two bottom wires are on the socket. Left - zero, right - phase, which in olden times was designated by electric rags with black cloth (there was no other marker, too).
It is worth saying that the antique metal mounting box for some reason fastens the tin as hard. It is screwed with some screws with nuts, which must be scrolled. I changed such blocks more than once, and each time to tear out this box is torture. I use powerful pliers, a large flat screwdriver.

4.This will never be useful to anyone else. Thank you for the service!
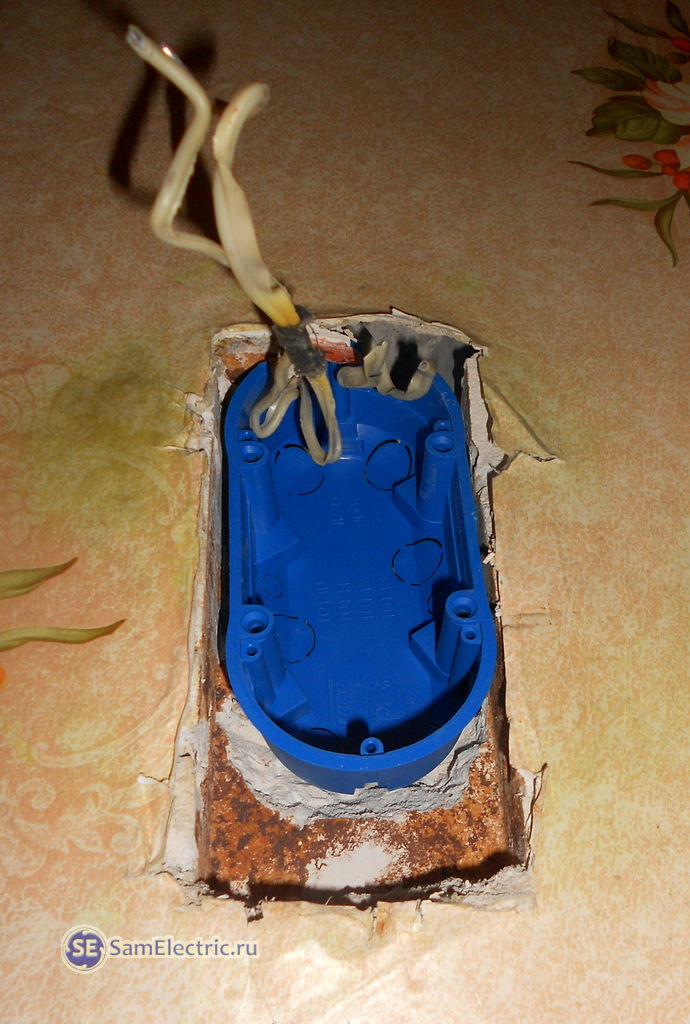
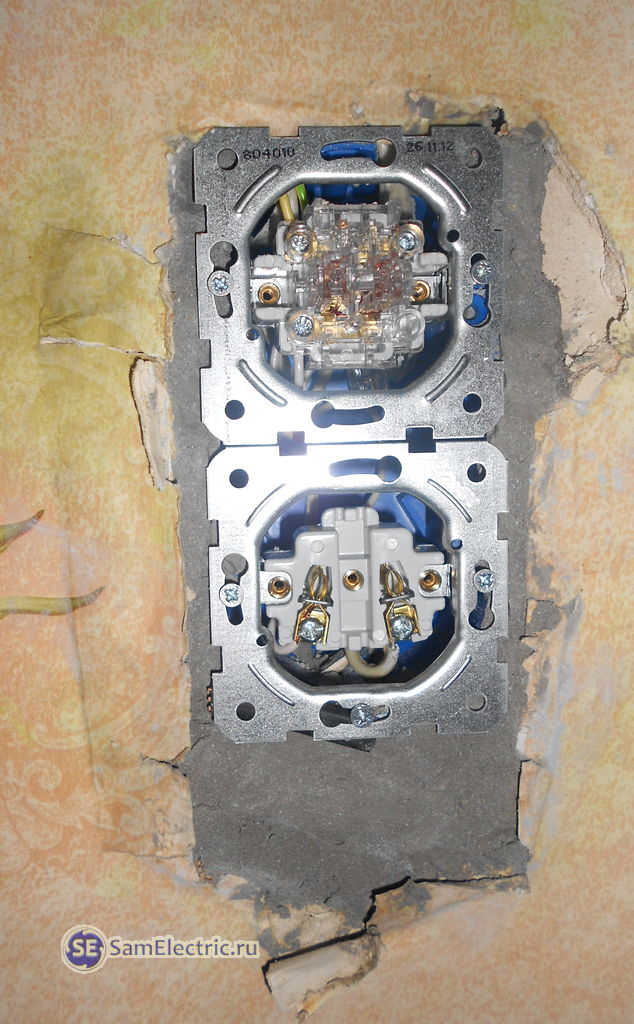
Installation of a new switch box with a socket
Here's what's best to use in such cases:

Also, in order to install the unit from the socket and switch, a double frame is needed, it did not fit into the frame. On the last photo she will, I promise.
Switches and sockets recently use only Turkish, most often VI-KO. They are the best in price / quality, and very convenient to install. The picture shows the model VIKO Carmen, the design is old. And the finishers do not like them for their rounded shape. In this sense, better VIKO Karre - they have a modern design, and they have a perfectly rectangular shape.

Sockets Karre - television and power under the triple frame. Photo from article
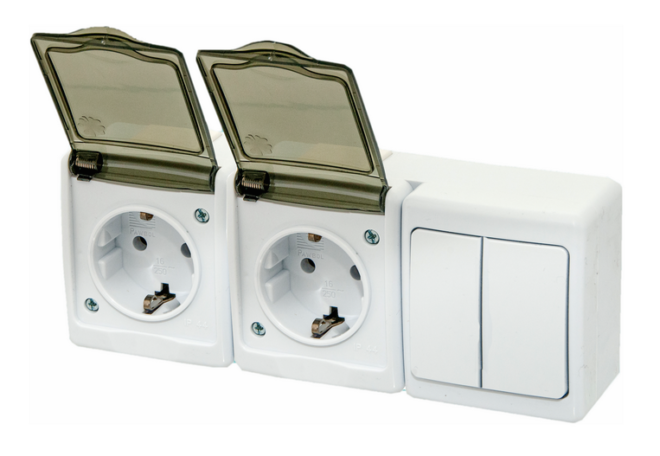
There are ready-made solid blocks for precisely such purposes, where in one case the socket and double switch. Production of Belarus, and Russia. Very uncomfortable, bad, clumsy. I DO NOT RECOMMEND.
The box is specially for two installation places, one-piece. It is better to use it than two separate ones with a jumper.
Install the junction box. It is necessary to cut a part of the upper edge to minimize the old aluminum.

Below it is necessary to pile a little, that the box became flush with a wall:
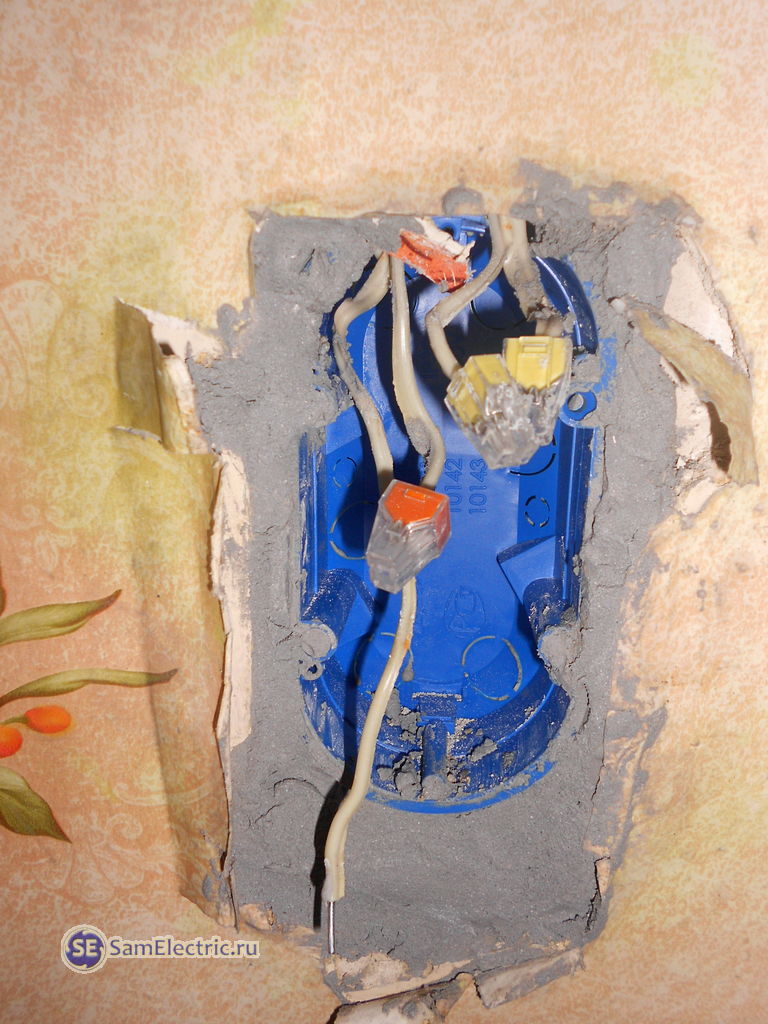
Then comes the longest, dirty and unpleasant. We work with alabaster or with gypsum putty, use a spatula and preferably a level. After that you can relax - smoke or (in my case) ask the owners to pour the tea.
Now we use the segments copper wire a cross section of 1.5 mm2 and which in great help.
It is important - that all this construction stood for many years (before), it is necessary to protect it electrically. The current of the circuit-breaker in this case should not be more than 16 A, and better - 13 or even 10 Amperes. In detail about the choice of a protective circuit breaker (automatic switch) I have already written more than once,.
We operate from below.
9.Connect and install the outlet first
Double terminals Vago I use to extend the wires to the switch, the quadruple to the phase distribution, zero to the socket was screwed directly, the length allowed.
We fix the socket with screws in the box. I already wrote, who did not read - I highly recommend it. We do not tighten much, and on the spacer ears one can not pay attention at all and even throw them out.
We install and connect the switch according to the wiring diagram. Reliably and smoothly fix the whole structure with screws.
10. The socket and the switch are connected and installed. Can you see the gap between the outlet and the double switch? It should be 0.5-1 mm wide, and equal in length.
The matter is drawing to a close. A few deft movements ...
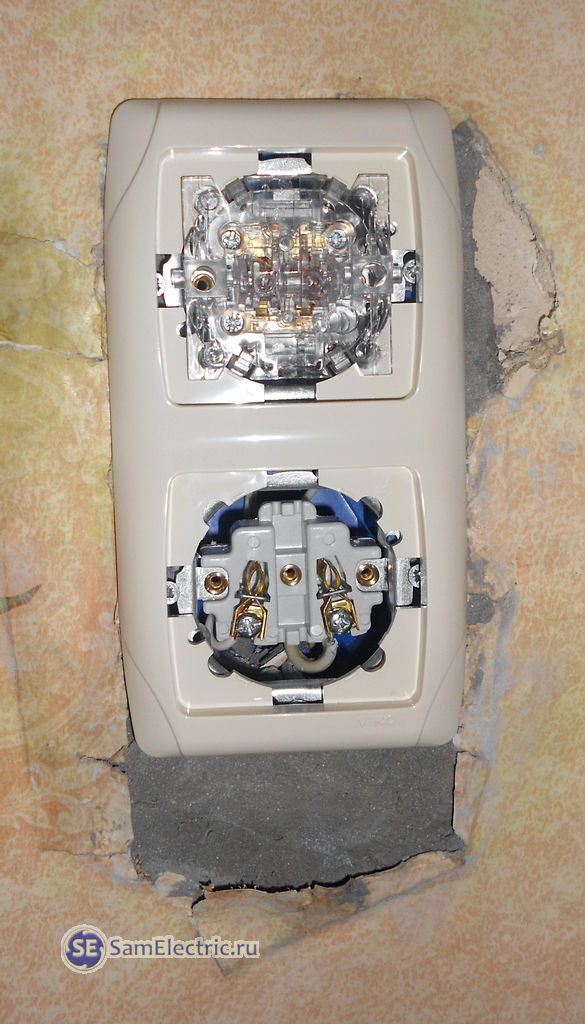
11.We attach a double border
And the installation of the socket block with the switch is finished!
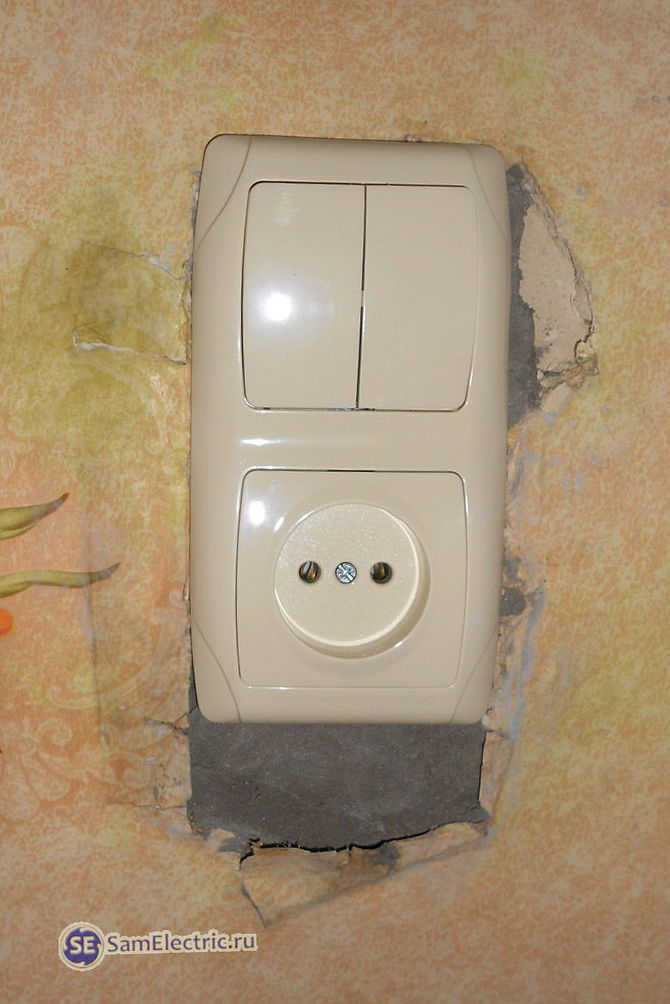
12.The power outlet and the switch for the bathroom are installed
That's basically it. If something is not clear or there is something to add - ask and write in the comments. If you're wondering what I'll be posting on the SamElectric blog next - subscribe to receive new articles.
Update on April 26, 2014: Here's another "pipets": a switch for two rooms. This is an apartment in the old district of Taganrog, there it does not happen (for example, two phases in an apartment, because between phases - 220V, and not 380) - there was one room, there were two. And the switch remained ...

If there are questions, how to connect the double-breaker unit with a socket - contact the comments!
The advantage of the interlocked armature is not only aesthetics and ergonomics, but also the ease of installation and connection. In this case, there is no need to drill several depressions in the wall panel and pull different wires to them.
Of course, shtroby will have to be closed, however, the laboriousness of this operation is incommensurably lower than when replacing the wiring and several outlets or switches.
The question of the convenience of placing the keys and the plug panel on one level is quite complicated. From the point of view of classical ergonomics and electrical safety rules, the optimum height of the socket is 50.0, and the keys of the on / off device are 130-150 centimeters from the floor.
The rules of European norms and regulations for wiring, on the contrary recommend placing all elements of electrical fittings, with the exception of points of connection of light sources, on the same level.
Mounting Features
Install and connect a three-key trip-out fittings combined with a power outlet in one housing is easy.
This block does not require punching several grooves (drilling holes), can be connected using a minimum of wires and installed on any wall panel.
There are built-in models and products with an external installation, for which drilling holes are not required. The "socket-switch" block is produced both in the usual design, intended for installation inside living quarters, and in the protected one - for installation on the street.
In this case, the outlet openings are covered with a special lid, which prevents direct contact of moisture on the contact groups and inside the case.
If you independently install the interlocked electric fittings, no specialized tool is required.
The master will have enough of the following mini arsenal:
- Drill with drill column.
- One or two screwdrivers with insulated handles.
- Pliers and cutters (side cutters) with insulated handles.
Modern interlocked electric fittings can be installed on any kind of walls - wooden, brick or concrete, as well as any kind of finishes.
Many people are skeptical about the interlocked electric fittings, believing that the failure of one element (socket or switch) requires the replacement of the entire device, the price of which is somewhat greater than the total cost of single sockets and electric switches. However, this difference is so insignificant, ease of use completely compensates for all financial losses.
Installation Sequence

There are no fundamental differences in the connection of conventional and combined electrical fittings. For most modern interlocked electrical appliances, the landing size of the inside of the unit, designed for hidden wiring, corresponds to the dimensions of single outlets and switches.
The only thing that can be required when wiring a larger cross-section, which is necessary for connecting three sockets at the same time - is the piercing of the strogs with a larger cross-section.
The approximate sequence of operations when connecting a combined unit is as follows:
- The wire laying is done (cable) with the indication of the places of installation of the installation boxes, into which the interlocked electrical fittings will be fixed.
- In the place of installation of the drill bit, mounted in the drill, a hole is drilled.
- In the box you need to break the punched plugs holes in the places of cable tailoring.
- Stripped wire ends are built inside the boxes.
- The boxes are fixed in the wall panel.
- Remove the cover from the outlet block connect to it.
- The unit is installed inside the box and fixed in it.
- To mask installation clearances, a decorative panel is installed on top of the installed and connected "socket-switch" unit.
When choosing a specific model, there may be some installation features, however, the connection sequence does not differ from the above.
Connection from one-button unit
Scheme for connecting a socket with a single-key switch
The most common are the blocks of electrical fittings, in which one or more outlets are interlocked with a single-key switch.
In most models, several outlets have a single connection - a group of two terminal clamps for phase and zero, and the phase terminal has a jumper on one of their switch contacts.
The sequence of operations is as follows:
- From the housing distributor to, a two-wire cable is supplied, leading the phase and zero.
- In the same box, it is necessary to make three wires from the "socket-switch", and two wires from the lighting fixture.
- In the junction box, the phase wire is connected to the wire, coming from the female terminal.
- Zero wire from the lighting device is connected in the box with a "zero" from the distribution board, and the second wire from the lamp is connected to the conductor connected to the free contact of the switch.
- If the socket has an outlet ("Eurostandard"), then it is necessary for him to punch a separate wire to the jamming contact in the junction box.
The connection of the multi-key switch will differ only in the number of conductors connecting the switch contacts to the illuminator.
Blocks that have lED backlight schemes, are technically no different from conventional interlocked electrical fittings. At the same time, the power circuit of the LED is embedded in the design of the device and does not require any additional connection.
Selection
 The modern market of electrotechnical devices offers a lot of different modifications of the combined electric fittings.
However, all of them can be classified according to the following characteristics:
- Ratio between the number of interlocked sockets and switches.
- Mounting method - Outdoor or built-in.
- Design.
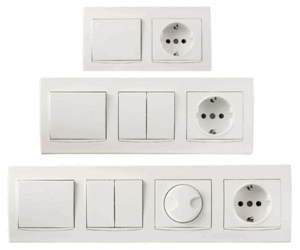
Today, you can find on sale a unit consisting of one outlet and one- three-key switch, but you can pick up a product with two or three electrical outlets and a different number of switches.
Of course, the choice of this or that modification depends on the number of connected consumers of electricity and the number of lighting sources. Multi-key switches are indispensable when connecting multi-chandelier chandeliers, when a different combination of pressed keys allows you to change the intensity of the lighting step-by-step.
The external electrotechnical armature is visually perceived somewhat cumbersome and its installation is caused by the impossibility of wiring electrical wiring.
The cost of the combined electric fittings

Etude BPA16-242B
The cost of interlocked sockets and switches depends on their functionality. Of course, a multi-key unit with several outlets will cost significantly more than one socket, combined with a one-button switch.
Most people who are more or less versed in electrical engineering, the choice of any armature is not based on the price index, but on reliability, which can be indirectly determined by the brand (the manufacturer).
In this case, the purchase should be made either in the branded stores, or at dealers of electrical companies, which guarantee the inability to sell counterfeit products.
Today, electrotechnical products having a trademark (brand) Legrand and Schneider Electric (France), Lezard and Gira (Germany), Viko (Turkey) and some others are quite in demand.
Let's consider cost parameters of the interlocked adjusting electroarmature on an example of the French brand «Schneider Electric»:
- Two-key unit with one euro socket outlet "Etude BPA16-242B" costs about 300 rubles. This fittings allows you to connect electrical appliances with power up to 3.5 kilowatts to the socket. A similar model in the waterproof version, the socket of which has a protective cover, can be purchased for 400-420 rubles.
- Single-key three-branch power unit will cost 1100 rubles. The high cost is due to the built-in filter.
- One-key unit with one socket with grounding of the switch, costs less than 200 rubles.
"Legrand" products cost a little more. Usually, all electrotechnical fittings of this brand are completed with decorative overlays. One-button block "Legrand Valena", supplemented by two euro-socket outlets, can be bought for 650-655 rubles.
Usually, the problem of a person who wants to just replace the switch-outlet block is that he sees only a bundle of wires that does not give him a general picture, which means that it interferes with the proper orientation. Another can be the previous installation is performed with an incorrect phasing, which also does not add clarity. So enough words, let's understand.
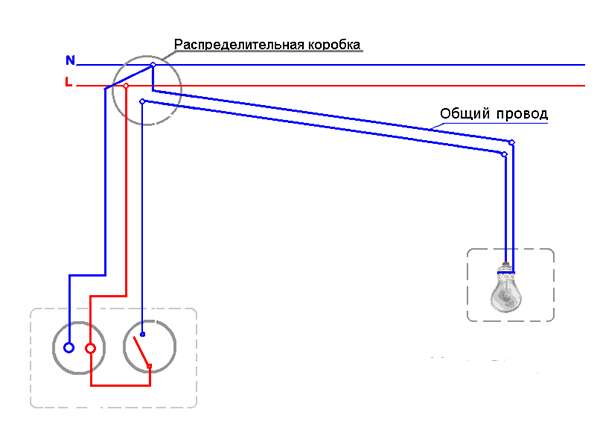
The switch is disconnected (its input through the light bulb comes to zero)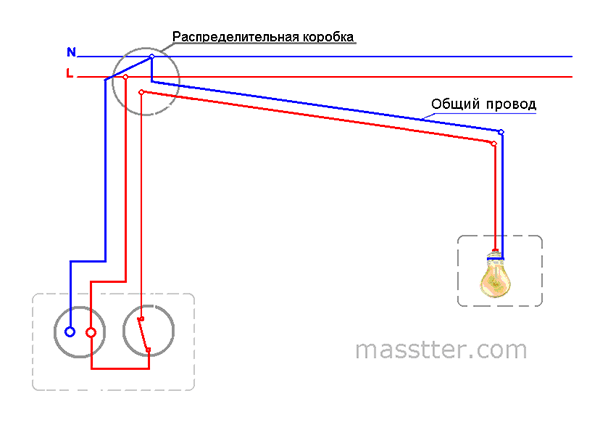
The switch is switched on (through it the phase goes to the light bulb)
As you can see from the circuit for connecting the socket with the switch, we need three wires: one comes the phase, another zero, and the third through the jumper to the switch input the phase returns feeding by the lamp lamp.

It should be noted that the first three figures (top) with correct connection, that is, zero from junction box goes directly to the lamp.
Then in the box of the outlet and the switch we see three wires. Two on which zero (one zero we get through a connected lamp), and the other with a phase. This is provided the connected serviceable lamp is connected.
When replacing the unit, we can (after de-energizing the line) simply repeat the connection (throwing a similar unit or a socket with a switch). But, if this is not possible, we need to determine exactly where the wire is. To do this, to de-energize the line, we make a slanting.

Photo of the spaniel on three cores.
It will help us avoid the short-circuit of the wires and will make it possible, if necessary, to place the wires in the sequence we need.
Then turn on the line and the indicator find the phase, through it (phase) control lamp determine the direct zero (the control lamp glows in full glow), zero and phase are connected to the outlet, the other wire through the switch (phase jumper is fed to the breaker input) must power the lamp.
When you touch it (the remaining wire), the control lamp glows in the floor of the glow, and the lamp weakly lights up (if the incandescent lamp is connected) or lights up at full power (modern lamps).
Having identified with the wires, de-energize the line and connect the socket-switch unit. Collect, turn on and check the performance.
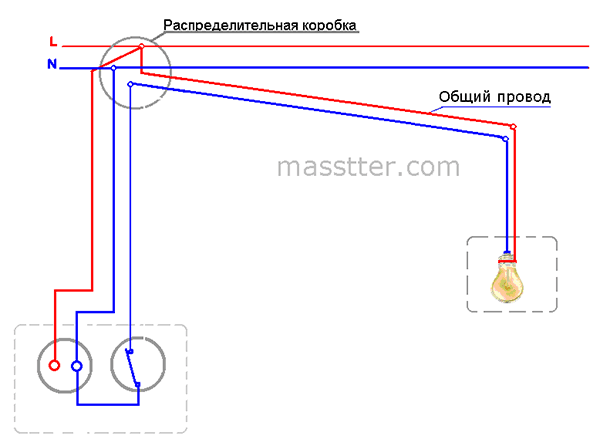
Scheme of connection of a socket with a single-key switch with incorrect phasing
Incorrect phasing is easily determined by the fact that the indicator shows two wires with a phase. All actions remain the same, as described above, with the only difference being that now the direct phase is (searched) through zero, and it (zero) through the jumper is fed to the input of the switch. 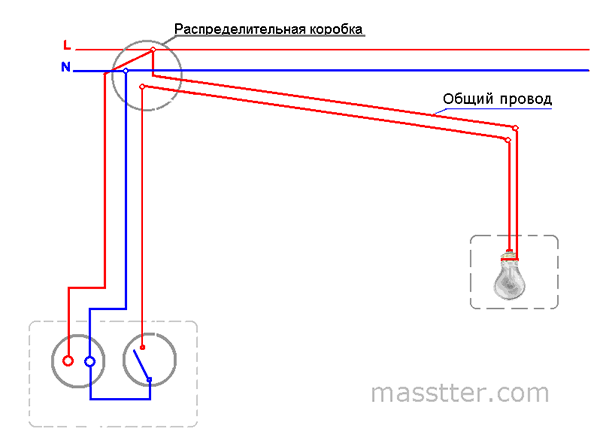
You may get caught in a situation where there will not be three, but four wires, do not be scared, then one wire is either not working, or the pair is taken by the vein (the two wires are simply connected together). Just insulate the wire you do not need and that's it.
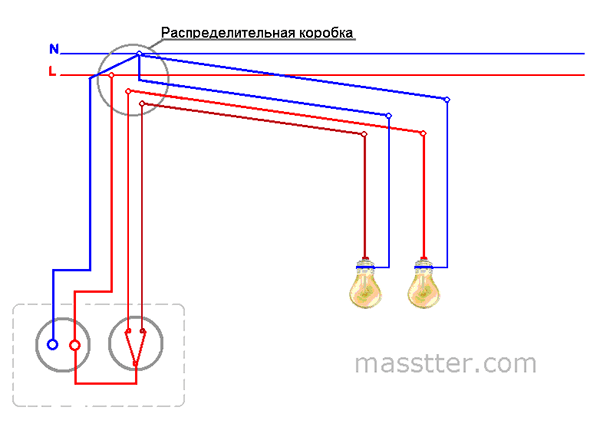
Scheme for connecting a socket with a two-button switch


A photo of a spaniel on four veins.
Scheme for connecting a socket with a three-key switch

The switch is off (at its entrance through the bulbs comes zero)
The switch is switched on (through it the phase goes to the light bulbs)
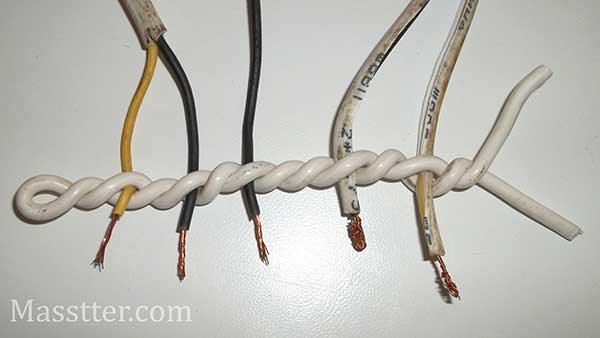
A photo of a spaniel for five veins.
The circuit is not much more complicated when connecting the socket and the three-button switch, but if you understand the previous schemes, then this one will not present a difficulty for you.
In practice, here, too, can not go out five, but six wires, but this means that the electrician simply did not want to separate one wire from the twin and one wire or not working, or a pair of wires was taken.
How to connect a socket with a switch | Video explanation
If something is not clear, ask questions either in the comments, or even better on the forum.
On this all, you good editing!
Electrical wiring of any premise consists of three obligatory elements - lighting devices, switches for control of luminaires and sockets for connecting equipment. And if in public places we do not care much about what, where and how it is connected, at home we want maximum convenience, aesthetic appearance and at least a little saving. In terms of economic effect, an advantageous device is a socket with a switch in one housing. In what this benefit we consider below, and also we will talk about constructive features such apparatus, its varieties, shortcomings and how to connect a socket with a switch to the common electrical network.
What are the advantages and disadvantages?
 The main advantage of such a device as a socket and switch, combined in one housing, is the saving of labor and material costs. If you put these devices separately, you would have to mount two holes in the wall for the mounting boxes, buy and install two janitors, lay two separate two-wire wires to the switch and outlet. In the case of installing the unit, you will need one three-wire wire and one paddle-box (only it will not be round, but a special oval shape), which will at least slightly reduce your time and labor, as well as financial expenses.
Sometimes an additional advantage of the device in which the socket with the switch is combined in one housing is the same height of their arrangement.
The disadvantage of this combination is that if a single device is out of order, the whole unit is subject to replacement.
Another disadvantage is that the switch block, combined with the socket, is problematic to install in a concrete wall. For such a device, the hole will not be round, but oval, knocking it out in concrete will be more difficult.
Where is it better to install?
It is very convenient to install such a unit in places where it is not required permanent connection electrical appliances to the outlet.
Before connecting the double switch for the corridor and the adjacent bathroom (toilet and bathroom), think about it, but do not install the common unit with a power outlet? One key includes light in the corridor, the second in the bathroom, and the outlet can be used to connect a hair dryer, electric drill, vacuum cleaner, mobile phone charging.
The unit, in which the socket with a switch for one button, is suitable for installation in garages, sheds, cellars, lodges, cabins and other economic buildings. In this case, one key of the switch is sufficient to light the lamp indoors, and the socket is useful for connecting power tools, a kettle, a fan or a radio.
In other rooms (hall, kitchen, bedroom, children's room) the connection of a combined power outlet-switch box is unlikely to be appropriate. It will not have that aesthetic look to fit into the overall interior. After all, the lighting switch, as a rule, is installed at the entrance to the room. Imagine how it will be ugly, if the cord of a TV set, a computer, a refrigerator or an air conditioner will extend to the outlet.
Therefore, before you connect the unit that combines the outlet with the switch, think carefully about where you want it to be installed, and whether it is needed there.
Varieties

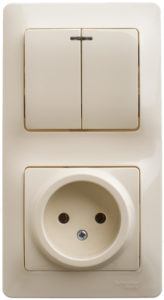
In the electrical goods market, there are several variants of the units where the socket and the switch with one, two or three keys are located in a single housing. They differ in price, installation method (indoor or outdoor), can be equipped with additional functions - backlighting or various kinds of protection (from children, moisture, dust).
- An indoor unit consisting of a switch and a socket without grounding. This is the simplest and cheapest model. However, with modern equipment with household appliances, the lack of grounding is a drawback.
- The indoor unit is equipped with a switch and a grounded outlet. The switch key can have a special light indication, which will help to easily find the switching device in the dark.
- Outdoor unit with one-key switch and a socket equipped with a special plastic cover and having a degree of protection IP 54 (against penetration of dust and water).
Exactly the same models can be using a triple or double switch.
By the arrangement of the switch and the outlet, the units are divided into horizontal (switching devices are located side by side) and vertical (the switch is located on top of the outlet).
Outdoor units are used for installation with an open electrical wiring, when the switch and the socket are not submerged in a special hole, but are fixed by means of a bar on the wall surface. Wires in this case are laid on the walls, they can be laid in special plastic boxes, wound in corrugated pipes or simply openly attached to walls on porcelain insulators.
The indoor units are used for concealed wiring. The device itself is inserted into the socket, located in the wall box, and the wires are laid in special stitches inside the walls.
When selecting outlets combined with switches, give preference to models made of high-quality plastic and having a grounding.
If the house has small children and to prevent their independent acquaintance with electricity, choose models where the socket has special protective curtains. They close the contacts, and if the child starts poking into the outlet with something metallic, at least, the possibility of its falling under tension will be excluded (the curtains open only when two pins of the plug are inserted at the same time).
Device
Before connecting the switch box with a socket, let's talk a little about its design.
![]()
Consider the example of a switch with two keys:
- In the middle of the socket there is a screw, with which a protective curtain is attached from the children. Unscrew this screw and remove the curtain.
- Carefully remove both switches.
- The upper plastic cover of the common housing is fixed with two screws, unscrew them and remove the cover.
- Now you can clearly see that the device consists of a conventional socket and a switch for two keys, they are housed in one housing.
- The switch has an incoming contact, to which the phase from the mains supply is suitable, and two outgoing contacts, the phase wires of the luminaires are connected to them.
- The socket consists of a receptacle in which a plug is inserted. This socket is connected to the contact part, where there are two terminals, they connect the phase and neutral wire from the mains.
Installation of the outdoor unit

Such a unit has its advantages and disadvantages. Install and replace this design is easier, as well as faster you can find a malfunction in the device by its appearance - this is a positive side. The only disadvantage is that in the interior the open wiring and outdoor units are not so beautiful. Therefore, most often such devices are used in garages, baths, sheds and other household premises.
- Always any work related to electricity, start with de-energizing the room where you will work. Turn off the voltage and using indicator screwdriver check its absence.
- Disassemble the body of the unit by removing the top (or front) cover.
- The back cover with the core must be secured to the wall. Attach it to the location of the future installation and mark with simple pencil the place of fasteners. Set aside the block while sideways, drill the intended places, drive in the dowels. Now you can fix the core of the block with screws.
- Then the electrical part is executed (how to connect the unit to the power network will be discussed below), it remains only to put on the top cover and fix it with screws.
Important! If the outdoor unit is installed on the wooden wall, between them mount a paronit gasket. In the case of contact heating and further ignition of insulation, the paronite will prevent spontaneous combustion of the wooden wall.
Installation of the indoor unit
The housing of the switchgear is not so conspicuous in the wall, it does not spoil the general interior view, therefore, the method of closed wiring and indoor unit is used much more often, especially in living quarters.
- Work similarly begins with the removal of tension in the room and checking its absence.
- Using an electric drill with a special nozzle in the wall, drill a hole for the jar.
- Choose a special plastic pad, one-piece for two installation places. Fix it in the wall hole with alabaster.
- Insert the core of the unit into the socket, make all the necessary electrical commutation, and then secure the housing securely in the jar. This is done with the help of spacer legs.
- It remains only to install the top plastic cover.
How to install and connect the indoor switch-outlet box can be viewed in this video:
Connection diagram
The simplest circuit is the connection single-key switch with a socket in one unit.
A three-wire cable is laid from the junction box to the installed unit.
The following switching is carried out in the junction box:
- The neutral wire of the supply network is connected to zero wires, going to the outlet and the lamp.
- The phase from the mains is connected to the phase conductor of the socket.
Now the switching actions that need to be performed in the block itself:
- The phase and zero came from the junction box to the socket, connect them to the required contacts respectively.
- Then the phase from the socket is connected by a jumper to the incoming contact of the switch.
- Another wire is attached to the outgoing contact of the switch, it will be connected in the junction box with the phase of the luminaire.
Note! In the case of a socket with a grounding, you need a wire consisting of not three, but four wires.
If the connected unit has a switch with two keys, then:
- the phase from the outlet is connected by a jumper to the incoming contact of the switch;
- two phase conductors are connected to the outgoing contacts of the switch, they go to the junction box, where they are connected to the phase conductors coming from the cartridges of the two lighting devices.
Otherwise, the connection diagram two-key switch with a socket is similar to the above option with a single key, the difference is only that the zero of the supply network must be connected to the zero conductors going from the junction box to the socket and to the two luminaires.
This video details various options Connection diagrams:
- When you choose the model of the combined socket with the switch, give preference to the product, which has two teeth on its paws. In the wall, such blocks are fixed more securely and firmly.
- If there is a need to connect several household appliances at the same time, use a female connector. Most often it is used in kitchens, where the refrigerator, extractor, dishwasher, electric kettle, TV are constantly working.
- When you buy podrozetniki, choose models, in which the walls inside have ribbed execution. When installing the switching device, the lancing arms will cling securely.
With all the shortcomings and advantages of such a combined unit, you are now familiar. You know how to install and connect such a switching device. Decide for yourself, you need such a model outlet with a switch or not. Once again, for utility rooms this is a very convenient option, it is better to use a separate variant for a living room.
Sockets and switches are the main elements of the home electrical network. The question of their installation by their own hands for many is relevant. From the drawing up of the correct circuit of connection of switches and sockets and installation the comfort and reliability of work of all electrical appliances in the house depends.
When laying the power grid, the main factors are the safety and convenience of using outlets and switches.
Standards for installation
To determine the number of outlets and the choice of their locations, one should know the installation standards required by the PUE:
- The presence of a grounding contact with a separate input, which is not a conductor of electric current under normal conditions.
- There should be no outlets above the sinks or under them, in cabinets and other uncomfortable places.
- Sockets in living quarters and in the kitchen should be powered from separate lines. Kitchen elements and lighting can be connected in one group.
- In residential premises, it is possible to connect sockets in rooms with high humidity (bath, toilet, bath) only through the RCD.
- It is recommended to place the places of connection of electrical appliances at a distance from grounded elements: metal pipelines, shells and other engineering networks.
Norms for installing switches
- Switches are always installed in the breakage of the phase wire.
- In rooms with high humidity and in the attic, their availability is not allowed.
- Above the floor level, the switches are located at a height of 1.5 m. At the entrance to the room they are installed on the side of the door handle.
- With simultaneous switching of more than 20 lamps, only automats can be installed.
- The external socket or switch on the outside wall of the house must have a design with protection not lower than IP44.

Wiring Modes
After drawing up the circuit of connection of switches and sockets it is necessary to calculate their parameters and required cross-section of veins. Then you need to lay the wire and install the switching equipment in place.
- The installation of the wiring is done open and hidden. The first method is mainly in the back rooms and outside the house. For concealed wiring, it is necessary to make dusty and labor-consuming work of grooving the grooves for wires with recesses for junkets and junction boxes.
- The process of wall slashing is not a problem with the availability of a special tool, which is usually not in personal use. Shredders and other devices can be rented.
- For pits under podrozetniki and grooves, a perforator with a crown and a special nozzle is used. The gasket is made easier if you mark the way in advance by drilling holes in the walls. With gipsokartonnymi partitions to cope much easier if you buy a special round nozzle on the drill.
- Equipment for outdoor installation is applied open type and must be protected from dust and moisture.
When wiring is entered into the room, the connection of the sockets and switches is done through different lines. They can be from two to four under the equipment:
- lighting;
- sockets for the router, computer, TV, charging the phone and other household appliances;
- air conditioner or electric heater.
The cables are connected through the end or through the junction boxes. In the first case, the wires that connect with other elements do not come out of them. The transit box has such a connection.
Installation of the socket
Connection of sockets and switches by their own hands is made by the rules.
In carrying out of electrical installation works the whole apartment is de-energized. The wire for the outlets is three-wire, where the blue wire serves to connect the neutral, yellow-green - for protective earthing, and the latter can have any color and is connected to the phase. The wire comes from the control panel automaton or from the box. For conventional outlets, its cross-section is 2.5 mm 2, but here it is necessary to take into account the power of the connected device.
The wires are passed through the holes of the podzroetnikov and are mounted to the power terminals of the sockets. For them, the phase is usually located on the user's left hand, and zero - on the right, when he stands face to the outlet. This is of no special importance, although for a powerful electrical equipment can be fundamentally. The ground wire is connected to a separately located contact.

The contacts can be self-clamping, where screws can not be tightened. The bare ends of the wire are inserted into them, and the built-in spring presses them to the current-carrying terminals. The installation should be done neatly, otherwise the contacts will be weakened, and electrical circuit will be disturbed, or the conductors will overheat in these places. No more than two cores can be connected to one terminal.
In the box, the socket is fixed with clamps. If it is fixed with spreading paws, they keep it worse. It is better to use self-tapping screws, which are screwed into the holes of the podzrozetnik. The cover of the socket must be close to the wall. It is screwed to the inside. The external socket is mounted on the wall surface and is used for open wiring. Such an installation is simpler, but for aesthetic reasons, the apparatuses try to make internal ones.
Connecting multiple outlets
Several devices are connected side by side. The circuit should take into account the load on each outlet. for sockets and switches of the latent installation is located indoors, and to it the feeding wire from the automatic switch of a control panel is brought. The main connections are made in it.
It is advisable to bring to each outlet in the room a separate food. Then, if one of them fails, the rest will remain functional. The method is expensive, but it is often used because of its high reliability. Especially this applies to the connection of powerful consumers.

Parallel connection of all outlets to one line saves money and labor for installation. The disadvantage in the connections of the devices by the loop is the disconnection of the whole group in case of a failure in the operation of one. Therefore, the first try to connect an average outlet, and from it - the rest.
Schemes for connecting switches and sockets are made through junction boxes, where wiring connections are made using terminal blocks, soldering, welding, crimping, screw clamps. Twisting is not recommended. According to the rules, in all places where conductors are connected and branches are made, a margin is created along the length of the wire so that it can be used again to update the connection later. Boxes are recommended to have an indentation of 10-20 cm from the ceiling, where there will be no casual touches to them. They can easily be hidden and, if necessary, have access to repair wiring.
Connecting switches
Switches are used to connect power to the lamps. Usually they close the phase wire. Protective and zero wires through them do not pass. To the zero wire is connected one terminal of the luminaire, and to the phase wire - the input of the switch. On the opposite side is the terminal, from which the wire goes to the second contact of the device.
Two-key switch
Rules showing how to connect the lights are the same as the simplest device. The only difference is that the device has two terminals, which are usually connected to the chandelier. Each of them is associated with a key that enables the inclusion of a separate group of lamps. The two-button model combines two simple devices in one housing. 
Advantage of the method is the possibility of simultaneous or separate inclusion of two groups of fixtures from one device. More switchings require additional laying of the phase wires to the switch and the lamps. A diagram showing how to connect a two-key is always on the reverse side of the switch. It can also be found in the accompanying instruction.
Socket-switch in one housing: how to connect?
The switch is connected from the outlet, if they are combined in a common housing. The method is used for unloading the junction box, saving the wire and connecting a nearby luminaire, for example, around the bed in the bedroom.
The connection is made as follows:
- power is supplied to the outlet in the usual way;
- the phase is connected to the breaker input;
- the protective conductor can also be connected from the socket;
- the switch is connected from the switch output and the socket outlet.
The reverse connection of the socket from the switch is not done, since the zero wire is not supplied to it. The outlet can only be turned on or off from the circuit breaker located in the control cabinet.
Conclusion
Schemes for connecting switches and sockets are not difficult, but they should be performed correctly. First of all, this is related to electrical safety. Step by step implementing all the recommendations of installation and correctly assembling the scheme, you can avoid many problems and ensure the reliability of the home electrical network.