Antipyretics for children are prescribed by a pediatrician. But there are situations of emergency care for fever, when the child needs to give the medicine immediately. Then the parents take responsibility and apply antipyretic drugs. What is allowed to give to infants? How can you bring down the temperature in older children? Which medications are the safest?
Everything starts with a clean sheet, on which a conditional project-scheme for placing all outputs of the network is applied. Most of the work on the project is entrusted to professionals, but, by and large, this can be done by yourself, if the log is small. You will need to calculate the materials that will be needed, the number and placement of outlets, switches, junction boxes. You can place them as you like, the main thing is that this project does not violate the basic SNiP and GOST. Let us consider in more detail what is needed and what can not be done by drawing up a diagram.
- You need to place all the devices in an accessible location for subsequent maintenance so that you can get to them without using a specialized tool. Counters, sockets, switches and even distributors should be in a conspicuous place.
- According to SNiP, switches and sockets should be in a place that is not obscured by heavy objects (cabinet, bed, for example), and also away from flammable objects (curtains, blankets, etc.). The height from the floor also matters - you can not place it lower than 100 cm from the floor covering. All electrical outlets must be clearly visible for safety.
- It is necessary so to draw up a diagram so that each electrical appliance can be connected without using an extension cord - this will reduce the number of connections, and also greatly simplify the subsequent operation of all devices. To be exactly so, the posting in wooden house should be done immediately taking into account the location of all devices. As for the norm of SNiP, for every 6 square meters of area there should be 1 outlet. It is allowed to have 3 or more outlets in the kitchen, but each of them should be located away from metal objects (65 cm), as well as from kitchen equipment, in particular a plate, a washbasin (55 cm).
- Stroke lines should only be vertical or only horizontalso that you can easily find them during the subsequent repair, as well as not damage them during the operation of the room. If they go diagonally, then it will be difficult to calculate where on the wall you can hang a picture, make an exit on the antenna or conduct an Internet connection. According to the technical specification, it is not possible to place stitches in less than 5 cm from the curtain mounting, 15 cm to the ceiling, and not less than 20 cm from the floor.
- The hidden wiring in the wooden house (if any) must go into the junction box, where it will be connected to the input cable. You can not connect several wires - there should not be at all 1 connection on 1 wire line. They can be done only in the distributor or directly at the outlet of the power grid. If you do not follow this rule, all contacts will oxidize, burn, melt. A line of pieces does not serve for a long time, especially if one part is aluminum and the other is made of copper.
Before you post in the house, you must have a project taking into account all the above requirements and recommendations, otherwise problems with the electricity supplier may arise. Remember that even if you do not order expensive installation from a resource supplier, your work will be checked for compliance with all GOST and SNiP. In order not to alter later, consider all the requirements and wishes immediately.
Selection of the right tool and materials
The first thing you need to stock up is not only a convenient, but also a safe working tool for doing this work. A screwdriver, a hammer, a drill and all that will be created electrical wiring in the house with their own hands, should be with quality insulated handles.
Pay attention to the distributors - they can be of two kinds, plastic and metal. For a log, it is more important to take the latter, as they are durable, do not melt, are strong, and also they will be conveniently attached with screws to a tree. Do not be afraid to ruin the view of your utility room, buy a large distributor - it's much easier to work with it.
As for the cable, its choice should be approached responsibly, as this is the main part of your electrical wiring. Its cross-section should be equal to the total power of all electrical appliances in the house + 25% just in case. Since you will never include all the instruments at the same time (or very rarely), the stock will be very large.
If you install a thin cable - it will heat up, melt, and the braid will burn out after 1 month or earlier. As for the material, only copper is needed. Aluminum becomes brittle with time, oxidizes, has much less throughput at the same cross section with a copper cable.
Cable channels and skirting boards. They are intended to hide external wiring (internal is prohibited by SNiP in log buildings). It is better to choose them according to the color of the wood, so as not to stand out too much, the size is chosen according to the number of wires that will go along the wall. Sockets and switches can be purchased for your taste - there are no special requirements, their number is also an individual matter, as much as necessary, and put so much.
Still need to buy PPE, insulation tape, clips, corrugations, fasteners for plinth (mainly self-tapping screws). Maybe you need a little more varnish, maybe stain, if you have to decorate the wood after the work.
How to make wiring in the house in a few hours - detail about the installation work
First you need to lay the main cable. We bring it through channels or plinths to the place where it's time to lift it on the wall (or lower it, depending on how you arranged it), point it vertically to the outlet and conditionally attach it with staples. It is important that its length is accurately measured.
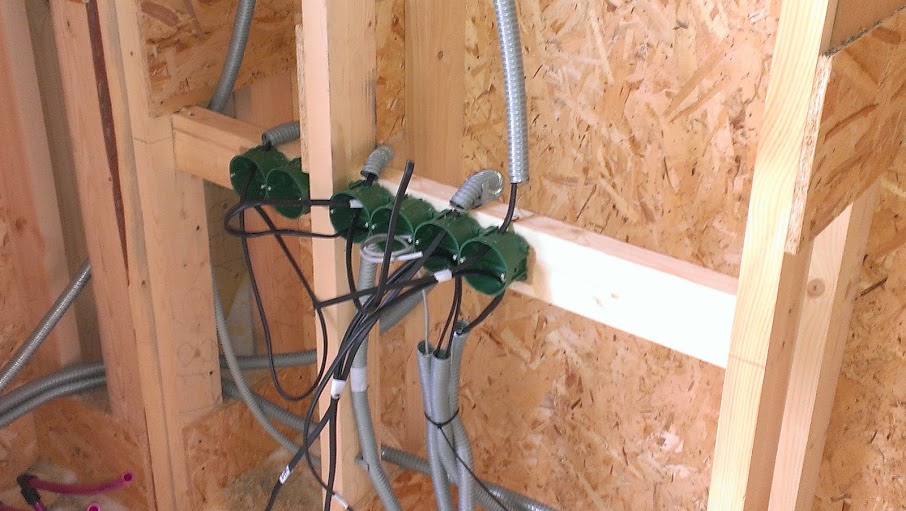
Next, you need to install junction boxes. They put in place, where the main cable is divided into all switches and sockets. It is necessary to think about the method of fixing the wire in the RK, as a rule, the masters choose PPE - this is the simplest and most reliable way, where the contacts do not oxidize, do not loosen, and are easily attached. The cable is twisted under the fastener, it is bred in such a way that the edges can not contact each other. It is also possible to use ordinary twisting with an insulating tape, but this is not recommended because the service life is not long, especially if the cable is heated a lot, contact may disappear with time.
We connect sockets and switches. One of the main reasons why the wiring in the house with your own hands (in the frame) is considered to be a fairly easy process is the lack of the need to make stitches and places for sockets and switches. They are attached directly to the wall by screws, so their fastening takes only a few minutes.


Construction of electrical board
This is an important stage in the installation of electrical wiring, since it often becomes necessary to de-energize the room partially or completely for a while. To do this without effort will help the switchboard with automatons. Also, it protects from electric shock, after all, when a short circuit is triggered, the automatic device turns off the current from the line. In it, you set the electricity meter, so as not to take it out separately on the house and not spoil the exterior, automata, grounding pins, tires.
Electric wiring in a log house. Hidden installation. Preparation.
Its features are the installation of electrical wiring in a wooden house, and the installation of a hidden wiring in the log house is even more complicated. Fire safety, reliability and durability of hidden wiring in houses from chopped logs, rounded logs and glued beams stand in the first place. replacement of wiring in them is either impossible or impossible, without appearance.
Concealed wiring is, of course, more aesthetic than wiring in an external way. The routes of passing the wires are not visible, only the sockets and switches on the log. How to conduct the wires so that they can not be seen, and that it was safe and reliable, we'll tell you now.
Drilling, shtroblenie passages.
During the construction of the house, the layout of the electrical wiring has already indicated the locations of the outlets, switches, and other points of electrical consumers, as well as the location of the electrical panel (or electrical panels). For log houses, agreement with this plan and preparatory work for wiring are needed already at the time of the erection of the walls.
During the assembly of the log house, and in the future, before laying the floors and sewing ceilings, vertical and horizontal holes-holes are pre-drilled in the logs for the subsequent installation of the sockets and switches. Routes of laying wires from the shield to each group of consumers, whether they are sockets, switches or lighting points, are drilled in lags, beams, floors and ceilings; It is impossible to sew up the floor and ceiling before final cabling. The diameter of the holes for the wire laying should be such that it is possible to freely lay the planned size of the hose with the wire.
On logs, in places of outlets and switches, flat areas are cut off or cut down. Precise marking is carried out on the sites, and hole-holes are drilled - places for junior suckers.
In the doorways, before the installation of the door frames, vertical stitches are sawed for the subsequent drilling of the passages to the switches.
All the aisles, cuts, strobes in the log frame, intended for laying wires, holes for podzroetnikov, must be treated with special solutions-fire retardants for wood, which reduce the likelihood of fire.
Places for pick-up boxes .
A concealed way of installing wiring in log houses involves making wire connections in electrical cabinets. It is necessary to use such enclosures of electrical panels, in order that there may be enough space, both for control devices and for connecting wires.
If nevertheless there was a need for installation of hoods, they should be located in the basement, attic space, and if this is impossible, inside the house in the outdoor version, but in any case with the possibility of a free audit of the hoods and with all safety measures.
Experience in installing hidden wiring in log homes we have. If there is a need for experienced professional electricians, please contact us. We do qualitatively wiring.
Installation of concealed wiring in a log house.
In a log house, the installation of a concealed wiring can be performed in several ways.
Installation using metal pipes.
Let's start with electrical installation using metal pipes. This method assumes, when erecting walls and ceilings, to drill in the logs passages for wires.
In the drilled passages are inserted metal pipes, sleeves, corners, into which the wire is tightened. This is good fire safety. In the openings for sockets and switches, metal pads are inserted in such a way that the metal podzheetnik and pipe have a good contact; all pipes are grounded.
In our opinion, this is not the optimal solution, and that's why. The frame of the house gives a slight shrinkage; but if the logs have shrinkage at home, then there is no shrinkage at the metal pipes. This is noticeable in the vertical passage, resulting in, at times, crevices are formed between the logs, aesthetics are disturbed. Long holes in the log do not always drill straight, especially horizontally - large knots can get caught, and sometimes the pipes are not blocked into the walls to the end. When approaching the end points, the docking of the pipe and the sub-socket is not always reliable. This technology is considered obsolete.
Application of metal hose.
Another, popular now, way flush mounting In the log house is carried out after the construction of the house and roof. After the installation of walls and ceilings, but before the beams and floors are sewn with floors and ceilings, the wires, tightened in a modern metal hose (such as RZ-TS-PVC), are laid from the electrical panels to the end points, drilling walls, beams and ceilings. Further, the metal hose with wires in electrical panels is grounded.
Metal hose RZ-C-PVC is strong not only for compression, but also for tearing; neither a bug nor a mouse gnaws through it, and the wire does not spoil it; it will not rust - it is made of galvanized steel tape and covered with a PVC sheath.
On logs, in places for outlets and switches, the sites are cut down; in them holes for the electrical boxes are drilled. In the wells treated with flame retardant (such as "Ecopyrene"), modern podrozetniki (Czech "Kopos Kolin ") Of durable, non-flammable plastic. In the sockets are installed mechanisms of outlets and switches.
Plastic tube corrugation.
When wiring electrical wire in a tree, plastic pipe corrugation can not be used, at least, for three reasons:
· There is no full confidence in fire safety.
· Rodents easily gnaw out not only the corrugation, but also the wire, which can lead to the death of an innocent rodent (and unpleasant smell), and sometimes a short circuit with possible subsequent repairs.
· The corrugated pipe is easily deformed and torn, so sections of the wire, which are not protected by the corrugation tube, are possible.
Choice of wire.
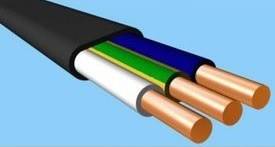
Most electrical professionals (including ourselves), when wiring electrical houses, prefer the domestic wires of the VVGng brand (ng - not supporting combustion) or the wires of "foreign manufacturers" NYM . Both types of wires are made using non-flammable insulation, convenient and already familiar in the installation.
As a rule, for rosette groups, cable-wire 3x2.5 square meters is used. mm, for groups of illumination - 3х1.5 кв. mm, for electric stoves and modern washing machines (up to 6 kW) - 3x4 sq. m. mm, for other consumers, such as electric boilers, boilers, etc., there must be a compulsory calculation of the electrician.
Connections of wires are carried out in electric boards. Unscrambling boxes are permissible in the basement and attic space in the overhead (external) version in compliance with the PUE, and with the mandatory accessibility for revision.
Types of possible wire connections: welded wiring, braided brazing, terminal blocks with self-clamping contacts, terminal blocks with clamping levers, screw terminals.
Metal electrical panels.
In wooden houses, it is necessary, if possible, to use metal electrical panels with mandatory grounding. The main reason for this is fire safety.
General wishes.
When wiring electrical wiring in a log house, it is better to use non-flammable, fireproof materials. From automation - it is necessary to use RCDs or Difavatus. Electrical panels, metal hose, metal trays in the tracks, not to mention the sockets, etc., must be grounded.
And, of course, attract professionals for installation of electrical wiring - us. Experience in electrical work in wooden houses we have. Call.
Skalin Evgeny.
.
Despite the abundance of modern building materials for the construction of houses, wood and structures from it still remain a sought-after material for the construction of private households and dachas. And any modern house can not do without a lot of household electrical appliances and auxiliary mechanisms that have an electric drive. Given the fact that the tree is a combustible material, concealed wiring in a wooden house must be carried out with special care. Let's consider the issues that should be addressed first.
The installation of electrical wiring in a wooden house with their own hands requires knowledge of certain provisions set forth in the "Wiring Rules" (PES) and the availability of some skills in working with tools. First of all, the PUE obliges to carry out the installation of electrical wiring in such a way that will ensure safety, eliminate short-circuit and the possibility of occurrence of fire (fire). After all, as experience shows, it is a violation of the requirements of the PUE when carrying out such work with their own hands can lead to a fire, damage to property and harm to the health of people living in the house.
Therefore, the laying of the hidden PUE should be carried out only in metal pipes having sufficient wall thickness to prevent their destruction during the operation of the house.
Only steel or copper can be used. Pipes should have thick walls. This precaution will help to avoid damage to the electrical wiring: if necessary, hammer a nail into the wall or make a hole in it. For example, to hang a picture or fix a shelf.
What are the features
Features of the installation of hidden electrical wiring in a wooden house are caused by high combustibility of the building material. This should be borne in mind when laying the wires themselves. The requirements of the EAE do not for nothing provide for these purposes only solid metal pipes - steel or copper. The use of all kinds of corrugated metal hoses or similar corrugations made of polyvinylchloride (PVC) does not provide the required protection against fire and does not comply with the provisions of the PUE. Let's try to figure out why this happens.
Wooden houses are usually found in rural areas, outside the city limits. And this implies the presence of a variety of all kinds of rodents, including mice, rats and the like. And if in the warm season they mostly live in natural conditions, where they have enough forage, then in the winter, the situation is different. In the winter, rodents are looking for more warmth and better life.
Therefore, a large number of their field relatives can join the home mice. And for the teeth of rodents, the protective shell of PVC corrugations is not an obstacle. They chew it without difficulty, thus obtaining a wiring, the isolation of which also represents a treat for them. As a result, a short circuit and fire may occur. For a fire in a wooden house, one spark is enough to light up the wood dust that is always present inside the wooden structures.

It is not an output according to the requirements of the PUE for the use of a corrugated metal sleeve for wiring, which is so tempting because of its low cost compared to thick-walled pipes. Take this into account when doing the work yourself. In the event of a short circuit, the thin wall of the metal corrugated hose can burn out in a couple of seconds. This situation will again lead to fire and fire.
Another requirement of the PUE, in addition to laying electrical wiring in metal pipes, which can not be ignored in the performance of the work by one's own hands, is the mandatory grounding of these pipes. If a short circuit occurs in the wiring, this measure will prevent damage electric shock. Therefore, all metal pipes used for the installation of electrical wiring must have an electrical contact with each other.
Another feature is the need to ensure the tightness of metal pipes for electrical wiring. To this end, the joining of steel pipes between themselves must be carried out with the help of welded or threaded connections, and copper pipes - by soldering. Mounting boxes and podrozetniki must be metal and have an airtight contact with the pipes suitable for them. The wire leaving the pipes is insulated with a sealant to prevent air from entering the pipes. This is another precaution against fire. In case of accidental short-circuiting and ignition of the braid, the absence of air circulation in the pipes will lead to a rapid burnout of oxygen and the cessation of the fire.
Video "Mounting for a house from a bar"
Direct mounting
Before starting the installation yourself, no matter what house it is made of - frame or folded from rounded logs, it is necessary to make an installation diagram with marking of the laying of pipes. This diagram indicates the exact location of the pipes on the walls, the location of the installation boxes, sockets and switches. On the diagram it is necessary to note the entrance point of the lead power cable and to be convinced of the possibility of its laying through the wall with the help of a thick-walled metal pipe. Next is to place a metal power shield in which there will be a counter, automatic protection devices (AZ) and at least one outlet.
All electrical wiring in wooden houses, framed or folded from round logs, should be carried out with a wire with a copper core and non-flammable insulation. This is also one of the requirements of the SAE, which can not be neglected, if you make the installation yourself. This position applies to the power input cable, which provides electricity supply to the house. And the supply of electricity to the house can be accomplished aluminum wire, which has a special braid, resistant to atmospheric precipitation and the action of sunlight. The cross-section of such a wire is usually taken at least 16 square kilometers. mm. The connection of this wire with the input power cable must be reliable. Conventional twisting of wires is not allowed. It is recommended to use special protective hermetic clamps, which ensure reliable contact and exclude corrosion of wires.

So, the wiring diagram is ready. We make the input of the power cable through a thick-walled metal pipe and mount a power shield next to it. Then, following the instructions of the wiring diagram, we prepare metal pipes in place. Steel pipes can be connected together by welding or threaded connections. Copper pipes can simply be welded together. The corners of the turns must have smooth curves. This will facilitate the subsequent pulling of wires through them using a special cable and will help to avoid possible damage to the insulation of sharp corners.
When performing self-assembly in a frame house, this work is not very difficult. In the frame house, the walls are covered with decorative material made of lining, block house or other similar materials. Therefore, it is easy to hide all necessary communications during the construction of such a house. The holes for the sockets and switches are easily cut off after the pipes are fixed to the walls.

In houses made of logs, the installation process is more difficult. The rounded log is a building material made by machining conventional logs to give them the same diameter. Thus, this material has no internal voids, in which it is possible to lay pipes for mounting wires. In a log, it is required to cut, cut, or make channels (strobbs) in another accessible way. This is a rather laborious process, requiring certain skills and tools.
It should be noted that only one twist is unacceptable for security reasons. Contacts must be carefully disassembled or used for this purpose special clamps. All contacts must be carefully insulated.
Rules of work

When performing work, basic safety requirements must be met. First, when connecting pipes with each other by welding, welding work should be carried out outdoors. This requirement also applies to the process of pipe cutting with the help of a "grinder". Even a small spark on a wooden surface can cause a fire.
Secondly, after pulling wires and cables through the mounting pipes, it is necessary to check the integrity of the insulation for a short circuit. A tester can be used for this purpose. Such a precautionary measure will save you from possible troubles.

If finance allows you to purchase copper pipes that are more expensive than steel pipes, then you should give preference to the first. When doing the installation yourself, this will greatly simplify the task. Copper pipes are easily bent, so they can easily be given the right configuration. Steel pipes are not easy to bend. In some cases, they can not do without heating them with a blowtorch or in any other way.
When connecting copper pipes, a usual powerful soldering iron will be enough for each other, and for steel, welding or tapping of threads for coupling by means of couplings will be required.
If your choice has stopped on steel pipes, it is desirable the presence of galvanized inner surface, which eliminates corrosion when condensation forms. In extreme cases, you can resort to painting inside the pipes with a special anti-corrosion paint.
If conventional pipes are used without a protective coating, it is recommended that, with a horizontal arrangement of the wiring, give the pipes a slight inclination. This will allow the condensate to drip off.
When installing the power cord, you must pay close attention to the observance of safety measures. Wood is a combustible material, and any shorting can lead to a fire. Electrical wiring in the house from round logs is mounted only by licensed specialists, and independent electric installation work Are carried out in the event that there is a special knowledge. What you need to know the owner wooden houseto avoid fatal errors?
Power installation features
The most common mistake that home "craftsmen" allow during the laying of the power grid is the installation of concealed wiring in walls without protective devices. It can often be seen that the wire is not hiding in a metal one, but in a corrugated plastic pipe, this can eventually lead to a fire. Hidden wiring in a log from a rounded log is dangerous for several reasons:
- When laying the cable, the insulation can be partially broken, and often the electrician does not even notice it. As a result, when the load is switched on, the damaged section will quickly heat up, and this will lead to a short circuit. When heated, the corrugated pipe wall quickly collapses, after which the ignition of the walls becomes inevitable.
- The second reason for the hidden laying of electrical wiring in a house from round logs should only be done using a metal pipe - rodents that live in many wooden buildings. Rats and mice can gnaw a plastic box and taste the insulation of the wire. This again leads to a closure and a fire, and it is almost impossible to detect a damaged area immediately.
- In voids in wooden walls accumulates dust. This material instantly lights up when the temperature rises, and the fire will take on alarming dimensions in a very short time. The house is destroyed along with all the property in just a few hours.
The main reason for such problems - the desire to save on the call of qualified electricians and the desire to quickly complete the laying of cables. As a result, the structure is under threat, which could easily be avoided if appropriate measures were taken.
Installation of the power network: stages of operation
Electrical wiring in the house from round logs is laid and hidden, and open way, but in both cases the work is strictly according to the regulations. The first stage is the design of the building's electrical network: all sockets and switches to be placed in the rooms must be indicated in it, and all lighting. It is necessary to imagine approximately where the home appliances will be installed, so that the outlets are comfortable, and there is no need for tees.
Consumers of current are divided into groups, and each group is supplied with its own automatic device. If wiring is supposed to be done in a small room, you can combine all the devices into one group. It is important to think about street lighting, since darkness on the site can cause injuries.
For internal wiring The cable VVGng-LS with copper cores is used, it is supplied with non-flammable insulation to prevent fire and spread smoke.
Sockets are selected depending on what wiring is, hidden or open; they can be combined into blocks for easy placement.
You should also choose the correct input cable, it must match the power of the network.
Ways of installation of electric network
The laying of electricity in the house from cylindering is carried out in two main ways:
Additional work
Electrical installation work is completed by grounding and installation of residual current devices (RCDs) preventing the network from overloading. The RCD responds to the slightest change in the current in the network, which can become a sign of a short circuit and disconnects the system. All work on the installation of electrical equipment should be carried out by specialists who correctly calculate the power of the equipment and select all that is necessary for installation.
It is important to remember that any electrical wiring requires timely repair and periodic replacement. It is recommended to change the wires every 10 years. In addition, you will have to respond in a timely manner to all alarm signals, such as sudden operation of the RCD, heating sockets, the appearance of a spark, etc.
If such symptoms occur, it is necessary to take immediate action without waiting for a closure that can be very expensive. And here, one of the disadvantages of hidden wiring manifests itself in full: finding out the damage in this case will be much more difficult, and after any repair work you will have to restore the wall anew.
Electrical wiring in a private house is a responsible and dangerous business, therefore compliance with all precautions is necessary. It is extremely undesirable to save on the call of a specialist: any error can lead to malfunctions in the operation of the power grid, which will lead to equipment failure and other troubles. Faulty wiring is one of the most common causes of fires, so every owner must take care of safety.
You need to enable JavaScript or update the player!
When he makes his own wooden house, the owner first of all must take care of his protection. And we are not talking about all kinds of wood coatings, although no one diminishes their dignity. In this article, the correct wiring of the wiring will be considered, from the undesirable failure of which according to the Ministry of Emergency Measures and fires occur. In order not to cause misfortune, it is required to know how to make wiring in the hallway, while not breaking either beauty or comfort.
Ways of installation
Usually there are two of them - open and hidden. First, before the cable is installed in the house, this communication should be junction box. If the home master does not have enough for this qualification, then there is no need to try - it is too responsible, it is better when they are engaged in a professional.
So, the wiring in the hall begins with the street and is conducted in two ways - air and underground. We will analyze the advantages and disadvantages of each. The air gasket gives such advantages:
- This method is cheaper than the second.
- The cable for this installation is used by self-supporting self-supporting insulated wire, which means that there is no cable for it.
That's all the advantages. Of the shortcomings can be identified violations of appearance - the cable is not attractive in appearance. In addition, air wiring in the log house outside of it can be damaged by weather conditions or trees clinging to it.
Yes, and fire such a cable can, which reduces the chances of logging to remain intact - sparks can spill over to the house. Underground gasket in this respect much better. Here are its benefits:
- Such a method, in which electrical wiring in a log house from the street is almost invisible, means that the communication is hidden securely and the ground also serves as a ground.
- The cable will not get any damage, as the ground will remain stationary. Note that it is necessary to memorize and somehow mark the locations of the gasket. So that it does not happen that earthworks will be subsequently carried out on this site, so that there is no danger of crashing into tension.
- For the possibility of a fire from such a cable, you do not have to worry, even if there is a short circuit, the sparks are immediately extinguished by the ground.
How to conduct a cable under the ground
The necessary manipulations associated with this work must take into account the technique of their own safety. This requires protection, at least hands, and the absence of any metal or wet objects nearby. So:
- For this, a ditch depth of at least 70 cm is dug out.
- At the bottom is laid a pillow of rubble and sand, then stacked under the log house wiring. You need to choose a place where she will enter the house more rationally, so you do not have to stretch it far.
- Then a cable is laid on such a pillow, and it is covered with sand, not bringing to the edge 10 cm.
- After that, a tape with the inscription "Do not dig" is placed in the trench and the backfill is made to the end.
It becomes clear from the written that it is best to choose an underground way of putting cables into the house. Next, about the ways of laying directly in the house.
Transaction options
An open option is when the wiring is visible. Here are its benefits:
- This method is more expensive, because it does not require technological holes and cable laying in the appropriate devices for this.
- Nothing hinders to dismantle the plots or replace it, since the wiring in the hallway is in sight.
- It can be installed in plastic ducts and PVC ducts.
- Very posh looks like open wiring with a twisted retro cable.
Disadvantages:
- Appearance, if the wiring is made by hand, is called an ugly word - snot. Indeed, the sagging is not too attractive.
- An inadequate cable bought on the market from people selling different junk, threatens to fuse, and as a result - a fire can not be avoided.
- Installation must be verified perfectly - because everything is in sight.
The hidden way, that is, to understand where it is, to the uninitiated is very difficult. The advantages are:
- Absolutely does not violate the internal original appearance of the wooden frame.
- For its installation, reliable cable options are used. At least, it is worth to clarify the sellers of electrical stores.
Disadvantages:
- This way is expensive. It will require the correct layout before the installation of ceiling and floor ceilings.
- Do not use PVC channels, only metal. This is prohibited by the rules of the construction of a wooden house, where concealed wiring in the doorway takes a special place.
- If replacement is necessary, it will be necessary to disassemble the floor or ceiling sections.
Decide, of course, the owner, but above all, you should think about the security of the home. About this there are documents regulated by the rules, which state how all electrical devices should be installed.
- Should be from the floor at a height of not less than 20-30 cm. In houses with small children, they should be protected with curtains, which must open with effort. In addition, a socket that is left without work is plugged into a plastic plug, which the child will be problematic to pull out.
- In bathrooms and kitchens, the distance from the floor to the outlet should not be less than a meter.
- Among other things, such devices should not be in contact with gas equipment or furnaces.
Switches:
The essence of the special difference from the outlets is not. The classical size is the growth of the average person. The European measure is at the distance of the lowered hand. None is a violation. One should only remember that the wiring in the house from the log house should be convenient for all members of the family and be located away from gas or heating equipment.
Basic requirements for wiring
To condone when conducting electricity - means to bring your own home to disaster. So, the basic safety requirements:
- You can not start the installation without having the appropriate qualifications. It can be too expensive.
- Buy all the necessary items only in specialized stores under the guidance of sales consultants. Do not be shy to ask them questions - their work, respond to everything.
- If it is desired that the wiring in the house from the log house is invisible, it is worthwhile preoccupied with the plan of location, and arrange the moves before finishing the finish.
- The street location of electricity should not cause complaints and simply must be safe.
- Timely operation of networks will help to avoid problems in the future.
Fulfillment of these requirements is a guarantee of safety and convenience of using such a blessing of civilization as electric current.
You need to enable JavaScript or update the player!