Antipyretics for children are prescribed by a pediatrician. But there are situations of emergency care for fever, when the child needs to give the medicine immediately. Then the parents take responsibility and apply antipyretic drugs. What is allowed to give to infants? How can you bring down the temperature in older children? Which medications are the safest?
This article describes step by step the procedure for dismantling and installing the meter with one's own hands for its subsequent commissioning as a vodka, and also the process of manufacturing an adapter through which water will flow to the consumer during the absence of a meter.
Preparation for work
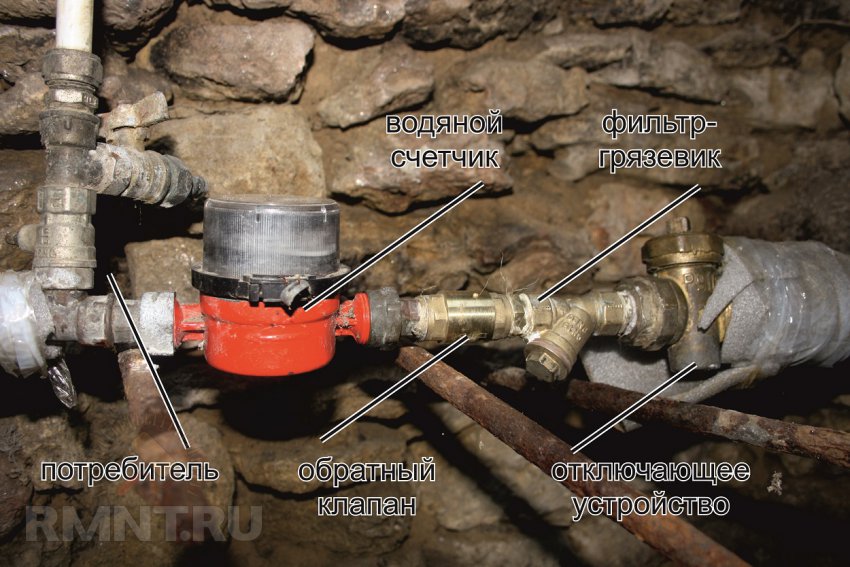
Before dismantling the meter, it is necessary to call the representative of the service provider (Vodokanal) to remove the seals from the device. Independently to break fillings is forbidden. After removing the seals, we can proceed, having previously got acquainted with the composition of the accounting unit. It consists of:
- disconnecting device (crane);
- filter-mud (mechanical coarse filter);
- a non-return valve (a device that transmits water only in one direction);
- water meter;
- all water-consuming devices installed after the meter.
To dismantle the water meter and manufacture the adapter, we need the following set of tools:
- adjustable wrench;
- caliper (the ruler is suitable);
- brush for metal;
- stationery knife;
- flat screwdriver;
- oxygen hose (Ø 9 × 18 mm, length - 110 mm);
- fitting for oxygen hose Ø 9 mm with external thread 3/4 (2 pcs.);
- clamps Ø 20 mm (2 pcs.);
- rubber gaskets 3/4 (can be paronite) (4 pcs.);
- locks keys 14, 17, 19 and 30 mm.
The last item is not mandatory, because you can do with a wrench, but if you can work with a special tool - it's worth using it.

Getting Started
We overlap the introductory tap using the 14th horn key.
Tip: to extend the life of any crane (cork, ball, valve ...), it should be periodically opened-close. This simple procedure will prevent the settling of the tap crane on the walls of the cladding, the accumulation of which can lead to jamming.

Completely drain the water by opening any faucet after the counter. We are convinced that the introductory tap completely blocked the flow.

We clean the mud filter. It is more convenient to do this until the counter is dismantled, while the node is tightly assembled. We unscrew its stopper using the 17th key, holding the non-return valve by hand.

Inspect the filter for contamination.

We brush the brushes with a brush for metal. We do it with pressure.

We wash the mesh with running water.

Shortly opening the opening tap with the 14th key, flush the filter housing. We overlap the tap.

We loosen the two union nuts. To do this, we hold the bottom of the union nut with the 19 th key, unscrewing each nut in turn.

We unscrew the nuts completely, using the 30th key.

We take off the counter.

We take out the old gaskets.

For the manufacture of the adapter it is necessary to measure the length of the counter by calipers. It is 110 mm.
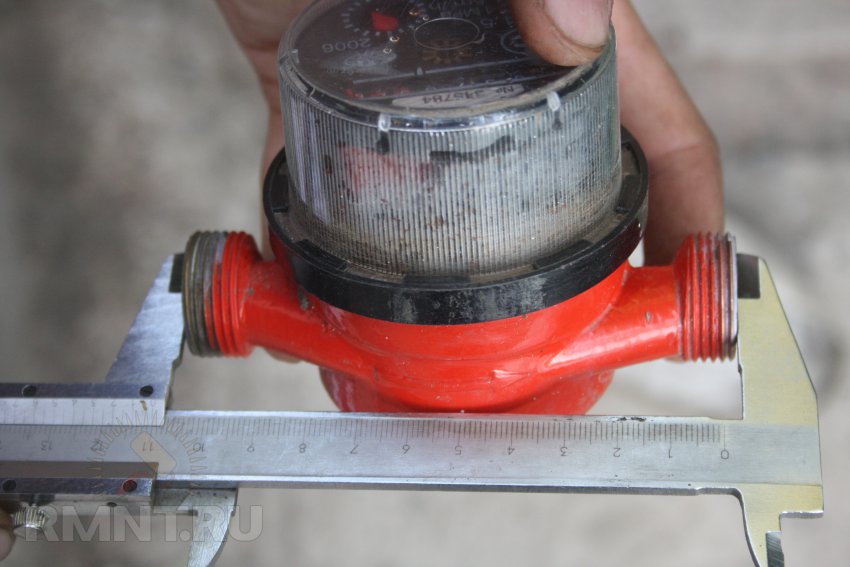
We measure the length of the fitting, without taking into account the length of the nozzle on which the hose is mounted. In this case, 16 mm.

We calculate the required length of the hose. To do this, from the length of the counter, subtract the lengths of the nozzles without a spout. 110 - 16 - 16 = 78 mm. We note.

Cut off the oxygen hose on the mark with a stationery knife.

We insert the first choke into the oxygen hose up to the stop.

We put the hose clamps on the hose and insert the second choke.

Crimp the clamps at the base of the fittings with a flat screwdriver.

The adapter is ready.

The field of the fitting is rather thin, therefore I advise you to use paronit pads, rubber can press.

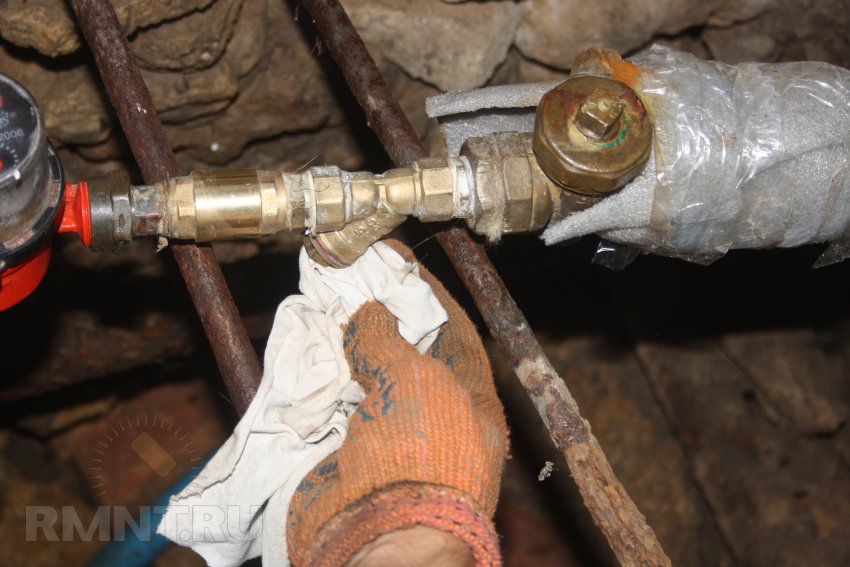
We install the insert into the place of the counter, by engaging the union nuts by hand.


We tighten the union nuts with the 30th key, holding the union with a draw-off nut.

We collect the mud filter. Open the tap.
Tip: it is advisable to lubricate the sump filter. For this purpose, petrolatum, solidol, graphite lubricant is suitable. This will facilitate its cleaning in the future.

Check the tightness of the connections.

Replacing the counter. We remove the adapter, preliminarily blocking the water, and install a certified water meter on the rubber gaskets. Do not confuse the direction of water movement.


We tighten nakidnye nuts the 30th key, holding the counter for the bottom.
Tip: do not tighten the rubber gaskets, just tighten the connections by hand and tighten the key a little.

We open the introductory tap. We check the tightness of all connections, including threaded connections. If necessary, we tighten the union nuts on the counter.


Surely after the work done you will be pleasantly surprised by the pressure of water. After all, not all the plumbers, taking the meter in check, pay attention to the cleaning of the mud filter. And given the fact that the meter is sealed together with the filter, there is no more convenient time for this operation. Do not forget to call a representative of the local water canal to seal out your attorney counter.
Alexander Birzhin, rmnt.ru
The cold and hot water meters that are installed in the apartment have their own operational life. If there are no mechanical damages, the cold water meter is designed for 5 years of operation, and hot for 4 years. After the end of this period, the water meter requires verification or replacement on a new device. The management companies strictly monitor compliance with these rules and require the replacement of the water meter by the expiration date without fail.
Independent replacement of water supply meters is not a complicated procedure, however it is desirable to clarify in advance the possibility of conducting it in the relevant services. Quite often these companies insist on replacing water meters with their specialists, since this service is paid for and due to the proceeds from its provision to consumers, it is possible to significantly supplement the organization's budget. At the same time, from the point of view of a water user who has the ability to replace the counters on his own, these are extra expenses that can be completely avoided.
Even in the absence of special skills, the replacement of water meters should not cause any special difficulties. Special plumbing tools for this, too, will not be needed. To replace the water meter yourself, you only need a wrench.
Step-by-step instructions for replacing the meter with your own hands
- First you need to cut off the water (the tap is installed in front of each water meter). You do not need to call the employee of the housing office - do it yourself.
- The absence of water in the system should be checked on any mixer. If the tap water continues to flow, then in addition to the water meter, the overflow valve is also replaceable.
- Even with a closed tap in the pipes are the remains of water. In order to remove them after removing the counter, you should prepare rags in advance.
- Now with the help of a crane, you can remove the old water meter.
- On the drive, unscrew the nuts (unscrewing the flap nut is counter-clockwise).
- After removing the counter, you should remove the old gaskets, and then clean the ends of the hose from the possible remains of the rubber that has become attached to the gaskets. Stripping can be done with a conventional knife or screwdriver.
- The new meter is installed in place of the old one, and for qualitative sealing of the connections we use paranitic or rubber gaskets. The thread of the water meter does not require additional sealing, as this only makes it difficult to tighten the nut.
- Note that the device must be installed in the direction of the water flow (on the body of the water meter for orientation, the arrow is drawn in the desired direction).
- After this, we set the gaskets between the drill and the counter, tighten them. For convenience, hold the water meter with one hand so that it does not scroll. It is not necessary to tighten very much, it is better to tighten it later than to spoil the gasket.
- Now you can open the overhead valve and make sure of the reliability and tightness of the connections (the valve on the mixer opens up to the stop).
Features of replacing the hot water meter
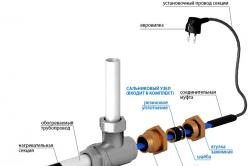
Performing the same manipulations that were listed above, you can replace the hot water meter, taking into account some features. This counter differs in color from the cold water meter (it is important not to confuse these devices during installation). It should be noted that the pipes of hot water are sometimes served slightly warm, or even cold water. At the same time the water meter will consider it as hot, at the appropriate rate. Therefore, in the selection, replacement and installation of a new hot water meter, the recommendations of a qualified technician should be used. In the kit with the new device go the filter, special fittings with nakidnymi nuts and gaskets ensuring the tightness of the connections.
It should be borne in mind that in water pipes (even in new ones) there is dirt. To release it, and with it the air that remained in the meter, you need to open the valve for a few seconds at full capacity. It is very important. Since the air remaining in the device can influence the correctness of the water meter readings.
In conclusion, I would like to note that it is much more expedient not to buy cheap water meters of doubtful quality, but to stop your choice on more expensive and high-quality products. This will protect you from the need to change the water meters frequently due to permanent breakdowns.
The use of water meters has long ceased to be a rarity and exotic in our city apartments, especially since the installation of these devices is mandatory in accordance with the current legislation. However, those who are just beginning their operation often have a number of questions related to how to take the water meter readings.
This is very important, because the errors made when taking meter readings, can lead to problems related to the payment of the consumed resource. That is, only one incorrectly recorded figure can "fly into a penny" to the hapless payer, especially if it is a question of using hot water paid for at higher tariffs.
Water meters are installed according to the standard scheme: from above there are pipes with hot water, and, accordingly, there is a counter for hot water, and a bottom for a cold one. They are attached to the water pipes in the toilet or in the kitchen under the sink. Sometimes pipelines with meters are located vertically, but for clarity, the instrument cases are painted in the appropriate colors: red and blue.
In order to check the correctness of the installation of the counters, before opening the water meter readings, open the tap by lowering the cold water from it. At the same time, you must earn a blue counter that is responsible for accounting for cold water. If you understand the location of the meters, and they are working correctly, you can proceed to the most important event: taking readings.
Values of digits and their decoding

On the dial of the counter are eight digits, 5 of which are black and 3 are red. Reds indicate the number of liters used. They should not be considered, as payment for consumed water is made in cubic meters. That is, we are only interested in black numbers indicating the number of cubic meters of water we used during the reporting period.
- Record the desired numbers in a notebook or notebook in the order in which they are shown on the device.
- The last digit is rounded upwards if the number of liters is more than 500.
- Multiply the received value by the established rate for water payment and enter the value in the payment book. Now you can go to the nearest branch of the bank to calculate for consumed water.
Please note: Before taking a reading from the water meter, make sure that the pipes in the house do not have leaks, and the faucets in the bathroom and in the kitchen ensure water lock at a normal level.
If all sources of water consumption in the house are turned off, and the meter continues to "wind up the numbers", even with a minimum speed, then there is a leak in the home network that needs to be identified and eliminated in order to prevent the payment of unused water.
Check the correct operation of the hot and cold water meters as follows:
Having closed all the taps in the house, pay attention to the counters. They should be stationary, and their readings should remain unchanged. After this, take a 10-liter pan and fill it with water to the brim. This manipulation should be made five times, thus typing 50 liters. Then again check the readings with the actual calculation of the water. They should increase by exactly 50 liters. If there are discrepancies in the actual and nominal readings, the counters should be checked in the relevant organization for possible problems and malfunctions.
Here is a simple example of how to take readings of water meters yourself:
In the apartment, new counters of hot and cold water were installed, at which the indications at the time of their installation were zero.
That is, it looked like this:
- Hot water: 00000000;
- Cold water: 00000000.
After a month of using the water, the testimony on them changed as follows:
Hot water: 00018657. This means that during the reporting period 18 m 3 and 657 l of hot water were spent. For payment we need the first 5 digits. This is 00018. We round out the last digit, we get the number of cubes for payment: 19.
Cold water: 00020826. Here the indications are removed in a similar way. Take the number of cubic meters of water used: 20 and round them by 1. Pay 21 m 3 of used cold water.
Next month, for example, how to take the reading of the hot water meter if it shows the value 00028556. It is necessary to round off the readings to 29 m 3 and from this value take the previous month's readings, which were 19 m 3. As a result, we get 10 m 3, this will be the flow of hot water for the current month. Cold water is calculated by the same principle.
That is, being careful and attentive, recording and timely paying for the testimony, you do not have to worry about how correctly to take the water meter readings, since the assumption of serious errors is unlikely at the same time. The main thing is to do everything regularly and responsibly.
How to take readings of the water meter the video will demonstrate clearly.
The flow of water from the water pipe today is measured by special devices. Replacement of water meters should be carried out every few years. A cold water meter (Figure 1) is usually installed in the apartment together with a device for measuring hot water (Figure 2). This is done by tenants for several reasons:
- reduce water use costs;
- prepare for the day when the counting devices of consumed water will be a mandatory attribute of each apartment.
Figure 1. Counter of cold water.
What are the meters for?
Instruments for calculating hot and cold water save tenants to 1000 rubles. monthly. With a larger number of people living in the apartment, the savings will be much greater. But the law says that all these devices must be checked after a certain amount of time. How is water meters replaced? Everything begins with the installation: the device needs to be bought, installed and sealed. You can do all these work yourself, but if they are incorrectly connected to the pipes of the system, there may be problems with sealing the products. It is better to order work in a special organization.
If all equipment is installed and sealed, it must be remembered that after 4 years the hot water meter should be checked. The cold meter has a working life of 6 years. If you miss these terms, you will be recalculated and will charge for water at a tariff. It is much more expensive than paying for meter readings.
To check the counters, you must remove them and take them to the repair department. This procedure is expensive, its duration is quite large. But to replace the counter with a new one will be even more expensive. Changing water meters can only be cheap for better quality devices. All replacement takes place 2-3 hours.

Figure 2. Hot water meter.
What is the replacement of counters for?
It is necessary to change the water meters to those tenants who have expired the life of the meters or they have not passed the test. Can I do it myself? In a privatized apartment, replacing the water meter is the privilege of the owner of the housing. In some regions, local authorities can take on these costs, but are not required to do so. The federal law in clause 13 provides that the meters must be installed by the owner of the house. But is it necessary to apply for help to plumbers? Or you can change the meters yourself?
The adjustment of the installation or the replacement of counters must be taken necessarily. After all, in any case, you need to turn off the water in the riser. If the housing maintenance department insists on its specialists, it will be necessary to obey. If you already had such equipment, the law does not prohibit the replacement of meters themselves. To fix on the prepared place the new device is not difficult. Anyone can cope with this task. It is sufficient to be able to work with a wrench and sealant. But after installation it is necessary to call a representative of the Housing Department at home. He will inspect the instruments, seal them and make a corresponding entry in the technical passport. After that you can pay again according to the indications of the devices.
How to replace the water meter in the apartment? To do this, you need to prepare some tools and equipment:
- calibrator;
- the adjustable wrench (Figure 3);
- tape FUM or flax plumbing;
- gaskets for counters;
- the counters themselves;
- soldering irons for polyethylene pipes;
- couplings-adapters.

Figure 3. Adjustable wrench to replace the counter.
If the apartment has a water tap, shut it down and unscrew the nuts of the meters. They always curl in a clockwise direction, and twist in the other direction. Fittings are cleaned of used gaskets and are equipped with new products. It is better to use silicone or new rubber gaskets. It is necessary to clean and coarse filters. All fittings must be brass.
The rules for replacing the meters require inspection of the pipes for leaks and damage. If there are any malfunctions, they should be fixed. On the body of the meters are arrows, which help in the installation of instruments. They should be directed towards the flow of water. Nuts are wrapped by hand to the end and dovorachivayutsya key 1-1,5 turns. When water is turned on at the joints, there should be no water droplets.
Conclusion
The law requires the installation of gas, water and heat meters in the apartment.
Water meters are devices that help save about 1000 rubles per month. If the family is large, then this figure will be much higher. If the counters are already up, then in 4-6 years they need to be checked. Faulty instruments should be replaced with new ones. You can do it yourself. But for the final commissioning of them, you need to call the representative of the housing department for inspection and sealing. There are many varieties of counters. It is recommended to install products manufactured in Germany. They serve much longer than domestic ones, up to 20 years.
It is better to entrust this work to specialists. Then there will be no questions from the housing department. These workers are well aware of the order of the installation work and make a maximum of 3 hours. Even with a malfunction of the device, the responsibility in this case will be borne by the company that installed it.
Installation of a water meter for cold and hot water can significantly save the family budget. Especially if in fact there are 1-2 people living in an apartment instead of five registered. But installing an accounting device is not all that needs to be done to change the payment for utilities. Now it is important to learn how to use the meter and correctly take its readings in cubes of water consumed. Decoding actions when taking readings from the water meter in the material below with visual photos.
Understand with counters
In order to correctly remove all the necessary indications of water meters, you must first determine the purpose of the device. That is, which water is used for what. Here everything is simple:
- A water meter enclosed in a blue hull counts cold water;
- The water meter, which has a red casing, calculates the consumption of hot water.
It is important: to make sure the installation and the purpose of the devices are correct, simply by opening the tap with water. For example, we open the tap with hot water and observe the registration of the meter. In addition, it is worth knowing that the cold water is always consumed more, which means that the readings on it will be large, unlike the counter for hot water.
Now we need to understand the interpretation of the values on the water meter. For us, only those figures that are included in the movable dial matter. The numerical values indicated on the top of the meter body are the serial number of the product.

So, back to the mobile dial. It is worth knowing that all eight numerical values play a role in calculating the water expended. But when taking data, only those numbers that are indicated on the black drums of the mobile dial on the left on the water meter should be considered. Here water is already counted in cubes. The same numbers, which are indicated on the red drums of the dial, take into account the liters of used water. As a rule, they are not taken into account, or rounded up to a greater or lesser extent according to the rules of mathematics.
That is, if we have a value less than 500 on red numbers, then in this case we can round off the reading in the smaller direction and simply enter the values from the black dial in unchanged form into our home list. If the red numbers indicate a number greater than 500, you can round off the water meter data in a larger direction.
Example of taking readings from the meter to water

We will analyze the principle of taking readings from one of the counters. So, you installed the accounting device and its initial readings were 00000351. This value simply indicates that the equipment was tested at the factory. Before you start using the counter you need to create a special notebook and raspraizte it. The first column will be for the name of the month in which we take the testimony. The second column graph will be used for the date in which we take the reading. The third graph is for the digital values themselves from the dial of the water meter. We need a fourth column, in which we need to write the total number of water cubes consumed (used at will for more accurate management of home accounting).
Important: to make it convenient, the notebook must be kept in such a way that there are always two sheets in the spread - the left one to hot water, the right one - to the cold one.
So, we enter the name of the month and the date in the first and second columns. And in the third, we introduce the initial readings of the counter. In the fourth column, while writing zero.
After a lapse of time (month) your water meter wound up a certain number of cubes of water, which was consumed for domestic purposes. The readings will affect the black numbers of the drum dial. Perhaps now your data on the meter will be 00015615. It is necessary to write the month and date in the corresponding columns, and the third one - the data that the device shows. Now we have to deduct a smaller number, that is, from 00015615-00000351 = 00015264. The last three digits are discarded in this case and we get the number of water cubes consumed - 15.
It is important: to take readings from the accounting device is allowed in general without taking into account the last three figures placed on the red part of the dial. Since liters when paying for water bills are not taken into account. Only cubes of water are taken into consideration. In this case, the calculation in the notebook can look like this (00015-00000 = 15). That is, you have used 15 cubes of water.
In the same way, the data is also taken from the second counter. And it is worth remembering that when deducing the amount of water cube consumed, always from a larger value we take away the previous lesser.
We fill in the receipt

After personal home accounting has been entered in the necessary notebook, it is necessary to take care of the correct filling of the payment receipt for water. It is important to make all the data in a legible and accurate handwriting, avoiding mistakes. Otherwise, the data will not be accepted, and the water bill will be set according to the average standards.
Entering data into the consumed water is done in the following way:
- In the column on the current consumption of cold water, it is necessary to enter the data from the meter to date without taking into account the last three digits on the red dial. Or round them up.
- In the section of the previous indications, it is necessary to indicate the data of the accounting device for the last month also without taking into account the last three red values. Similarly, graphs are filled for hot water.
- Now you need to fill in the "Wastewater" section. Here it is necessary to indicate the summed value of the consumed cold and hot water in cubes. That is, add up the amount of cold and hot water spent per month.
Important: if, for some reason, the receipt was not provided to the supervisory authority, then the water flow is derived from the averaged data for three months. Accordingly, according to these data, the amount of payment for water is charged. After providing accurate data, you will necessarily be recalculated.
Methods for transmitting readings from a recording device to water

- Refer the completed receipt to the Housing office;
- Send an SMS notification in which you need to correctly specify the subscriber's personal account and all the readings taken from the accounting device for the current moment and for the last month by analogy with the receipt;
- Take advantage of the Internet. We will consider this variant in more detail.
Sending data via the Internet

- In order to send data from the water meter via the Internet, you need to go to the site "Portal of state and municipal services". Here, the resource will require your registration, which you need to follow, following the prompts. As a rule, the name, phone number, e-mail and personal account are entered as registration data.
- After successful registration it is necessary to select the menu item "meter readings for cold and hot water".
- Next, you need to enter the code of the payer of public services.
- After that, the system will transfer you to the page of data entry from the accounting devices. We enter all the numerical values.
- Confirm the dispatch and click on the "Payment" window.
- Payment of invoices can be made at the bank's checkout, in boxes for paying bills or in the office of your housing office. No commission is charged for utility bills in this case.
For residents of a communal apartment

If the water meter is installed in a communal apartment, payment for water is carried out by dividing the consumed liquid in cubes by the number of people living in the apartment. It does not matter how long this or that tenant uses a bath, a shower or a sink.
If this method of payment does not suit you, you can contact the Housing Committee with a statement about the redistribution of payment of water bills. But you can do this only with the written consent of all tenants of the communal apartment.