Antipyretics for children are prescribed by a pediatrician. But there are situations of emergency care for fever, when the child needs to give the medicine immediately. Then the parents take responsibility and apply antipyretic drugs. What is allowed to give to infants? How can you bring down the temperature in older children? Which medications are the safest?
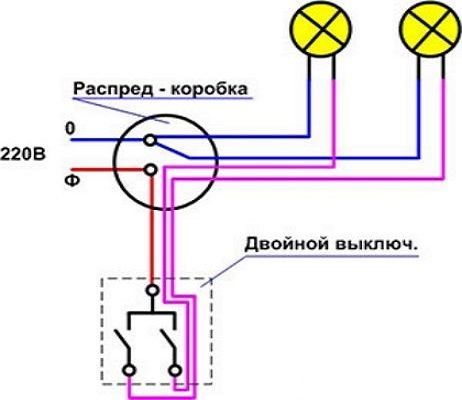
Many modern chandeliers are produced in two lamps, as well as lighting systems have two lines. How to properly connect them to switches? In this article, we will analyze,tell you how practical it is and how to do it correctly. Also consider the connection scheme for a double light switch.
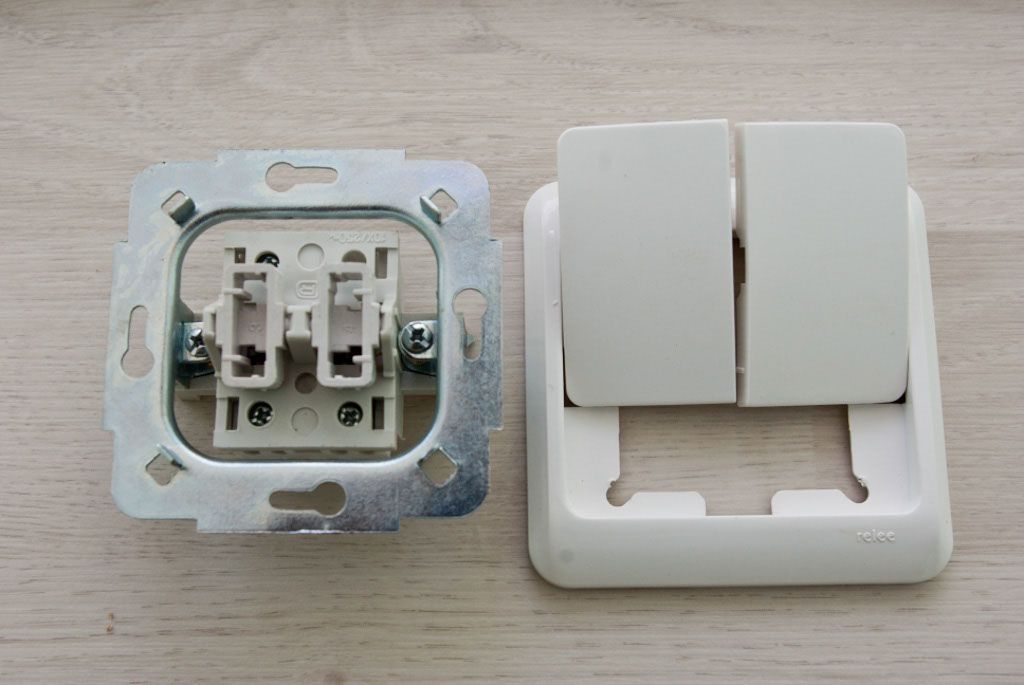
A standard two-button switch allows you to control two lines or lamps.It consists of three main elements:
- The body that is inserted into the box in the wall.
- Two buttons made of plastic.
- Terminal or screw for connecting cables (usually consists of three terminals - one input and two output).
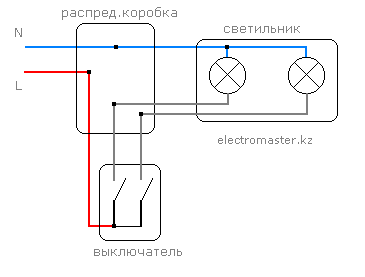
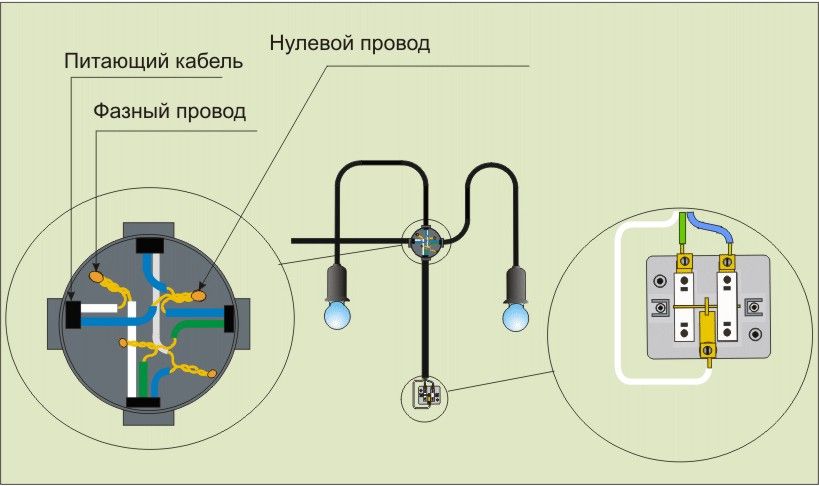
The principle of connection is fairly simple and it can be done with a single cable 3 * 1.5 VVGng. A single cable (phase) emerges from the switchboard, it enters the upper terminal. From the bottom there are two cables connected to the two output connectors. They are sent to the contacts of the chandelier or the lighting line. Zero cable immediately goes to the chandelier out of the box - it can be performed even with one wire (but it is better to drive 2 * 1.5 VVGG to connect also grounding).
When the button is pressed, the contacts close and the phase is fed to one lamp (zero is permanently connected). The inclusion of the second key feeds the phase to the second lamp. When the contact is opened, the contact is lost and the light goes out.
Fastening of wires
To fix the wires in the terminal blocks, you can use conventional screws (allow the cable to be tightened with a screwdriver) or self-tightening devices that "lock" the cable after insertion inside. The first ones are more preferable, because when replacing, you just need to unscrew the screw. But pull out without damage cable from the locking terminal block is almost impossible - you will have to use force or bite it at the base.
Note that is fairly simple and easy to implement. If necessary, you can put switches with dimmers or indicators - they are connected to the input phase and show the presence of voltage in the network (very convenient at night).
Attention:dimmers (dimmers) work only with incandescent lamps. If you plan to put LEDs or fluorescent lights, then note that dimmers do not work with them.
Connection diagram
Below you can see the classical schemeswitching of the two-button switch. It is best suited for mounting two lamps or lines.
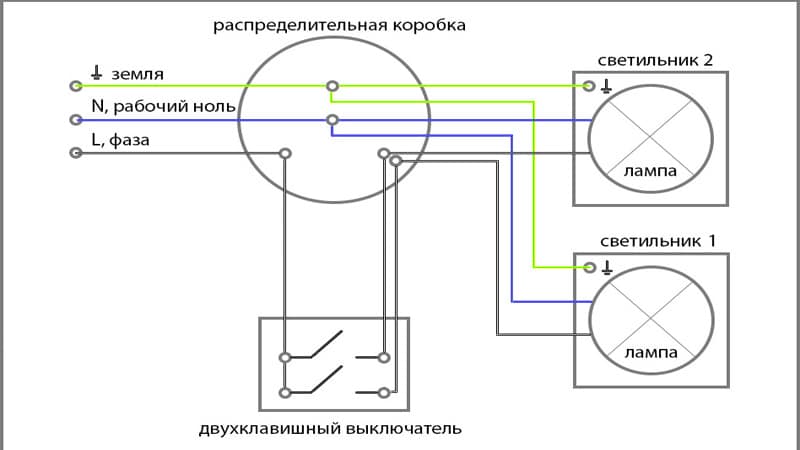 Schematic diagram connecting a double switch to two lamps
 Classical TN-C grounding is used here. Let's analyze how to properly connect it according to this scheme. The phase from the separation box L goes to the switch, from it through wires 1 and 2 comes to the chandelier. Zero and the earth go directly. Having studied the circuit, you can connect the device yourself quickly and safely. The main thing - make sure that the switch opens the phase.
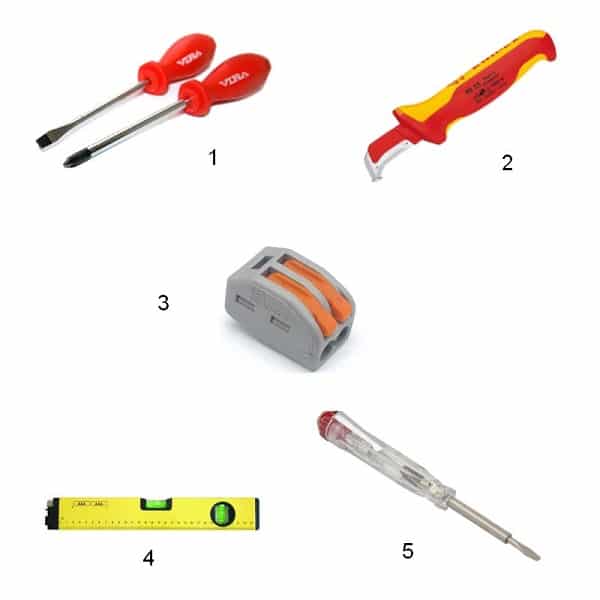
Set of tools for installation
Now you know,how to connect double-switch to two bulbs. We will analyze which tools are needed for this. You will need:
- A set of screwdrivers with a cross and a straight slot.
- Knife mounting for stripping wires.
- Cable cutters.
- Indicator screwdriver.
If the wires are planned to be connected in a new room, then you will still need a shroud or a classic Bulgarian with a diamond disc, chisel or punch and level.When you go to the store you will need to buy a sufficient number of cables (from the switch to the box, from the box to the chandelier + 15% stock), the chandelier, the switch, the box for its installation (they are different, for plasterboard and for concrete walls), terminals for connection of wires and tape.
Installation
If all the necessary materials are purchased, then it's timeconnect a switch with two keys to the chandelier. We will consider the option when the wiring is done in a new room, since if the cables are already laid, the task is greatly simplified.
 Wiring diagram of the box
 So, we have a simple lighting line under the ceiling, into which we decided to cut the switch. We begin to produce the markup. If the line passes on the desired wall, then we put the box vertically above the switch. If the line is on another wall, then we put the box near the corner, from it we pull the cable on top to the desired place, lower it down and lead up to the chandelier.
First, draw a strip on the location of the cable, then with a bulgarian cut out the strob, carrying two cuts at a distance of 2-3 cm from each other. Using a chisel or a perforator, make a furrow and fasten the cable in it with ties. It is desirable to hide it in plastic or metal corrugation to avoid unpleasant situations. Further, you de-energize your line, connect the wires in the box, install the switch and the chandelier. Then turn on the voltage, check everything indicator screwdriver (the phase came to the switch and is nowhere lit when the keys are off). If everything is in order, then turn on the chandelier - it should earn.
Attention:if you need to connect an expensive digital chandelier with a transformer, it is better not to experiment with it. Try it nowbridge double switch on two light bulbs and check that the system is working. If something goes wrong, then you will simply lose the light bulb, not the whole chandelier.Yes, and chandeliers are usually hung up after all the lining and cosmetic repairs have been done, so do not rush it.
Installation
- Remove the insulation from the cable by about 10 cm.
- The wires are put in a box holding the switch.
- The ends are peeled off (1 cm in most cases is enough). If the wire is stranded, then it is twisted, it is advisable to dissolve the end, especially if it is inserted into the screw terminal. For terminal clamps, the propay is not needed.
- The input phase is fixed to the input L of the switch. The double wire that goes to the lamps is attached to the outputs 1 and 2. This wire comes to the chandelier along with zero from the box.
Attention:in some switches there are two input and two output contacts. You do not need to enter two phases into it - you can simply make a jumper and power the second contact from the first one.
At this installation of a two-button switch is considered complete. Next, the connection in the distribution box and the insulation of the contacts (if terminal blocks are not used), connection of lamps and electricity.
In some cases, instead of two or three conventional switches, it is advisable to install one group (two- or three-key). We suggest to consider in what situations it is justified to use such devices and their design features. At the end of the article, you will be described in detail how to perform the connection.
This type of device allows you to switch two or three (if using a three-key design) of a group of devices (light sources, exhaust, etc.) or to turn on / off individual groups.
With the help of a two-key design, it is easy to organize the control of the intensity of room lighting. For example, if you use a light source with three light bulbs, you can connect it so that two groups are formed. Then you can turn on one, two or all lights at once. How to implement this option will be described below.
The second, no less common option, is the control of the lighting of a separate bathroom.
Of course, you can use two single designs for these purposes, but the double installation offers the following advantages:
- when installing hidden structures, only one seat should be made;
- the cost of a single-key and two-key switch is approximately the same, but the first two;
- two devices look less aesthetically pleasing than one, and take up more space, which can be critical in some situations.
Design Features
Two-key devices, for switching on / off the load, are structurally practically identical to single-key, the main difference lies in the switching mechanism. Below, in Figure 2, the main elements of the structure are shown.
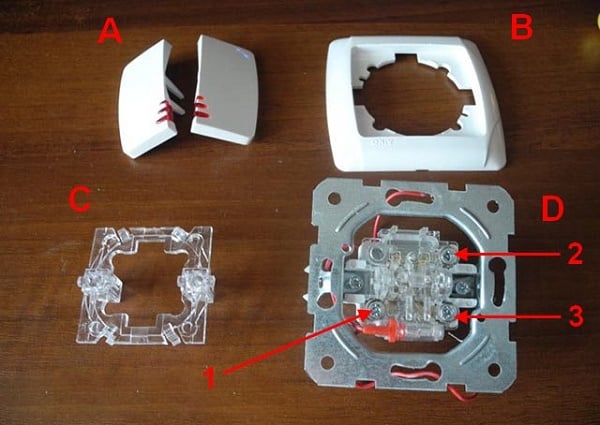
Figure 2. Basic structural elements
Legend on the photo:
- A - keys;
- В - the external panel-case;
- C - the inner panel;
- D - switching mechanism;
- 1 - input;
- 2 and 3 - contacts for control wires leading to the chandelier.
Now we will consider how the circuit diagram of the contact group of the switching mechanism is arranged, it is shown in Fig. 3.
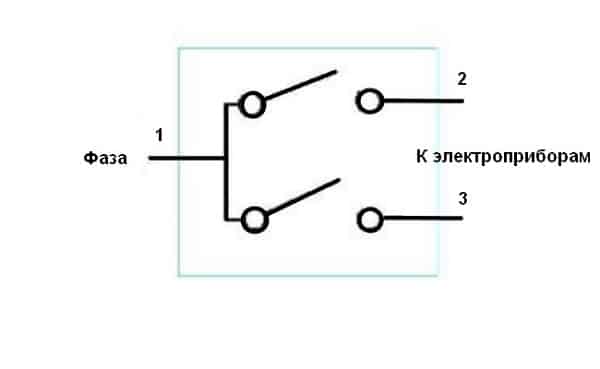
Drawing. 3. Diagram of contacts of a two-key device
As can be seen from the presented diagram, the switching mechanism has three contacts, "1" - common input, "2" and "3" - two control outputs.
Now that we have found out the design of the two-key switches, we can proceed to the scheme of their connection.
How to connect two-key switches
Let's consider connection on an example two-section lighting device (the diagram is shown in Figure 4). Note that this is the standard option, which is used to turn on / off any devices.
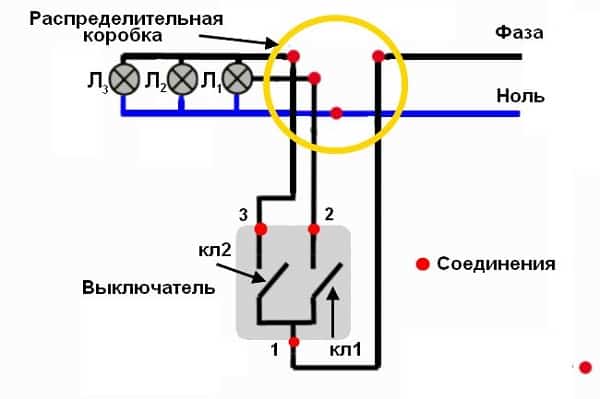
Drawing. 4. Connection of a two-section chandelier to a double switch
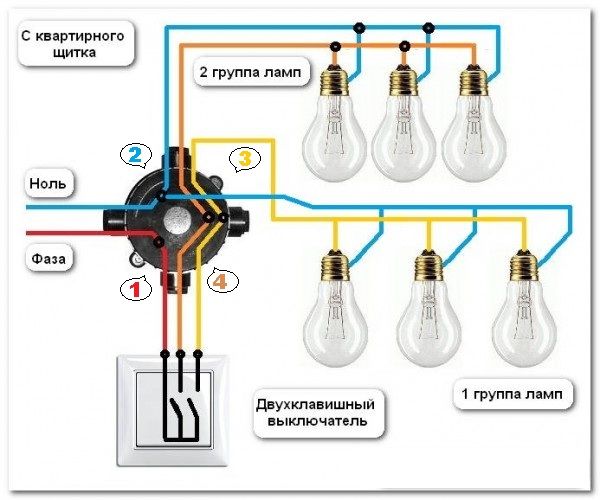
As can be seen from the figure, zero is fed directly to the light sources, in contrast to the phase that is switched. When the contact "kl1" is activated, "L1" is activated, respectively, "kl2" is responsible for the operation of "L2" and "L3". As a result, we can set three options for the intensity of lighting in the room (one, two or all of the lights are on).
Note that the input "1" is fed: the phase, and to the outputs there are two control lines ("2" to "L1" and "3" to the group "L2" and "L3"). The approach can be made by a three-wire cable, if not, then 3 wires are laid.
The variant shown in Figure 4 is more general. Therefore, I will also give more simple scheme connection for 2 light bulbs (luminaire):
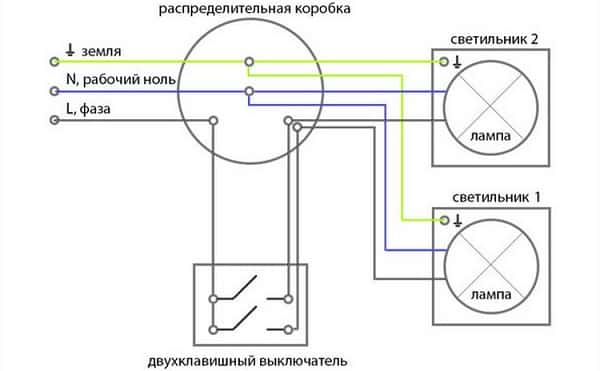
Simple wiring diagram
Why is it necessary to switch the phase?
The above circuit will function even if the polarity is reversed, but in spite of this, the phase conductor must be fed to the contact group (input "1"). Such a condition, exposed by the "Rules for the installation of electrical installations," is directly related to safety. If you switch zero, the voltage will always remain on the contacts, which can lead to serious consequences for maintenance or repair.
Step-by-step instruction for installing a two-key switch for hood and lighting in the bathroom
Suppose we need to install a two-switch on the hood and lighting in the bathroom. We assume that all the wires have already been laid and brought, and the hood and the luminaire are installed. Our task is to make commutation in the box and connect the equipment to the switch.
Let's write down how to do this work with the minimum amount of the tool, all that we will need is shown in Figure 5.
List of tools:
- Screwdrivers with a cross-shaped and splined tip.
- Special knife for removing insulation (you can take the usual);
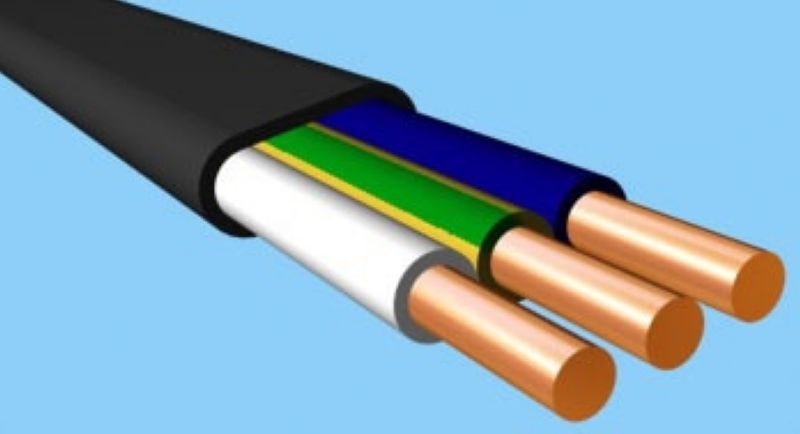
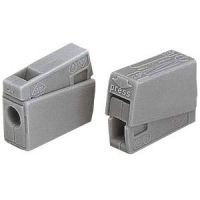
- Four double WAGO terminals. They will be needed to make connections. Of course, this can be done in other ways (soldering, welding, twisting), but we decided on this option, since it is the simplest, does not require a special tool and skills to work with it. For more information on WAGO terminals, please visit our website.
- Level.
- Test probe (needed if the wiring is made with monochrome wires).
The algorithm of action will be as follows:
- We de-energize the wiring in the switchboard - this is a prerequisite for the work.
- We perform switching in the box, zero connect to the common wire from the luminaire and hood, we start the phase on the switch, the outputs from it are connected to the control wires from the devices. To avoid making mistakes with the assignment of wires, Figure 6 shows the standard color layout.

If the wires are longer, cut off excess. Using a knife, remove the insulation from them (about 10-15 mm from the edge) and connect them to the WAGO terminals,
- We make the connection to the terminals of the switch, for this we cut off the excess and we clean the insulation. Now it is necessary to start the phase at the general input of the switching mechanism, if three single-color wires are output to the connection point, it will be necessary to find it. To do this, apply voltage to the wiring and probe alternately touch the wires. When the desired one is found, the neon light will light up in the device. Then turn off the voltage and continue working.
We connect the control wires from the hood and the luminaire to the outputs of the switching mechanism, the order of connection does not matter.
- We make the installation in a glass (if the device is hidden) or on the prepared place (external execution), after which we expose the external panel according to the level.
- We connect the hood and the lamp. As a rule, they are equipped with a terminal block; otherwise, double WAGO terminals can be used.
- At the final stage, we check the operation of the assembled circuit. If you follow this algorithm of actions, then there will be no problems.
Note that the connection three-key switch This is done in a similar way, only to connect it requires 4 wires.
By doing of electrical installation works It is necessary to take into account many factors that can influence the further operation of networks, devices and equipment. Most of the questions arise at the design stage, including those relating to the lighting device. The main difficulties arise during the the right choice electrical circuit for a particular room. Among them, the circuit of connecting a double switch to two light bulbs is quite often used. The need for its application arises when there are additional light bulbs or several groups of light sources.
Scheme of connecting a two-switch switch to two light bulbs
The use of a typical circuit with a two-key switch is most relevant for those rooms where fixtures with two or more lamps are used. This allows you to adjust the intensity of lighting, helping to reduce power consumption.
Before starting the installation of the circuit, it is necessary to prepare all the materials. When choosing a switch, it is necessary to take into account certain factors that affect its further operation. More reliable is a switch with ceramic core, which has good insulation properties. It is not subject to overheating during an accidental short circuit and withstands the main loads. If there is no wiring, you will definitely need an installation junction box, without which you can not mount this circuit. When choosing a box, you need to take into account that a separate product is required for the outlet, lamp and wiring.
The most important role in the circuit is played by wires. It is recommended to use a ready-made cable, in which each vein is marked with a certain color. In this case, the installation is much easier, especially if there is a pre-designed connection scheme. Do not connect wires made from different materials, as oxidation and destruction can occur in the future. takes into account the power of lighting devices. Usually a 1.5 mm cable cross section is used.
Mounting of the connection scheme for a light bulb with a two-key switch
Beforehand to understand the practical side of connecting a double switch, it is necessary to perform a preliminary diagram showing all available devices and connections. On the conductors, you must immediately select to exclude errors during design and further installation. Initially, all boxes and lead-in contacts are applied to the paper. Then, the location of the lighting devices and the wires emerging from them, which are connected in a junction box, are determined. The designation of the phase is necessary so that when the light is turned off, there is no voltage left in the cartridge.
Further, three conductors are output from the switch to the junction box. Two of them are supposed to be kept energized when the contacts close, and the third wire turns into a constant phase. The next step is to connect all the wires in the box together with the input. The phase wire is connected to the constant phase supplied to the circuit breaker. Zero wire connects to any wire that goes to the light bulb. After that, the switch and the source of consumption are connected.
At the final stage, the scheme for connecting a two-button switch to two lamps involves the connection of luminaires. The input of the circuit-breaker is made in accordance with its design and the available terminals.
Modern life is hard to imagine without electricity. The presence of electricians is an important factor for all spheres of human activity. Electrical devices surround us everywhere, making our life more comfortable, more favorable.
Features of installation work in the field of electricians
Planning
Electrical wiring helps to provide coverage of the entire house, the functioning of household appliances. Wiring is not an easy task, requiring special knowledge, skills, and skills. A newcomer will be able to understand this case using the right information.
You need to start working with planning. You should carefully inspect the whole house, determine the type of lighting, the optimal placement of outlets, switches in each room. Next, create a network layout, specifying the specific placement, the size of each element.
The entire network chain (network chain) is divided into several groups:
- lighting network;
- female;
- automatic devices for supplying individual devices (air conditioners, boilers, heating boilers, refrigerators).
The humidity level of the room is taken into account. The current-carrying vein in the basement, bath, toilet passes through a differential action machine. After determining the power supply, the voltage level should be calculated. Depending on this, a cable with the correct cross-section and the correct thickness is selected.
Important aspects of wiring:
- definition of the best section of a wire;
- connection of the shield;
- residual current device.
The following factors influence the choice of the type of current-carrying cable:
- material of manufacture;
- length of wire;
- operating temperature;
- air humidity;
- cable brand;
- number of phases;
- method of connection.
Wire cross section directly depends on the voltage level. The higher it is, the more powerful the cable. For example, a voltage of 2 kW normally withstands copper cable section 2 mm.
Copper cable cross-section 2 mm
In the middle of flammable structures, the cable is laid in the corrugation. One side comes to the mounting box, the second - goes into the flap. Required to leave 40-50 centimeters in reserve. The shield is connected after the cable has been pulled out.
In rooms with a high level of humidity, a differential automatic device or a protective shutdown device is installed. The devices provide safety from electric shock due to poor insulation. At the present time it has become popular to lay the wiring under the floor (allows you to save on consumables).
Double switch construction device
The main attributes for lighting the housing are a lamp and a switch. The shutdown device ensures the appearance of light at the right time for the person. The main task is to properly connect / disconnect the current that fits the light bulb.
Switches have different number of keys:
- one;
- and more.
A great solution to the problem of lighting control are two-key switches.
The device of the double switch
When working with lighting, the question often arises as to how to connect a double switch. First you need to choose the right device, suitable for color, design, size. Universal colors: white, beige, ivory. They are suitable for any design.
Installation and installation of switches begins with familiarization with the elements of the structure.
Structure of the device:
- the body;
- two keys;
- input / output terminals / clamps.
Scheme of application is attached to the product. The schematic structure is that two keys are responsible for two light bulbs. The electrical phase is fed through a switch. Pressing the key disconnects the path of the phase wire circuit. The circuit of the three working contacts is located on the back of the panel.
The outgoing contacts are always located opposite to the incoming contacts. One general goes to the phase, the two opposite - to the guiding outputs.
The two-key unit is installed by means of terminals or screw terminals. Wires of switches with clamps are located in a specific shoe, they are strengthened with screws and washers of U-shape.
The main disadvantage of screw fastening - after frequent use, unauthorized unscrewing of clamps may occur, the mechanism will start to function poorly. Eliminates the disadvantage of unwinding the body and tightening the screws. Self-closing terminals prevent the occurrence of such problems.
Connection Sequence
The lamp begins to glow when zero and phase are applied.
Double-breaker connection scheme
Modern wiring is carried out by a three-wire cable with multi-colored wires. These wires are suitable for the fixing point of the luminaire. Before connecting, you need to determine the purpose of the wires. The usual two-button switch has three contacts.
The sequence of light in the room has its own specifics:
- first, you must disconnect the housing by disconnecting the switch on the disconnector or the circuit breakers
- check the current shut-off by putting the lamp in the socket (if not lit, then everything is off);
- before installation, the exposed parts must be cleaned;
- the conductor zero wire from the switchboard must be combined with two contact groups;
- the second phase wire from the shield is attached to the wire going to the common contact;
- the color of the wires of different groups must be different (the first wire is connected to the phase of one group of fixtures, the second wire is connected to another group);
- phase wires are attached to their consumer groups;
- zero postings from the switchboard are connected to the zero wiring of the luminaires (the two-key switch combines two groups of consumers);
- you need to think carefully about the safety of finding a large number of associations in the cutting box (good twist, solder);
- the switch is carefully attached to the box on the wall (the mounting wire is very stiff);
- the decorative frame is fitted on the base, the button block is inserted into the grooves, securely fixed to the body;
The voltage indicator will help to check if the circuit breaker functions correctly. Sometimes there is a need to install a two-button switch in a complete set with a socket. In this case, an additional section of the wire is laid from the switch to the socket. The height of the placement of the device is the most diverse: the main thing is to make it comfortable.
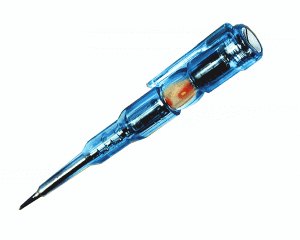
How to find a phase wire?
To properly connect the double switch, you need to determine the wires. Sometimes there are doubts as to which wire is phased.
Explain the situation will help the following method:
- the ends of the wires are gently pulled apart (so that they do not stick together);
- voltage on the shield;
- indicator screwdriver touch the exposed parts;
- phase wire, when touched, a light will come on.
Dimmers help control the intensity of lighting. There are sensory, push, rotary. The installation scheme for all types is the same.
Two-key devices are more compact, elegant than a few one-button, installed together. Careful adherence to the instruction will help to correctly install a pass-through switch (of the proper level) that meets the needs.
Precautionary measures
What measures should be taken when installing light in the house? Working with the voltage circuit requires a treacherous approach, taking into account the safety rules.
To avoid injury / accidents, before connecting the two-key switch, it is necessary to disconnect the current supply correctly, check the presence of voltage on the input cable.
Safety regulations:
- Work on the installation of outlets / switches is best to begin before the design repair.
- Before starting the installation, check the condition of the wiring.
- Correctly organize the actions during the daytime (in the dark it is harder to install).
- Be sure to check the serviceability of bulbs, other parts.
- Using a voltage indicator, check the current supply disconnection.

Voltage indicator for checking the current disconnection
- Disable the automatic or batch switches on the home shield.
- In accordance with safety regulations, use the red phase wiring correctly. The neutral wire is blue.
- All actions should be carried out with extreme caution.
To avoid electric shock, special attention is paid to rooms with a high humidity level. Power supply of porch, bath, cellar requires the use of reinforced insulation. The light bulb is replaced when the electricity is turned off.
Using a ladder, at the base put an insulation mat. After connecting the electricians in the house there should be no hazardous areas. Contacts are attached in compliance with all technical regulations.
Additional Information
How to properly prepare the wiring for proper operation of the equipment? The new wires in the box require preparation for the connection. The best work is provided with outgoing ends of about 100 mm length. Long parts are shortened with forceps. Accrued short conductors can create a short circuit.
The places of joining the ends are well pressed with pliers, wrapped with an insulating tape / tape. Excellent insulation protects against short circuits. Before placing the wiring in the terminal slots, about 15 mm of insulation is removed from the terminals.
The minimum set of mounting tools consists of the following items:
- a screwdriver "under the cross";
- pliers;
- voltage indicator;
- portable flashlight
- electrical wiring knife;
- additional electrical wiring length of 1.5 meters.

A set of tools for the work of an electrician
Connection. Video
About connecting a two-key switch from "A" to "I" will tell this video. The right approach will ensure the continuity of the power supply in the future.
Two-key switch is a pair of independent single switches, combined in a single design. The benefit from its application is obvious - for a concealed installation one is required), and it is not necessary to make a hole in the wall additionally, especially if it is concrete, and the price of one paired is lower than two separate ones.
It is used to include a series of standing lighting sections - it can be a bathroom and a toilet, lamps in the corridor, a group of LED light sources or a chandelier that has a separate inclusion of lamps.
Scheme required
For a correct and reliable connection, you first need to imagine the whole algorithm of actions, and for this you must draw a diagram. An experienced electrician can do such simple electrotechnical work without a piece of paper with a drawing, but only because he is "drawn" in his memory due to his work experience. For a beginner, it's right to start with a piece of paper.
Connection scheme for a two-key light switch
Prerequisites
We have a phase and zero coming from the shield, immediately we designate them with the corresponding color. If the wiring is one-color, you need to find out where the phase is with the help of the indicator. It is forbidden to apply a phase voltage to the appliance, bypassing the switch - safety depends on this.
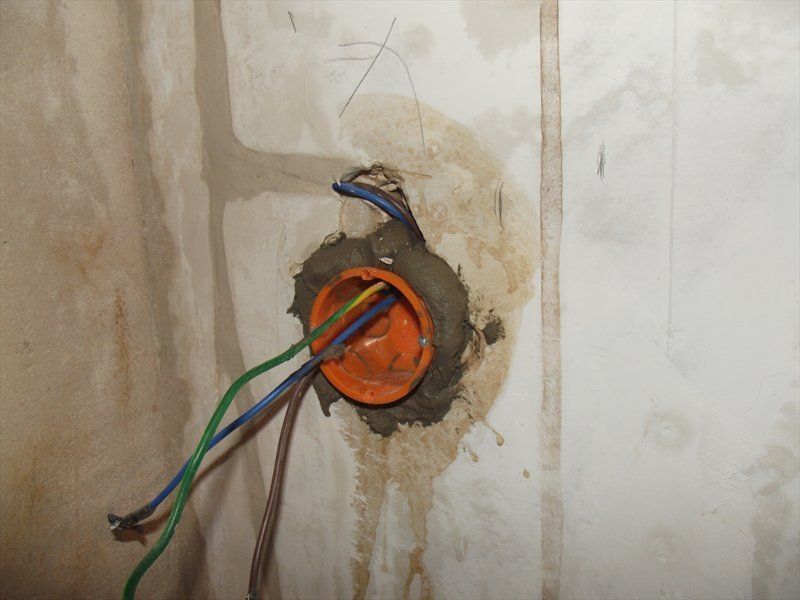
After determining the accessories of the wires, do not forget to de-energize them. As a rule, switches are connected by means of a junction box into which the network wires come. We will admit, different groups of electric lighting devices are connected, and cables to them are already laid, it is necessary to bring them to the connection points in the points indicated on the diagram.
Also, the wires that are lowered to the switch must be laid, and routed through the fixed junction box. You can not first make a connection, and then already do the laying and fixing of the wiring - from mechanical influences the contact may suffer, or even break off the wire so that it can no longer be pulled to the connection point.
Where to begin?
The answer to the question of how to connect a two-button switch consists of two parts:
- installation of wires in the junction box at the top;
- connection at the bottom of the switch's terminals to the switched conductors.
The principal difference is where to start. But it's better to start with a switch, because then, making connections in the box, having a tester, it's easier to find a common wire and switched lines by switching the keys. But at the bottom, having a single-colored wiring leaving the junction box, you can determine the points of its connection only by an experienced way.
When laying the wire to a double light switch it is necessary to lay it with a three-wire cable
Identifying Contacts by Testing Method
The core has three contacts, as a rule, they are appropriately marked, maybe even a diagram is drawn. If, for some reason, it is not possible to visually determine the accessory of the terminals, or it needs to be done with the wires already connected to the switch in the box, they are determined using a tester.
To do this, the keys are switched to the off position, the touch probes are connected and one of the keys is turned on. If nothing happens, it is returned to its original position, include the other. If in this case there is no signal, then the keys are switched on simultaneously, - the current will flow through the closed contacts and the common bus connecting bus.
indicator screwdriver. Phase wire "continuity"
Thus, the probes indicate two switching lines. Then one of the probes is rearranged to the common contact found, and the left and right keys are determined by turning on one by one. Experienced way you need to find such an arrangement, so that one probe always remains on one common terminal, and the other one in turn shows the triggering of each key.
It is important not to confuse them, although for a chandelier this does not really matter, but it will be inconvenient if the light on the left is turned on by the right button, and vice versa.
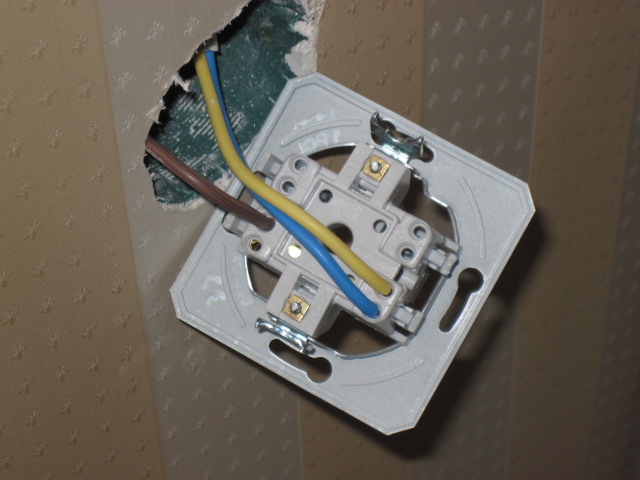
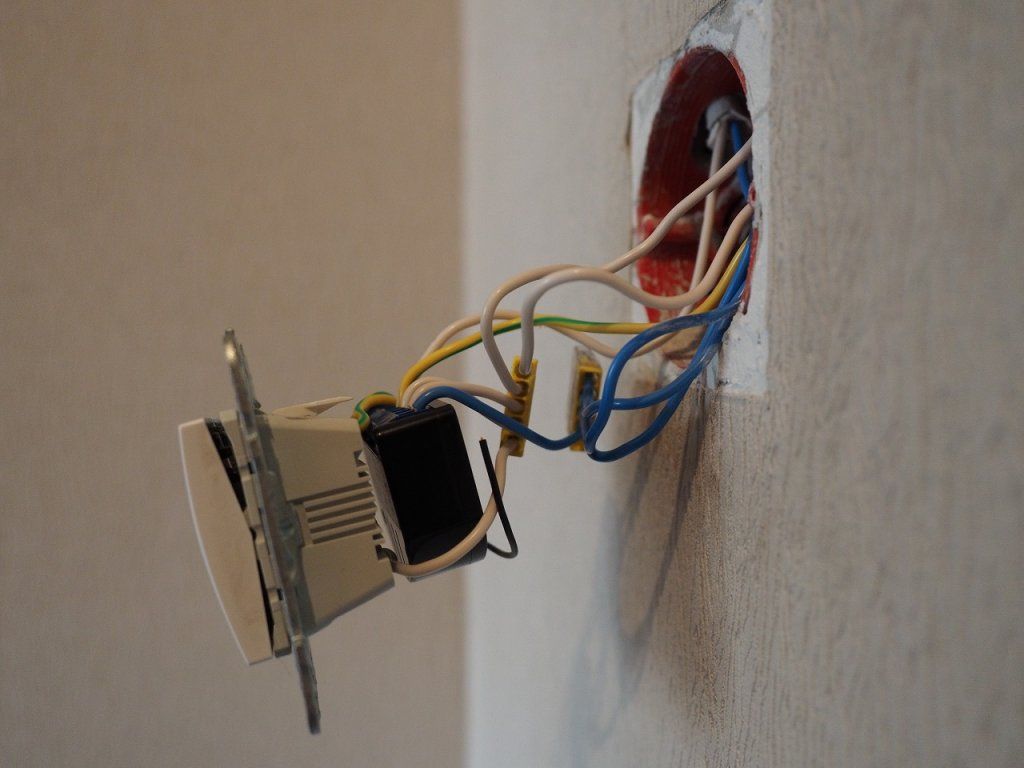
Protruding wires
Connecting the wall switch does not cause any problems. In the case of a hidden installation, the solution, how to connect a double switch, is reduced to answering the question: "How long should the wires from the sub-socket come up?"
The protruding wires from the socket are approximately 10-20 cm
There is such an unspoken rule of electricians: the wire should be free to reach the corresponding terminals with a downward-turned down switch horizontally leaning against the bottom of the junction box. Thus, the core of the switch will rotate as if on a horizontal axis, entering along with the wires into the sub-socket.
Some electricians give wires with a reserve and bend them in the form of a spring snake. The main thing is that the switch freely enters inwards, and does not rest against the wires. Of course, their terminals must be connected very carefully, otherwise they can jump out of the terminals at the time of installation.
Inserted to the stop, the switch, holding the hand, is fixed with the help of evenly twisted bolts, which extend the hardware clips. Fixation should be made only if the mantle itself is already securely fastened. The installation of the keys closes the installation.
Junction box
To connect the wires in the points indicated on the diagram, you can apply twisting, insulating it with an insulating tape, but the reliability and aesthetic appearance will not be at the highest level.
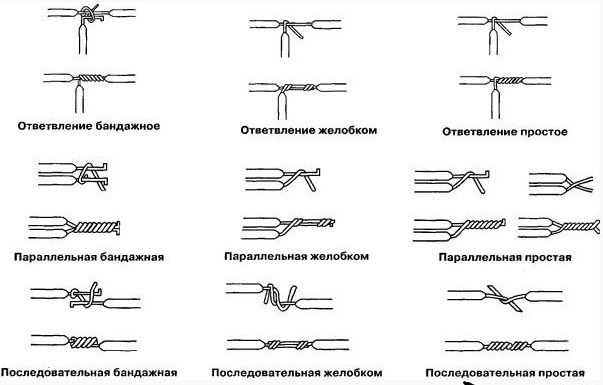
Ways of wire twisting
Instead of insulating tape, you can apply a shrink tube - tightening, it presses tightly on the contact surfaces, which will add reliability to the contact. Use twisting is undesirable, if there is a possibility of error - when unwinding the wires, the metal of the vein will crack, lose strength and conductivity.
It is impossible in this way to connect single-core and stranded wires - in this case, it is better to solder them or apply pressure testing with special sleeves. And it is absolutely unacceptable to twist together copper and aluminum - at the point of contact there will be electrochemical corrosion processes leading to loss of contact. As an alternative to twisting, you can use WAGO self-clamping connections.
The box in the box is a simple solution
Often junction boxes are sold together with mounting blocks that have a set of terminals for easy wiring.
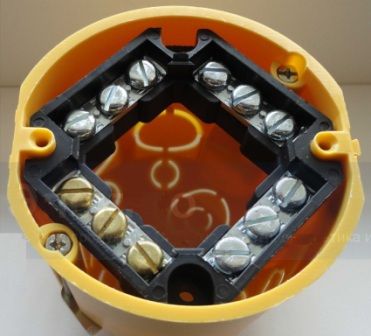
Type and variety do not matter, the main thing is that they maintain the voltage and current, and are suitable for wall material. Connection is carried out, as in the above diagram, at the indicated points connecting the corresponding wires.
We start with the phase conductor, we put it on the terminal, we clamp it, and immediately on it we connect the wire from the switch. Then repeat this procedure for the other terminals. It is always important to label the wires, this will save time in determining their affiliation.
Connecting the light switch to two bulbs
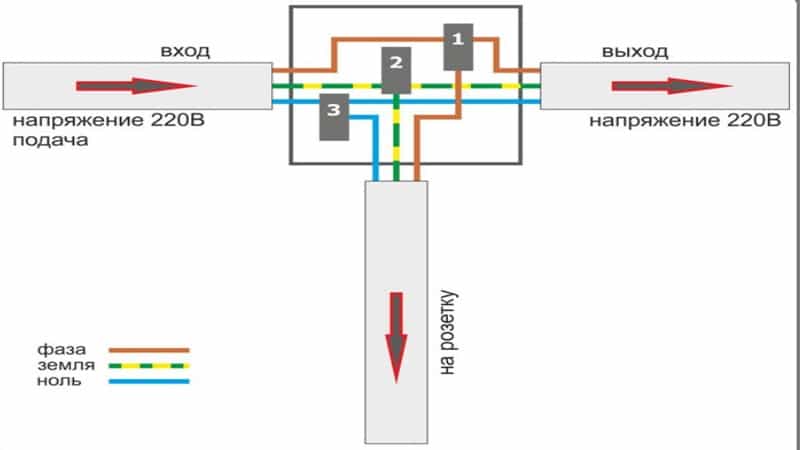
Connection without junction box
According to the PUE, there should always be access to junction boxes. In houses and apartments, where aesthetics comes to the fore, the lid on the wall will not fit into the composition of the style, discordant with the surrounding environment. Covering expensive wallpaper is also not the best solution - if necessary, they will have to be disrupted.
Therefore, in recent years, progressive methods of connecting switches that require a bit more cable, but excluding the junction box, have been used. The fact is that a deeper podzheetnik is used, and all connections are made in it.

In-depth receptacle instead of the box spreader
The phase wire is connected directly to the common terminal of the switch, the wires going to the bulbs are also connected directly to the commutated outputs, only the connection of the neutral conductors is carried out in the junction box. With sufficient skill, this method of connection can be carried out in a standard box.
the whole connection in the junction box. The principle of connecting wires is the same
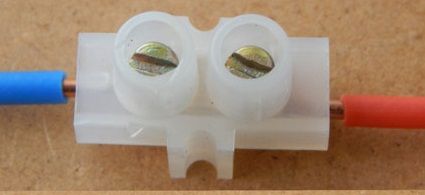
When replacing the switch, the old wire may break off. You can extend it with this terminal strip: