Antipyretics for children are prescribed by a pediatrician. But there are situations of emergency care for fever, when the child needs to give the medicine immediately. Then the parents take responsibility and apply antipyretic drugs. What is allowed to give to infants? How can you bring down the temperature in older children? Which medications are the safest?
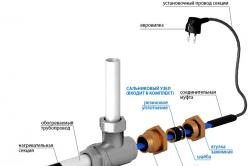
The main thing you need to know and always remember is not how to connect the light switch, but the fact that it provides a spark contact when the voltage is turned on. Any circuit breaker is a contactor for opening and closing the circuit, and hence a source of spark discharge. We remember about this, and below we'll talk about how to properly mount and test this device, what subtleties and pitfalls there are in this simple matter.
The main stages of connecting the circuit breaker
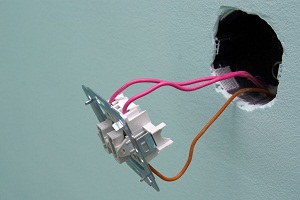
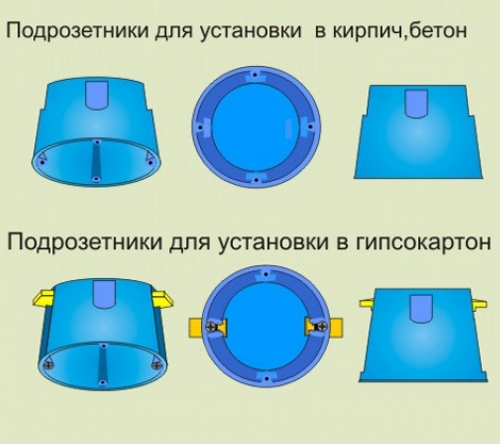
In any switch is important properly installed and fixed podrozetnik, a sufficient cable size (it is better to put a surplus behind the structure, and not cut off), as well as understanding where the supply wires, and where the ground (zero).
- The receptacle must be flush with the finish of the wall.
- It is inadmissible to leave naked wires inside, even if you can visually see that there is no contact between the wires! The switch is not the device in which "it will come down".
- When connecting the wires and when assembling the switch, do not use physical force. Modern devices require effort only when you incorrectly assemble the device. Stop, do not press, try to understand where you made a mistake.
- Check the operability check "by weight", until the end of installation. This will save you from wasting time on disassembling an incorrectly assembled node. If it is assumed that the switch will control several lamps, check its operation, sequentially screwing in one lamp, not all at once. On a note! It is easier to remove one exploding lamp than a few, and this happens at a short circuit, and believe me, it's easier to follow one lamp than several. They can explode in a row.
- On how to connect the pass-through switch, it is better to find out from a specialist. But, even having learned, draw for yourself a scheme of inclusion, compare with the physically laid line to avoid unpleasant surprises.
- Try to use switches with illumination, since almost all model rows today have such options. For a switch box (several in one place of installation), one backlighting is sufficient to indicate the position of all switches.
- At the end of the work, especially in unfinished rooms, use a small screen that will prevent contamination of the wall. He puts two minutes, and saves on washing the walls for about an hour.
It is easier to remove one exploding lamp than a few, and this happens at a short circuit, and believe me, it's easier to follow one lamp than several. They can explode in a row.
The photos show examples
Simple single switch with backlight and protective screen in the room to be trimmed. The main problem is that the door is too close to the casing. This is inconvenient to use, so when determining the location for the switch, walk around the rooms, touching the places where you plan to place them.

Double switch. The left key is light on the landing, the right light is on the stairs. Left key part through-switch, the second turns off the light of the site. The right key is also a pass-through switch that turns off the light on the stairs one floor below. The location is convenient, since the door does not interfere (the staircase), but the lack of lighting makes it necessary to turn on the light on the landing, when you go to the stairs, even if the light is not needed. It is decided to replace the switch with the backlight (immediately under the switch the first step and at night in the darkness it is simply dangerous to go down).
Block of two switches. Bathroom and staircase. There is already installed a switch with illumination (eventually all switches in the house will be just such). The protective screen is removed. Problem. When installing the air conditioner, it turned out that there were no free lines. Therefore, the air conditioner is powered with a circuit breaker. It was decided to use an unconnected outlet. But until it came out to figure out how to do it right, given the power of the air conditioner. Nevertheless, I had to figure out how to connect the switch from the outlet, providing separate power supply for the light bulbs and sockets. The author has not succeeded so far due to the peculiarities of the connection scheme for this floor. The air conditioner works when the light is on with the lamps turned out.
In fact, these examples cover the whole variety of switches except the adjustable (), so let's talk about how to properly install them. Let's start with how to connect a switch with two keys, in our example it will be at the same time and the manual how to connect the pass button, with a few remarks.
The practice of connecting switches
Unlike the rest we will not write - take a screwdriver, pliers, a multimeter, gloves and at the same time buy another, God knows what, then memorize our recommendations by heart. We'll do a little differently and figure out a perfectly working switch, showing in stages how it should be assembled in order to understand how to install a switch and achieve the same result. The person who made these photos has a remote relation to the electricians and is no different from many who will face the same problems.
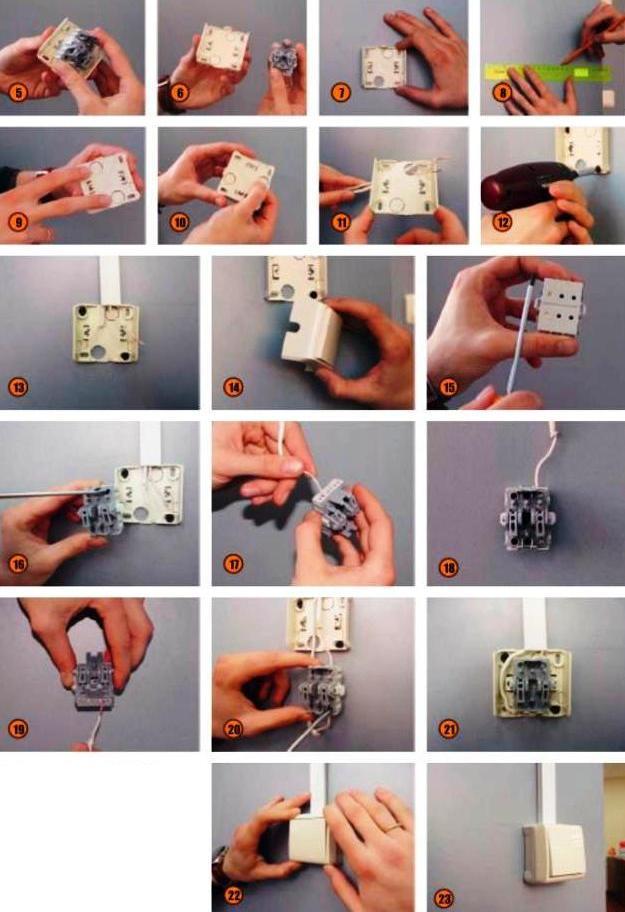
So, let's start disassembling this block. Recall, this is an end-hole and an ordinary switch in one unit.
We will need a knife with a thin blade, a screwdriver with a cross and a wide screwdriver (or a second knife). We poddenem key from the side and carefully (without damaging the edge of the plastic), remove it from the holder. Below is the plate-retainer made of brittle transparent plastic. We consider it and find edge hooks (where the knife is). Having picked up the edge of the plate with a knife, gently pull the hooks, walking in a circle, and then take out the plate
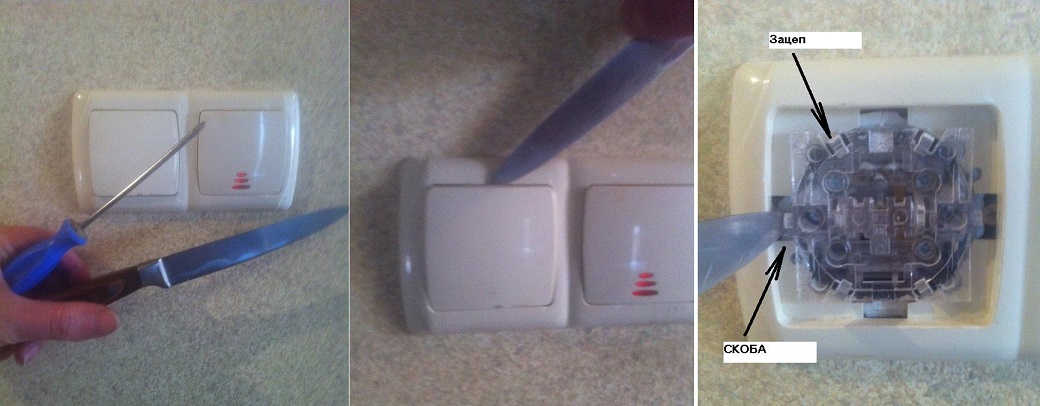
After removing the plates, the decorative frame is removed, since it holds nothing more. We add everything that we mount side by side not to step. In the photo below you can see how to connect the pass-through switch, in this four wires are wound at once. Do not try to repeat this particular configuration, the circuit-breaker circuit is individual! The switch is near normal, so it only has two wires plus a backlight.
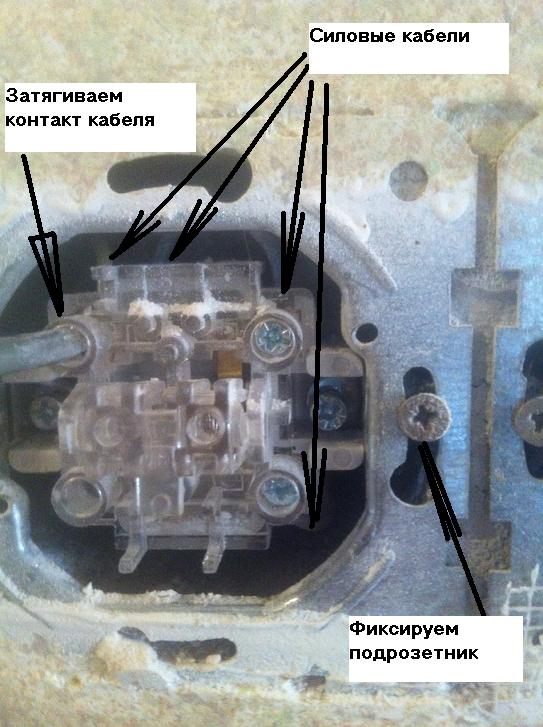
The switch is near normal, so it only has two wires plus a backlight. If the light is burned out, remove it from the socket, remove the cap, change it to a new one (it costs a penny and this is a standard element) and return it to the socket, which is clearly visible in the same photo.
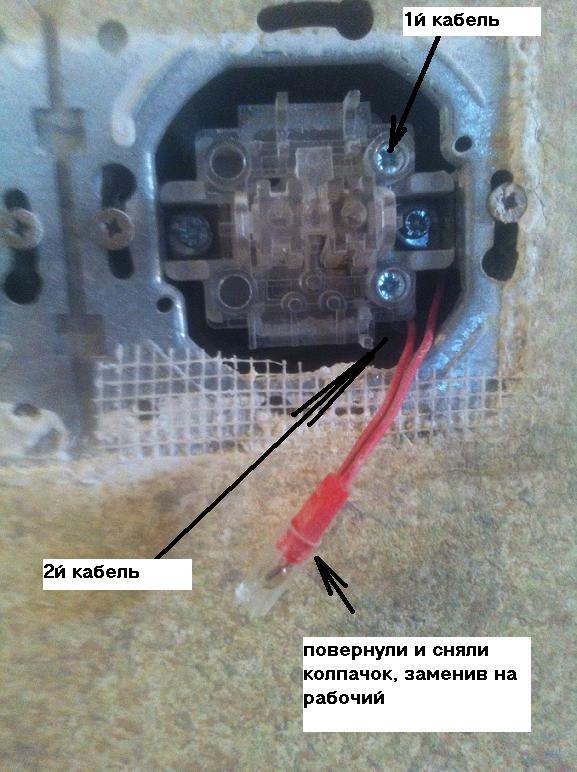
The picture shows why there is already no protective screen - the finish is complete, the plaster is shockproof and washable. When it was applied, the socket block was sealed with paint tape, and the finish was closed by the junction. Immediately visible and the main error of such works - no power failure .
Now we'll do the same with a two-key pass-through switch and look at the insides to figure out how to connect a light switch at all. It is clear that such a switch is actually two in one. In this case, these are two independent lines in one housing, since the lighting circuits of the platform and the stairs do not intersect each other and even are wound up in different protection automata. This switch uses all the loose contacts, two of which serve two wires each. There are no special difficulties in mounting, it is just necessary to correctly check the correctness of the connection.
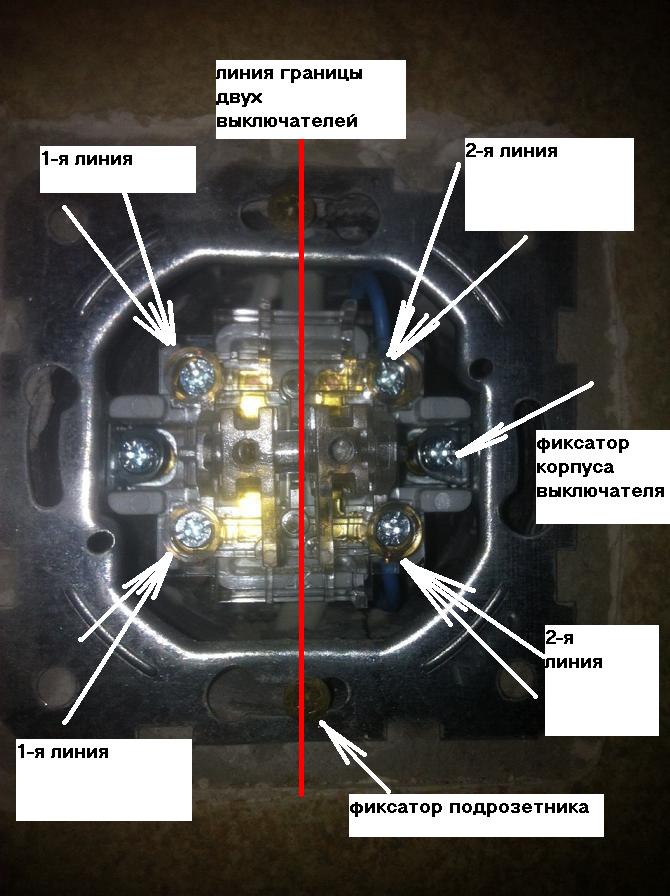
Still in the photo it can be seen that the mantle and the supporting frame are connected by a vertical axis of fastening, which left more convenience when aligning the switch body. All other switches in the house have exactly the same (upper-lower, and not left-right) fastenings of podzetetnikov and frames. The correct answer to the question "How to connect double switch? "Approximately this - it is best as two different, structurally assembled in one body and equipped with two keys. There are only three varieties:
- Two different, independent lines (as in the example).
- One line with an additional luminosity gain loop (usually a chandelier).
- Two lighting circuits in one room (main light and backlight).
Beyond the photo session, only two things happened: fixing the wires in the contact sockets, and securing the inner case of the switch to the socket with the help of sliding brackets, regulated by conventional screws. If you read our articles about and, no questions, these two stages of work will not cause.

A little about the subtleties of the process and small things.
Let's say how to connect the light switch we figured out. But what if the line already exists, and you want to additionally install a switch, but it's not clear how to do it. Or it would be desirable to establish a through switch, but it is difficult to understand, how much it is pertinent, and as it in general it is necessary to do. In all these cases it comes to the rescue, which must be designed and painted before starting any work with an electrician . In fact, it is considered that correct connection successive switches is an aerobatics electrician, especially if everything is done right the first time. Let's see how to connect the pass-through switch (or any serial light switch) in accordance with the electrical circuit.
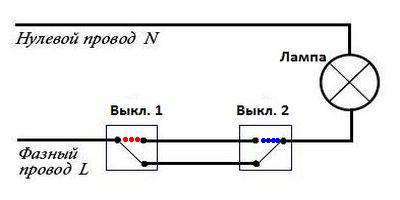
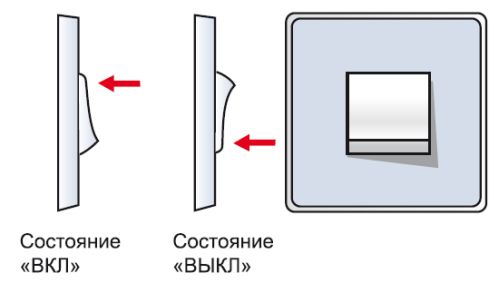
The black line is the position in which the light is on. Red dotted line - switch 1 is off. The lamp went out. Blue dotted line, switch 2 is on and the light is on. Look at the diagram, mentally change the switches and dots in places. Make sure that in any configuration, any switch is able to extinguish or turn on the light bulb. The tension just has nowhere to go.
The circuit-breakers operate in both positions. They do not have a "off" position, there is a position "off or on, depending on the state of the second switch". This is extremely important for any work because such switches are always live! The switch can be connected simply, and how to turn it off is a question - only completely de-energizing the line, which can have two automata.
You can do only one line from one switch to the second, if you are sure that you will cope with this task. If in doubt, lay another wire to the junction box.
The scheme assumes three variants of realization, including three switches, but first try to cope with two, after which the four switches will not become a difficult task for you - the main thing is to understand the meaning of the scheme. And the most important thing for a home electrician is to understand what scheme he implemented.
If you can explain yourself to yourself, then everything else will be a matter of technique and some effort. Take our word for it. And to the question - how to connect the light switch, it's easy! Good luck, but remember the security measures. And about what we advise always to give yourself time to think.
The sphere of application of double switches is multitude. They are usually connected to chandeliers in order to be able to adjust the intensity of lighting: to include a certain group of lamps, one lamp, or all at once. Another common application: the lighting of separate bathrooms or the connection of hoods and lighting.
In private houses, a switch with two keys often includes lighting on the street at the entrance or inside the hallway. Where lighting is carried out on a balcony or loggia, a double switch will also be appropriate so as not to install in the room 2 separate switches for each zone. Zoning of premises with the help of light or designer accents is becoming more popular, and double switches are often used to implement similar tasks.
Connect the objects to the switch with two keys on the shoulder of an average economic person. This will not require supernatural knowledge and skills. All that is necessary is to have a certain inventory and understand all the stages of the work.
First, you need to check the wires, that is, test which one is phase. Through indicator screwdriver it will not be difficult to do this: when the phase is in contact with the screwdriver, the signal LED will light up. Mark the wire so that you do not confuse it with zero when performing further operations.
Before you begin installing the switch, you need to secure your work site.
If it is a question of a chandelier - it is necessary to disconnect wires escaping from a ceiling. When the type of wires is identified and marked, it is possible to turn off the power (by using the appropriate automatic device in the shield) and proceed with the installation of the double switch.
Determine in advance and ensure that there is a connecting material for the wires. Usually used are:
- self-clamping terminals;
- screw clamps;
- caps or tape for hand-twisted wires.
The most convenient and reliable way is to fix the self-clamping terminals. Screw clamps can eventually weaken, and the tape has the property of losing elasticity, cracking. Because of this, the reliability of the connection can significantly weaken over time. Self-clamping terminals will provide a secure, durable connection.
For the accurate execution of all operations, you must have the following tools:
- 2 screwdrivers - flat and cross;
- a mounting or clerical knife or other device for stripping;
- pliers or side cutters;
- construction level.
Preparing the wires for correct installation
Depending on the type of device being connected, the preparation of the wires may be in various manipulations.
If you are installing a chandelier, where each lamp goes 2 wires, you can connect it according to your preferences. Modern lighting equipment often has ready-made wires already connected in a certain way. In this case, to change the combinations of lamps, you need to disassemble the base of the lamp. If this is of great importance to you, pay attention to the wires even during the purchase, in order to avoid unpleasant surprises when connecting the device.
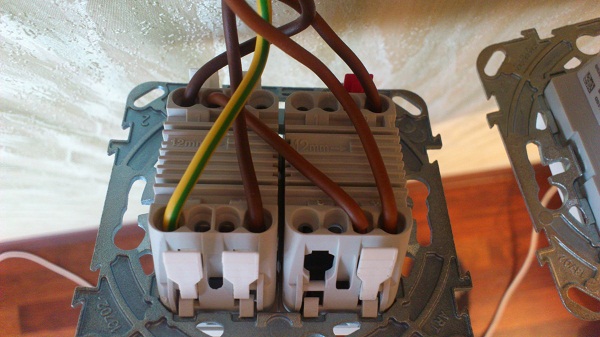
There are usually three wires out of the junction box. It is necessary that their length does not exceed 10 cm. This is quite enough for comfortable work. If the wires are longer - just cut them. Next, clean the ends of these wires from the insulation by about 1-1.5 cm and connect them to the corresponding terminals of the switch.
The phase is connected to the terminal marked "L", and the remaining wires - depending on which key switch you want to use for a particular section of the luminaire or individual devices.
If you have a modular-type switch, that is, consisting of two separate single-key components, you must provide power to both of its parts. To do this, make a jumper from a small wiring and install it between the two halves of the switch.
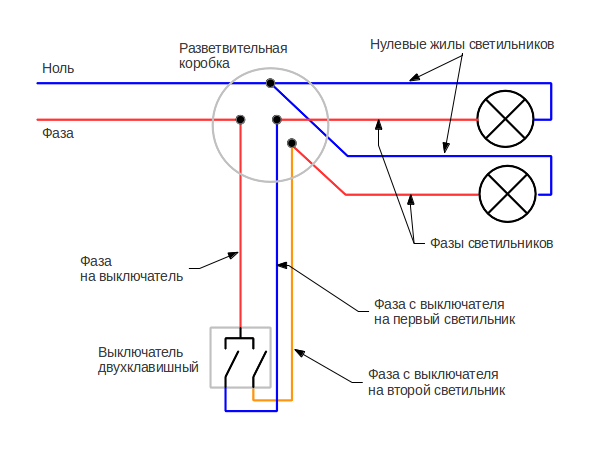
Diagram of connection of a two-button switch
The two-key switch consists of 2 single keys assembled in one housing. The zero and ground wires approach the sections directly, and the phase passes through the switch. Thus, when the corresponding key is triggered, a circuit is broken, that is, a phase that is suitable for a particular section of the device or a hotel device. 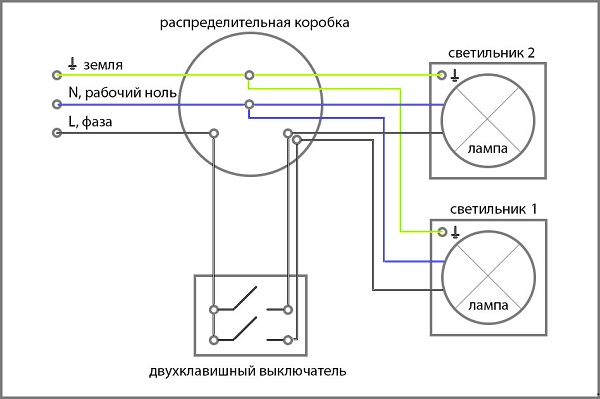
Connecting the circuit breaker to junction box described above. Often it is unclear how to perform wiring in place. There may be several options, depending on whether the number of wires on the ceiling coincides with the number of wires coming out of the chandelier.
- The simplest version: equal number of wires from the ceiling and chandelier (mostly 2 to 2, or 3 to 3). Here you just need to twist the appropriate wires, which you previously called and marked. Zero wire from the ceiling connect with zero chandeliers, and the phase from the ceiling - with the phase of the chandelier and always with the switch itself. The installation is finished.
- In the case when from the ceiling comes three wires, and you have more on the chandelier, you need to distribute the pairs in advance to the sections and connect each of them to only one of the phase wires. Both groups must be connected to the neutral wire.
- If you find that from the ceiling comes 4 wires, then one of them is grounding. Its presence is characteristic of modern buildings. If you have a similar wire on your chandelier, then you just need to twist them together. If not, then the wire coming from the ceiling must be isolated. Recognize the protective earthing wires can be a characteristic yellow-green color and labeling "PE".
Frequent faults are the operation of the circuit breaker in a manner that is not expected from you. For example, when the first key is pressed, a certain section does not work, and when the second key is pressed, all lamps are triggered simultaneously. That is, there is no distribution of luminaires to the switches of the switch.
Another option: when switching on the chandelier, only a part of the lamps are triggered, and all do not light up even when both switches are pressed.
Starting with the choice of the assembly site, the size, and ending with the connection of all the components according to the scheme - this is the secret of how to do it. Particular attention should be given to precautionary measures.
Is it possible to connect three-phase motor to a network of 220 volts? the article will provide an opportunity to understand how high-power devices operate in single-phase networks.
And finally, the most sad option: the switch does not work absolutely.
Most likely, when you connected, you did not observe the correspondence of certain wires and stuck them in the wrong order. You may have neglected the wire wiring on the ceiling and in the junction box, and relied only on colors and markings. And you should not do this in any case, because when posting a posting, non-compliance with the marking standards is very common.
In order to find the cause, you need to go back to the beginning of the installation and scrupulously follow all the steps.
Armed with an indicator, be sure to ring all the wires and mark them. In case of a suspicion of a wire fault, contact the masters. If there are no problems with the wiring, reattach the marked wires according to the scheme and be extremely careful.
Therefore, simple recommendations should be followed so as not to encounter problems in the performance of electrical work:
- before starting work, you must always turn off the electricity on the work site and take care that no one accidentally turns it on at the most inopportune moment;
- you must always act according to the instructions and do not neglect the deep comprehensive preparation: to check and label the conductors, properly clean them and prepare for subsequent operations;
- it is necessary to equip with tools, at least a minimum of adaptations is required, otherwise problems with reliability and strength of the connections can not be avoided.
Video on the circuit of installation of the double switch
For more detailed information on how to connect a two-button switch, we recommend viewing the video:
From time to time, every person who actively uses lighting in the house, there is a need to replace a broken or out of the way switch. Far not always it can make the qualified expert - the master-electrician, therefore to know basics of independent installation is necessary for own calmness. It is important to know how to install a light switch so that the work done by yourself is of high quality.
Switch: History and Evolution
The switches that were familiar today appeared in the late 1870s, thanks to the Edison invention. A few years later - in 1893 the light saw a prototype modern switch - Knife switch with spring mechanism and automatic. In the early twentieth century, the switches began to slowly take on their usual form. In the late 40's early 50-ies of the XX century, began to appear single-key products, later it became possible to purchase options with 2-3 keys. Today, this element of the home electricity network is equipped with lighting, has various forms and does not seem to be anything more unusual.
Selecting the dimmer: with one or two keys?
The convenience of controlling light in a room depends on many factors:
- own taste;
- arrangement of rooms;
- intensity of illumination.
One- and two-key on / off elements are the best solution for domestic purposes, because they are coping well with the load, but they will not stand if you have to work with powerful professional lighting devices - it's important to take into account.
They are suitable for work with both old incandescent bulbs, and with new, modern inventions - fluorescent lighting devices or diode lamps, ribbons.
The number of keys directly depends on the tasks assigned to the product - for example, to turn on light in a separate type of bathroom, it is better to purchase an element with two keys to save electricity. In small rooms is ideal single-key option.
The tricks of choosing a lighting controller: connection without problems
Before proceeding to the connection, it is important to learn the tricks of choice. Today, there are many models that allow you to control the level of lighting in rooms. If the choice fell on the rheostatic models, it is important to remember that they allow you to choose the level of light, smoothly adjust the brightness of the light bulb. However, this option is the most profitable, but it is only suitable for the most simple lamps glow and, having installed such a controller of light, they will have to use exclusively them all the time.
The body must be made of durable and necessarily fire-resistant plastic. The internal base can be made of ceramics. If the backlight is installed, which is very often used in modern models, it must be remembered that such a switch is always under tension.
How to correctly establish the elements of regulation: determination of the amount of light, preparatory work, connection and tools
Before proceeding with the installation, it is necessary to determine where the switches will be located, since the convenience of controlling the light in the room depends on this. The connection itself is not difficult, so the desired amount of light is easy to achieve. After that, it is important to check the availability of all the tools you need:

Installation work: ways to install light connecting elements
There are several ways to properly connect the controllers of light. All of them are not complex, do not require much time and effort, but some knowledge in this matter is mandatory, so that then the light sources would gladden the eye and could meet the needs of people.
Sometimes it is necessary to turn on / off the light in rooms from different places, especially if the room is large. For this purpose, usually different lamps are installed. For example, a person wants to control lighting in a room from the hallway and, in fact, from the room itself, there are 4 to 5 light bulbs in the chandelier, that's why you need to know how to connect the light through the switch in order to "play" with lighting at your own will.
In fact, you need to make it so that you can manage different groups of bulbs in the chandelier, for example, in a combination of 1, 2, 5-4-5 pieces at a time.
In order to change the number of bulbs in the group and you need to know how to connect the light switch.
Connection diagram
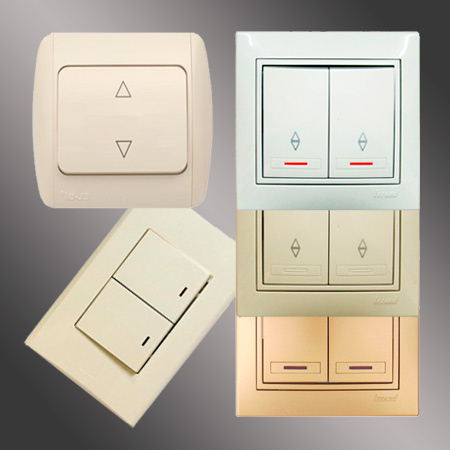
To make a connection, you need directly the controls themselves - single or double - depends on the need and desire of the people doing the repairs. It is more convenient to use two-key pass-through switches, when it comes to the hallway.
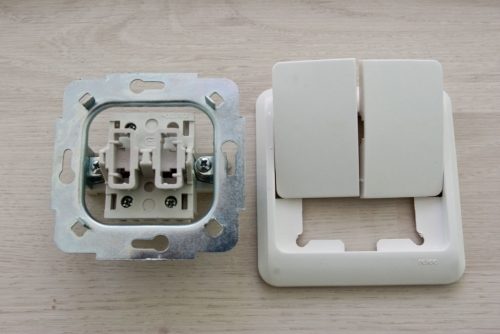
That's how it looks in disassembled condition, completely ready for installation:
A double or, as it is also called, a two-key illumination control element - there are always six contacts - respectively, two inputs and four outputs. Connection is made based on these features.
The connection scheme looks like this:
In fact, these are two single elements connected in one reliable housing. Here you can see how to connect a double light switch so that further operation is as safe as possible for a person, convenient and practical.
The scheme, designed to control lighting at the same time from three places in the room, does not differ much from the previous one. The difference is that it includes another element of the double type - cross, which differs from single and double, since it has four contacts, and not six, as before - two inputs and two outputs, respectively. When pressing the double paired switch, two independent contacts are immediately triggered to switch.
It is important to note that the total number of lighting control points from one switch installed in the room is not limited to two or three, it can easily reach five to six. This is done in the following way: the switch is used single for three contacts, in conjunction with it, another one is installed on four contacts.
Start work on creating the ideal light in the room
It is necessary to check the availability of all the tools beforehand so that the connection can go smoothly, since then leaving an unfinished control will be just dangerous. After this, it should be checked whether the wiring and lights installed in the room are working properly.
A single-key version of the built-in type is usually installed in the corridor or hallway. So look for one- and two-key options:
With the help of these developments it is convenient to create ideal lighting in the corridor.
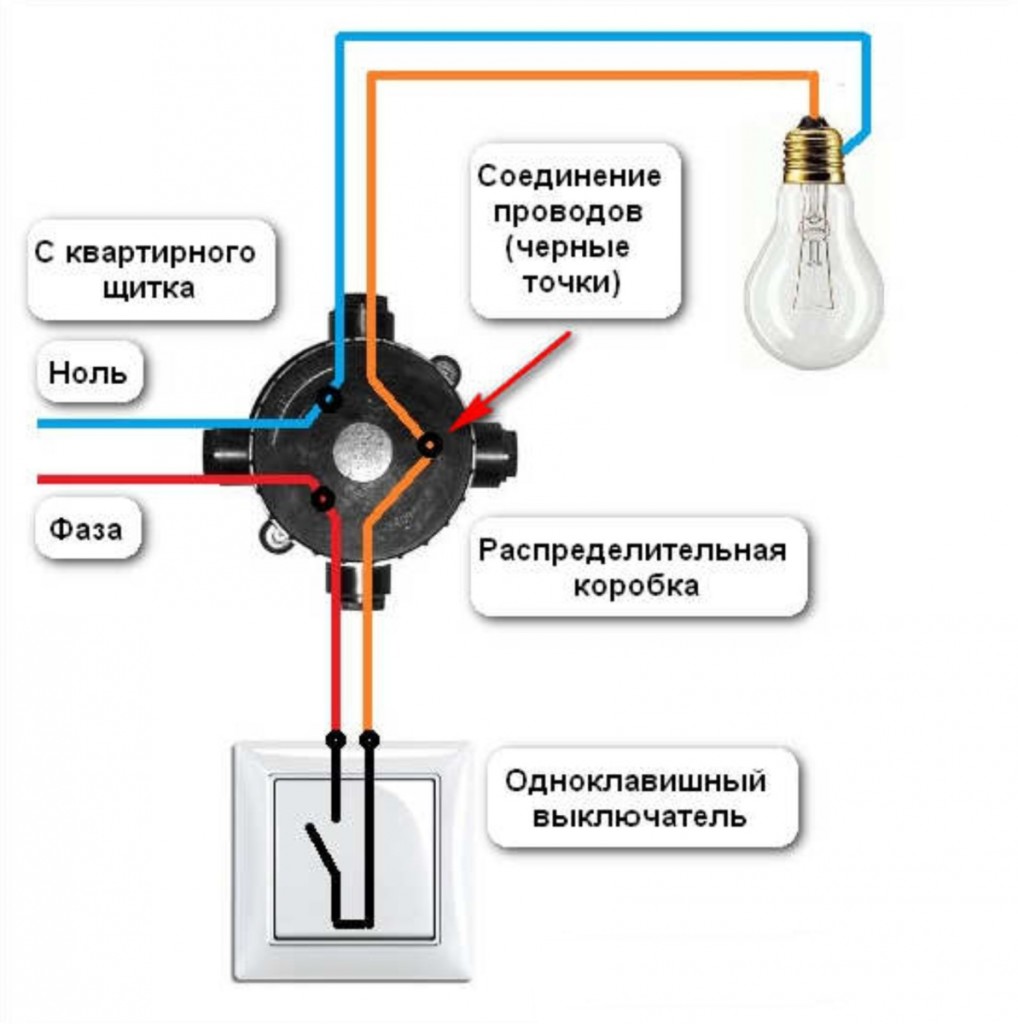
Connection diagram single-key switch - The most simple, because only one switch has 2 wires. To connect the light switch to one light bulb it is possible from the apartment switchboard, here the phase is the red wire, zero is the blue wire. Voltage comes in the junction box, which is located in the corridor.
The phase is connected in a junction box with a red wire that goes directly to the switch. From it, the wire marked orange in the diagram goes back to the junction box, where it also connects to the orange wire that goes to the lighting device, which is also a load in this circuit.
Zero, in turn, is connected in a junction box with a wire marked in blue, which immediately goes to the light bulb. For connecting the wires in the junction box it is convenient to use terminals - with them the connection will be faster and more reliable.
Important to remember!!! The switch should always break the phase, but not zero.
When replacing the lamp, it will be sufficient to disconnect only the switch and there will be no voltage in the cartridge. If you confuse and break zero, then when you replace the lamp, it will remain energized in any case. This happens if the switch is equipped with a light-emitting diode, which always glows in the dark. Connection of new elements in this case will occur under voltage.
Nuances of work: connection of light
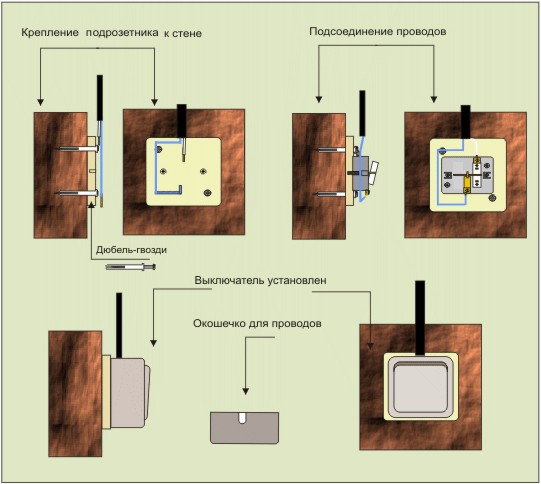
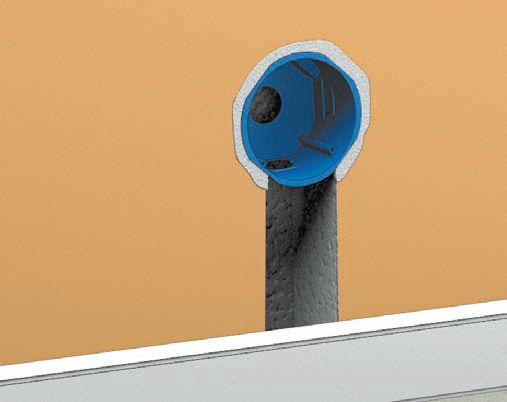
There are two types of installation - with open and closed wiring. In the event that it is a question of installation with an open wiring, then a podzheetnik will come to the aid, which is installed in the wall. It is already attached to the selected switch according to the above scheme.
Fastenings are made by screws, dowels or screws - the choice of fasteners depends on the material of the wall and the type of the switch. The holes, into which the switch is then swirled, are drilled in advance with a drill. After connecting the wires, an insulating cover is applied and screwed using special hooks. The key, by means of which the regulation of the amount of light in the room will be made, is put in the last turn. As you can see the connection of light - the case is accessible to most people, you just need to carefully study the instructions and act according to the scheme.
![]()
This is what the junior suits look like:
So - disassembled switches, ready for installation

On the video you can see the whole process of work and clearly see all the features that can wait for a person during installation:
You can install the switch yourself, even without special education. Difficulties can be expected only by those who are afraid to work with stress, as they will have to overcome their fear. In the rest, today there are detailed manuals and video tutorials that allow you to do any work yourself, without the help of masters, who sometimes have to wait for several days. However, if a person feels insecure or afraid of himself - it's better not to take risks and not experiment, but to use the services of a specialist - it's safer and more reliable. Thus, the connection does not take away much effort, time and nerves.
Previously, the light in the room was lit, simply by turning the bulb in the cartridge. This is not only inconvenient, but also unacceptable for modern lighting devices. Now an important element of the lighting system is the switch. This simple device can be installed independently. About how to do this, is described in our article.
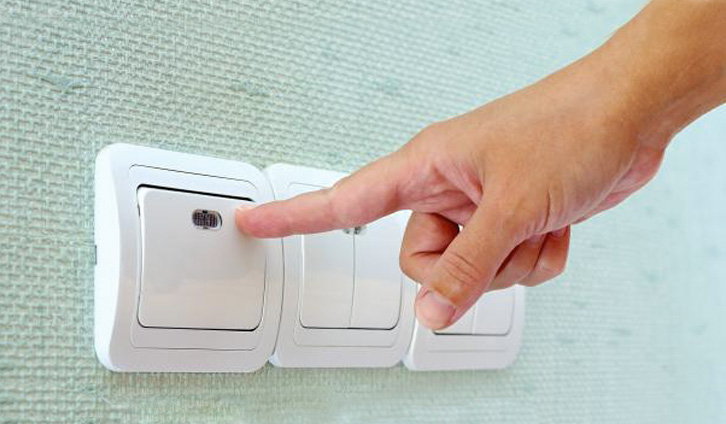
In the most familiar form, the switches are a small button that can be pressed or closed electrical circuit lighting the room.
The location of the switch can be different, it all depends on the user's preferences. Earlier, the cherished button was set at the eye level of a person of medium height. Now the switch is mounted so that to bring it into working state it is not necessary to raise the hand.
The principle of the switch is simple. In order to burn a light bulb, two wires come to it, which are called phase and zero. From the distribution box only the phase is released to the switch. Here it is broken into two wires: one goes from the box to the location of the switch, and the other from the switch to the luminaire. The connection and disconnection of the phase wires is carried out thanks to the key.
Types of switches
Structurally, all the switches that are offered now in the market of electrical goods, are divided into single-key and two-key. In addition, they may differ depending on the type of connection:
- closed are used where the wiring passes in the wall and a place is prepared for the installation of the switch;
- external switches are connected to external wiring, which is much less common today.
Let's start with a description of the design and method of connecting closed switches.
Installation of a closed type switch
At the installation site of the closed switch, there must be a cylindrical groove in the wall, usually equipped with a receptacle, which is a metal or plastic glass, through the bottom of which the connecting wire emerges. Conveniently, the length of the wires for connecting the switch is 10 cm.
How to install a closed one-key switch
Whatever the switch, before you start installing it, it is important to determine which of the wires is live and which one is not. After this, it is necessary to disconnect the power supply to the installation site of the device and again check the presence of current on both wires.
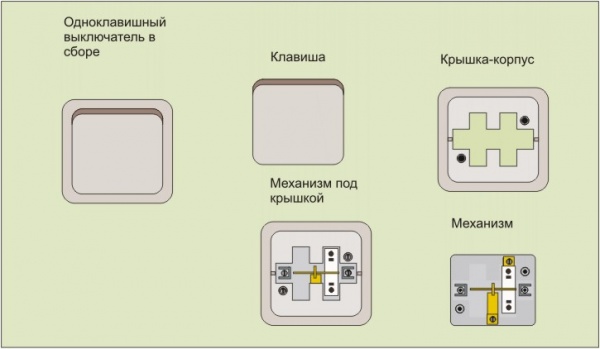
One-button switches may differ slightly depending on the manufacturer and price.
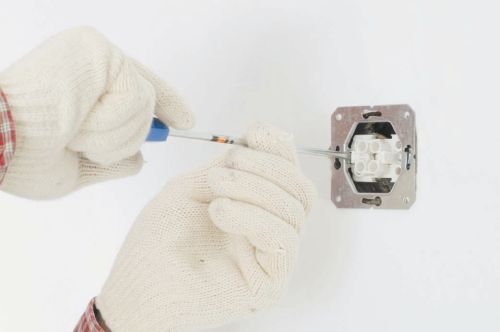
The simplest design is the device, the price of which does not exceed 80 rubles. On the mechanism of such a switch, there are mounting clips for mounting, which are tightened with screws. To connect each of the phase wires there is also a screw, to which the holes lead. The entire installation includes the following steps.
Step 1. After the phase is completely de-energized, start the preparation of the switch itself for installation. To do this, remove the button from the frame. Under the key there are two screws connecting the mechanism to the front side of the switch. They are unscrewed, disconnecting the frame from the operating element of the switch.
Step 2. Unscrew the screws to connect and fix the wires.
Step 3. Remove the insulation from the cables, leaving bare about a centimeter of each wire.
Step 4. In the holes leading to each screw, insert the phase cables so that the exposed wire section does not fit into the groove by 1 mm of its length.
Note! Even on some cheap switches on the back of the working mechanism, the points of the input and output terminals are marked with symbols. The input can be indicated by the number 1 or the Latin letter L, the socket of the outgoing cable is marked with the numbers 3, 1 (if the input is marked L) or an arrow.
Step 5. Screw the screws that fix the contacts and check how tightly the connection is made. The ends of the cables should not move freely.
Note! The screws for cheap switches, as well as the thread for them, are not particularly strong, so do not over tighten the fasteners.
Step 6. Now the mechanism is placed horizontally horizontally into the juniper.
Step 7. Fix the workpiece with spacers, tightening the screws that adjust the spacers. Check if the circuit breaker is securely mounted.
Step 8. Apply a protective frame to the mechanism and fix it through the special holes with screws.
Step 9. Install the keys.
The installation of the switch is complete.
Single-key devices, the price of which is above 90 rubles, differ slightly in their design and installation process. In the beginning, do not forget to check the active phase and turn off the power supply.
Note! For more expensive switches, the frame is sold separately, and the device itself consists of a mechanism and a key attached to it.
Step 1. Before proceeding directly to the installation of the switch, install a special plastic pad. It is mounted in a concrete wall with the aid of alabaster.
There is a special hole for the wire in the jar.
Step 2. Remove the key from the mechanism.
Step 3. The wire holes for such a switch do not have screws, but are arranged so that the contacts in them are securely fixed. For this, the wires are inserted into the slots according to the pointers: L - inlet, down arrow - exit.
After the exposed contacts are inserted tightly into the holes, it is necessary to check the strength of the connection. For this, they pull the wires lightly. If you need to pull out the cables for some reason, then click on the special lever located on the side of the mechanism.
Step 4. Mount the mechanism in the podrozetnik strictly horizontally and fix it with screws.
Step 5. Install and fix the frame by means of a special latch.
Step 6. Secure the key.
The switch is ready for operation.
Two-key switches and their installation

Such a device is installed to control chandeliers with a large number of light bulbs or, for example, for a separate bathroom. The design and installation principle of a two-button switch is not very different from a one-button switch.
The difference is that 3 phase wires are suitable for the switch: one is the input one, the other is the outgoing wire. Only the first cable is live.
The cheap switches do not have any notation in which slot to insert the wire. Actually, it's hard to get lost here. On top is a single screw, so a wire is connected here, supplying current. The lower grooves are provided for the de-energized phase.
At more modern and expensive devices on the back side of the switch there are following designations:
- when it is only a question of digital symbols, then 1 is the supply wire, and 2 and 3 are the lead wires;
- if there are L, 1 and 2 or L icons on the mechanism and two arrows, connect the supply wire to L, the outgoing wires to the others.
Note! If you do the wiring yourself, then all 3 wires are better to make different colors.
Otherwise, the installation does not differ from one-button switches.
How to install other types of switches

Outdoor devices are installed even easier. They do not need podrozetniki, but it will be necessary to drill holes in the place of installation for dowels.
Switches with illumination on the keys are slightly more complicated, but this does not affect the mounting process. And devices that respond to voice, cotton or other signals are supplied detailed instructions on installation.
Video - Installing the switch yourself. Connection of a single-key switch
Video - Wiring diagram for a two-button switch