Antipyretics for children are prescribed by a pediatrician. But there are situations of emergency care for fever, when the child needs to give the medicine immediately. Then the parents take responsibility and apply antipyretic drugs. What is allowed to give to infants? How can you bring down the temperature in older children? Which medications are the safest?
Without the switch it is impossible to activate the lighting fixtures, so from correct installation This simple adaptation depends on the ease of operation. If a single switch normally does not have problems, then the triple-switch connection scheme sometimes causes difficulties - then a multi-rounder chandelier or combined lighting can not fully work. Without elementary knowledge of the scheme electrical circuit it is difficult to correctly connect a triple feedthrough switch or other electrical devices, and this is important to understand in more detail.
House lighting control
The switch is one of the simplest devices for controlling lighting in the house. However, when self-adjusting electrical wiring in the house, it is important to exclude all possible mistakes in the connection of the circuit breaker to ensure efficient power supply of lighting devices and other devices operating from the network. For today, several versions of switches have been developed - automatic, pass-through, single-key and multi-key. In order for each of them to work properly, it is important to know the connection scheme and the principle of operation.
The main types of switching modules are:
- switch with presence or motion sensor;
- single or one-key through-switch or switch;
- switch with indicator;
- double or two-key pass-through switch;
- one-button switch;
- double-switch or double switch;
- three-key or triple-breaker;
- circuit breaker;
- switch with night illumination;
- dimmer or dimmer.
Each type of circuit breaker has its own specifics. It is difficult to give unequivocal advice when choosing a version of the switch, but they are all designed for certain functions. For example, if the control device of the lighting device has 3 keys, respectively, it is intended for a multi-pedal chandelier, which is included in 3 stages - 1 light bulb, 2-3 or full. This is very economical and convenient, so as not to unscrew unnecessary light bulbs. A pass-through switch is designed for long corridors and stairs so that you can use one module to turn on the lighting at the beginning of a long passage of the corridor, and at the other end the second module will turn off the light.
Most switches in their design are very simple devices, they have:
- the outer part of the box with the switch-key;
- internal, where the network closes.
If you do not go into the details of the circuitry of the circuit breakers, they visually differ in the number of keys for switching the lighting;
- single;
- double;
- triple.
Triple switches are used:
1. To control one complex lighting fixture (ceiling chandelier).
2. To control lighting of different types from a single point, for example, lED Strip Light and sconces in the bedroom.
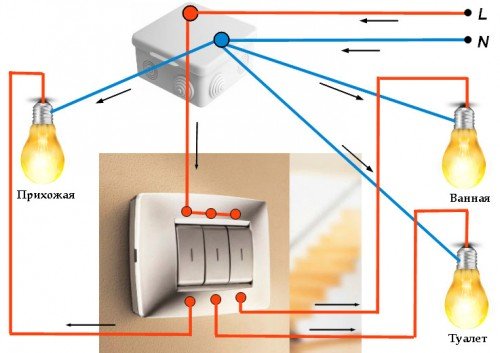
3. To turn off the lighting in different rooms from a single point, for example, a bathroom, a corridor and a toilet.
4. For advanced lighting control, when the triple-pass switch enters the control system by different types of lighting devices.
A single switch is installed at the entrance to the room or into the house, and sometimes it is mounted in another room. For example, it is very convenient to include a storeroom and kitchen from the hallway or corridor. This switch is enough to control a single bulb or a low power lamp.
The simplest circuit for connecting a simple switch:
A double switch is also used to control the lighting of 1-2 lamps of moderate power in a small room. Usually it is used in living rooms - children's room, bedroom, living room, kitchen. Very convenient such a switch for a separated bathroom - the bathroom and toilet are turned on in the middle. Such a switch can control 2 groups of lighting fixtures - a double-inclusion ceiling lamp, a lampshade and a lamp, a chandelier and a floor lamp, etc.
The simplest connection scheme two-key switch:
Triple switch is most convenient and multifunctional, because with its help the operation of a triple-throw chandelier or the work of 3 different groups of lighting devices is regulated. It is most convenient for switching off from one point 3-z different rooms. In a complex light-design such a switch can work according to the diode-illuminated "half-wall-ceiling" scheme. In addition to houses and apartments, three-key switch boxes are used for lighting control:
- in production premises;
- in warehouses;
- in office premises.
Wiring diagram of triple-breaker:

How to choose a suitable switch
Once upon a time switches were push-button and only single, and today the most common 1-, 2-, and 3-key switches are. In Europe, to unite a larger number of keys with a common frame, I combine several 2-button switches. On the American continent, boxes with more than 3 switches are manufactured, in South Korea they followed suit - there are 6-key modules, and each has its own color indicator, so as not to confuse the switches. The backlighting of European switches does not always have a backlight, most often it only has a 1-key box, but it is very convenient when searching for it at night.
1. Pass-through switches differ from simple switches schematic diagram - one and the same closed circuit can be opened in different parts of the corridor. Thanks to this, you can come to the house at night, turn on the light on the stairs, go up to the top floor and from there turn off the switches of any floor. No other switches are different from conventional switches. However, when buying it is important to know that inadvertently do not purchase a triple switch instead of a three-button switch, although visually they differ. It is for this purpose that on the packaging of the imported production goods, it is necessary to print a connection diagram or make explanations on the inside of the switch box.
2. Dimmers (dimmers) have a specific function - not just turn on the light, but also regulate its brightness. When there is no sense in bright blinding lighting, then leave a small percentage of the highlight. To select a dimmer, it is important to take into account the total load of the circuit breaker, so they are usually bought with a power reserve. For example, for a three-round ceiling-mounted chandelier with 75-100 watt bulbs, the wave is sufficiently dimmer with a marking of 300 W.
3. Sometimes the switch is confused with diode illumination and a control switch with an indicator. Outwardly they are similar, but they have different purposes and a scheme of work. A diode bulb at night will indicate the location of the switch in a dark room or when descending to the ladder. But the indicator has another functional - a glowing lamp at the control switch indicates whether the device is turned on. These switches are used to find out whether light is switched on in a remote room - in a garage, a basement or a summer kitchen. The indicator is not on when the dark room is dark - there is no need to go outside in the winter night to make sure.
4. Switches with protective casing are used for:
- swimming pools (indoor and outdoor;
- bathrooms;
- combined bathrooms;
- saunas or steam rooms;
- for controlling outdoor lighting devices.
In them, everything is thought out to counteract increased load on the indicators of air humidity. They are not afraid of the flow of water, if the water tap is broken, or the spray bathe in the pool. For this, the inside of the box is protected by rubber or plastic protection. Of course, you should not specially water this switch with a head of water from a flexible shower, to check the reliability, but with occasional splashes on their work you can completely rely on.
5. An interesting device is an anti-vandal switch for places of mass visiting, which are made of impact-resistant plastic or alloy. This is an ordinary switch with an "amplified" box, and when correct installation it is difficult to break, break, burn or knock down a heavy object. This is provided for large shopping centers and banks, so that intruders do not take advantage of the fragility of the design for criminal purposes.
Attention: But not only the boxes of vandal-proof switches are made of metal and especially durable plastic, but also control devices for lighting devices of exclusive series. They are thought out in such a way that they can not short-circuit and lead to a fire even in an emergency situation, for example, when a door is blown up.
How to choose the best quality switch
Causes of breakage of the switch:
- poor contact on contact plates - sparks and heats up;
- unreliable box and wiring connection;
- small deformations in the plastic box can give cracks;
- defect of fastening of keys - the plate can fall away or fall.
Tip: Check the product you purchased, check:
- complete, according to the instructions;
- marking, physical quantities (voltage and current);
- compliance with the intended purpose (dimmer, switch, indicator, backlight);
- the presence of instructions with a scheme and a check (you can exchange a defective product).
Only after that you can leave the store with a new switch and engage in the installation and connection of the switch. You will also need a tool:
- pliers and nippers;
- voltage indicator;
- cross and flat screwdrivers;
- screwdriver.
The simplest way to install a triple switch
Before starting the triple-switch installation, prepare the tool, turn off the power switch and disassemble the wiring on the wall where the 3-button switch box will be stopped.
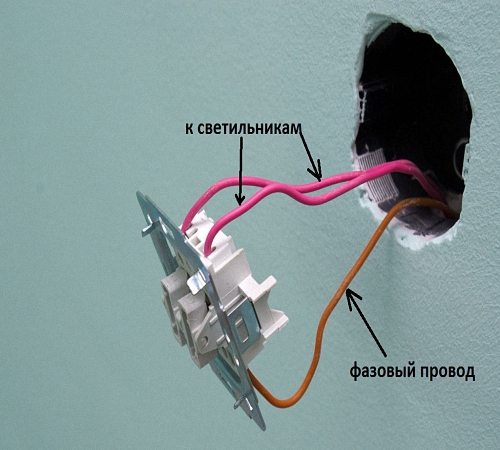
A bundle of 2 wires with 3 cores and 1 three-wire wire is important not to mix up where the phase is, and where the zero phase. These 2 wires are phase, but there may be other options that are different from this standard. The assignment of the wires should be determined using a voltage indicator - a phase wire is placed on the switch, if it is not yet clear how to connect the triple switch. Remember that it is also necessary to install the sub-socket if it is not available.
The zero phase is fed to the lighting fixture, and the breaker itself gives a phase discontinuity. But even when it is connected to the zero phase break, the circuit also works. Phase leashes after checking the indicator is better marked. Phase beams can also be checked using a conventional lamp glow when there is no indicator. It is enough to take a cartridge with the wires withdrawn and close to an obvious result.

When the lamp glows in a half-full, this phase break, the pure glow of the lamp burning is the zero phase. When the lamp does not turn on at all - hit on 2 phases or 2 zero. If in doubt, check everything again. The lamp is fed with 2-wire wires, and the 3-wire wire is placed in the switch box, where the phase and zero, and the ends with zero-phase are brought under the screw on the case of the switch. Next is the connection of 3-phase wires leading to the lighting device.
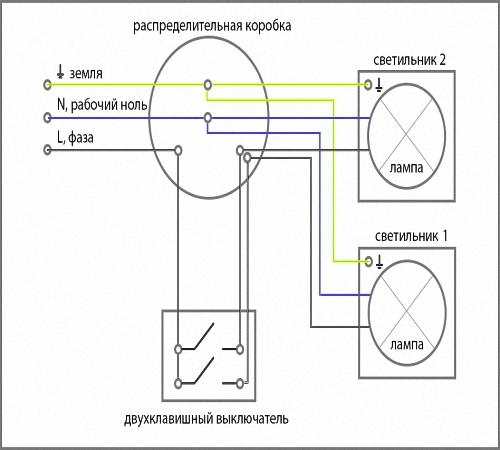
How to connect the triple switch: wiring diagram
Note: Remember that the triple switch controls the operation of the lighting fixtures or lamps in different rooms. It is important not to confuse anything, otherwise the rightmost key will have to include the room on the left or vice versa!
The installation must be carried out only according to the triple-switch connection scheme. Zero - directly to the lamp, phase - to the switch.
Tip: If you are connected yourself, you can save on calling a specialist, installing a switch box, a luminaire and an internal installation padding. But if you are having trouble installing the junket, grounding and the trip circuit switch itself, use the electrician's hint. Around the switch is also worth installing a special transparent shield, so as not to get the wallpaper from the hands.
The triple switch is used to separately control the switching on / off of three groups of lamps or lighting devices. This is much more convenient than installing several separate switches for each light source, besides, one switch looks much more aesthetic in the interior.
The device and operation of the triple switch
This product combines 3 switches in one compact housing. There are three outputs for the load and one common contact. Each of the three circuits is controlled by one of three keys - when you press a key, the connected lighting devices turn on, when all three are pressed, all the consumers connected to the switch are turned on.
The installation of this device makes it easier to control the lighting equipment in the room, adjust the intensity of lighting and economically expend electricity. In addition, the triple switch is designed to connect high-power consumers. If for single and double-key products the maximum permissible value for power is up to 2200 W, then for a three-key one this value can reach 3500-3700 W. This allows you to connect it with several lighting devices or with several groups of instruments.
Product Application Options
- Adjust the intensity of lighting chandelier, which has 5-8 lamps.
- Control of three wall lights.
- Creation of separate light zones when connecting to the false ceiling lighting.
- Connection of lighting devices in several rooms, for example, a bathroom, a hallway, a kitchen.
- Separate switching on / off of the fan and lighting fixtures in the toilet and bathroom.
- Management of three rows of lighting devices, for example, between shelves in warehouses, libraries and other demarcated rooms.
Important Features
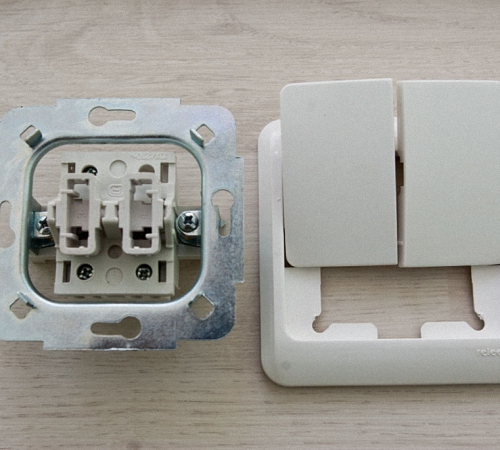
Type of installation. Most three-key switches are designed for concealed installation, so for their installation in the room should be concealed wiring, and you will have to groove the hole in the wall for the installation of the switch. On the surface of the wall will remain keys and an elegant decorative frame.
Material of manufacture. The keys are usually made of ABS plastic, which is resistant to mechanical influences and burnout, besides, it is easily cleaned of contaminants.
In our online store you can buy a three-key classic white switch or made in color for oak, pine, alder, etc. Detailed descriptions and characteristics of each product can be found on the product card, where you can place an order by clicking the button "Buy in 1 click".
The advantage of the three-key switch is that it can be used to adjust the intensity of the lighting in the room. Such a switch is used in long corridors, in rooms with several levels of lamps, and also in those cases when lighting from several points is controlled from a single point. For example, in the bathroom, toilet and kitchen. To make the switch work properly, you need to know how to properly connect it to the mains. This is what will be discussed.
Preparatory work
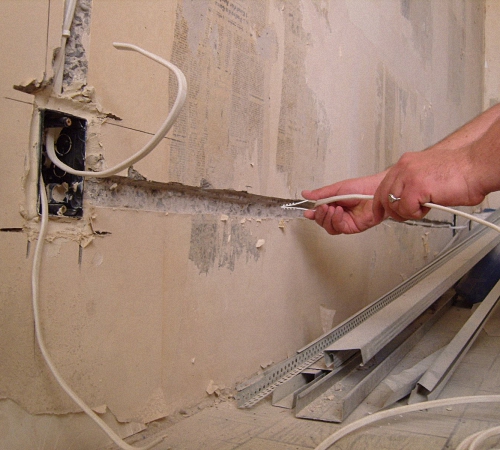
To connect the three-key switch it is necessary to prepare for him place on the wall. If the wiring in the house or apartment is external, it is enough to bring to the place of the supposed placement of the wire from junction box, having laid them preliminary in a cable-channel.

The approach of the cable channel to the lamps of illumination
If the wiring is hidden, then before installing breaker the wall is first mounted to the wall, to it (with the help of a stunt in the wall) is fed a 4-wire cable from the distribution boxes. All this is fixed with the help of wiring alabaster.
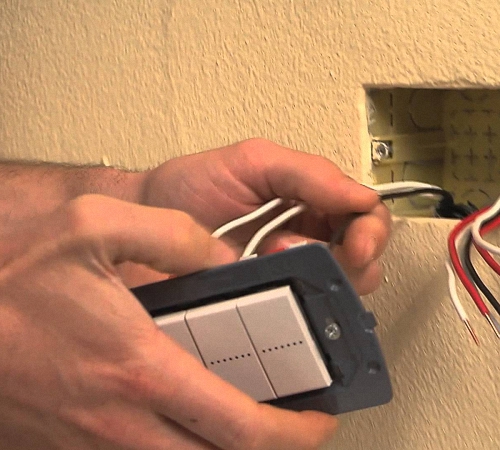
The cross-sectional area of each cable core must be at least 0.75 mm 2. The installation is made already on a completely finished wall - after finishing (painting, gluing wallpaper, etc.). If you just need to replace switch, then the problem is simplified. You just need to dismantle the old one switch. To do this, remove the keys, poddev their nail or screwdriver with a flat spline, and unscrew the fastening screws. After removing the protective casing, it is necessary to remove from the base plate the plinth and disconnect all the wires.

Example of removing the switch key
Dismantling of the circuit-breaker can only be carried out in a de-energized electrical network. Neglect of safety rules threatens to receive an electric shock, with all the ensuing consequences.
Power is turned off at switchboard houses (apartments). Automatic flag breaker stresses must be in the off position (down).

The check box of the circuit breaker is lowered downwards
To finally make sure of the safety of work, it is recommended to additionally check the voltage at the terminals breaker household indicator or tester.

The built-in LED lights up under voltage
For convenience of further installation, especially if this is done for the first time, it is desirable to mark the phase wire with a marker. It is located separately from the others, in the same way it must be installed in the future. With proper observance color marking, the wire with the phase is painted in red (or brown) color.
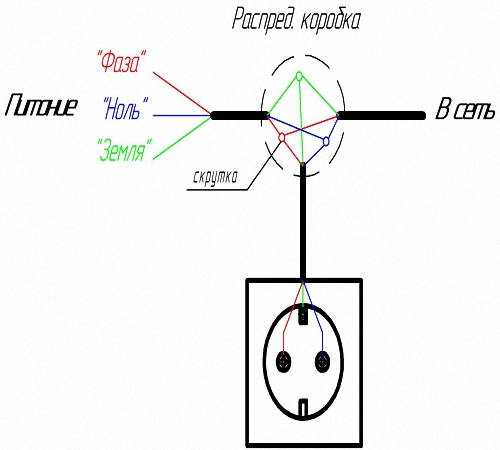
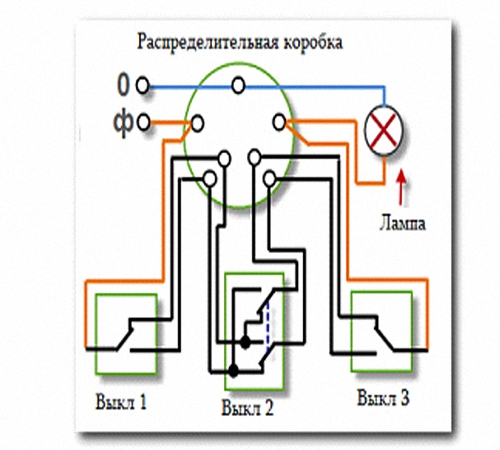
Utility and connection diagram of triple breaker
Principle of operation breaker is quite simple. By pressing the key, the lamp power supply circuit is connected or disconnected. Inside the socle are movable copper contacts. Moving the keys up, the contacts are connected, moving down - they open. On switch phase wire is fed. Zero is fed to the lamp from the junction box.
Example of the distribution of lighting functions on the keys
Use of the three-key breaker allows you to save space on the wall, simplifies installation work. In addition, when using such a breaker energy is saved (up to 20%), as it becomes possible to turn off unnecessary lamps. Different combinations of keys can illuminate only the space that is needed at the current time, to separate the lighting by levels.
What tools and materials are needed
To connect a three-key breaker you need the following tools:
- wiring screwdriver with a flat spline, size 3.5-5 mm .;
- pliers.
- knife or stripper for stripping insulation on wires;
Photo gallery: tools needed for work
If switch is installed for the first time, it will be necessary to use consumables cable of the required cross-section, junction box, installation pad, terminal strip or insulation tape. When outdoor wiring - the cable channel, and with the hidden - the corrugated sleeve and alabaster.
Photogallery: necessary materials
The terminal blocks are used to connect conductors. The connection points for twists are insulated with an insulating tape. The installation junction box 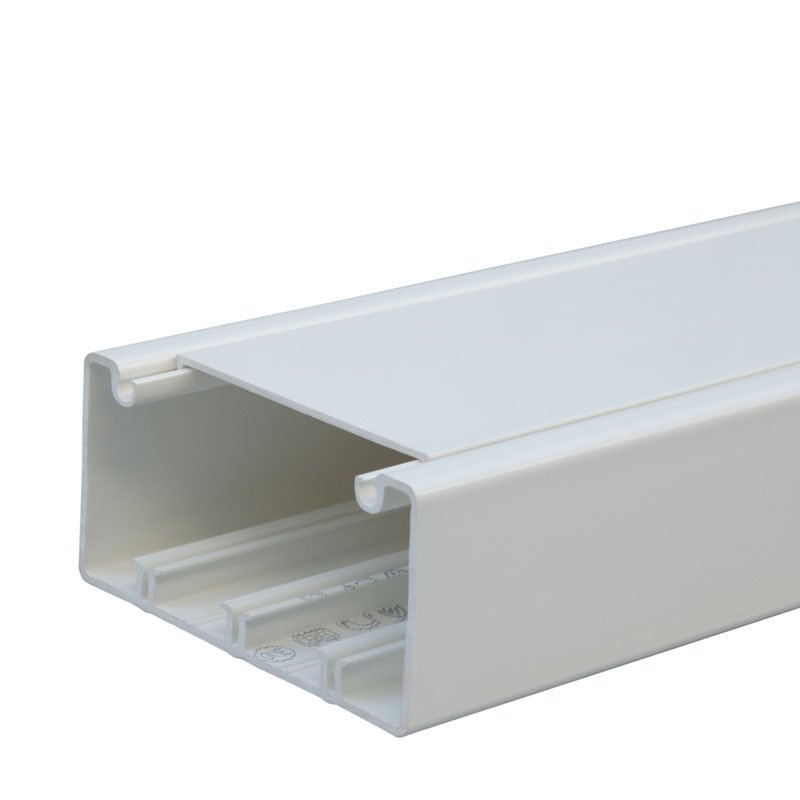 For external wiring, the cable channel is used. The switch is mounted in the sub-socket
  The jar is fixed with alabaster
At the time of buying breaker It is worth paying attention to the code "IP", which, as a rule, is put on the packaging. The code consists of two digits, indicating the level of protection of the cap from moisture and dust. This is especially important when installing the appliance in the bathroom or outside the house. The first digit indicates the degree of protection against dust, the second - from moisture, on a 6-digit scale. For indoor use IP 20 is enough, on the street or in a bathroom it is better to install switch with IP 66. In addition, in a qualitatively manufactured circuit breaker always indicates the connection diagram and the phase terminal is separated separately (by an arrow or by the Latin letter L).

Wiring diagram on the back of the switch
How to connect a three-key switch: step-by-step actions
Sequence of actions when connecting a three-key breaker the following:

In addition to the first and last items, the order of work may vary, this is of no fundamental importance. You can, for example, first connect the wires in the installation box, and then mount directly switch.
Another thing is important. According to the rules for the installation of electrical appliances (PUE), it is necessary to connect the device so that the phase conductor of the current is opened. If you swap the "phase" and "zero", everything will work, but the lamp will always have voltage. And this is fraught with current strikes in case of careless contact with bare contacts when replacing a light bulb. In addition, the rules regulate the position of the keys. Turn on the light by pressing the button up, and turn off - by pressing down.
Connection scheme for three-key breaker not fundamentally differs from the connection scheme of one or two keyboards. The difference is only in the number of controlled lighting points.
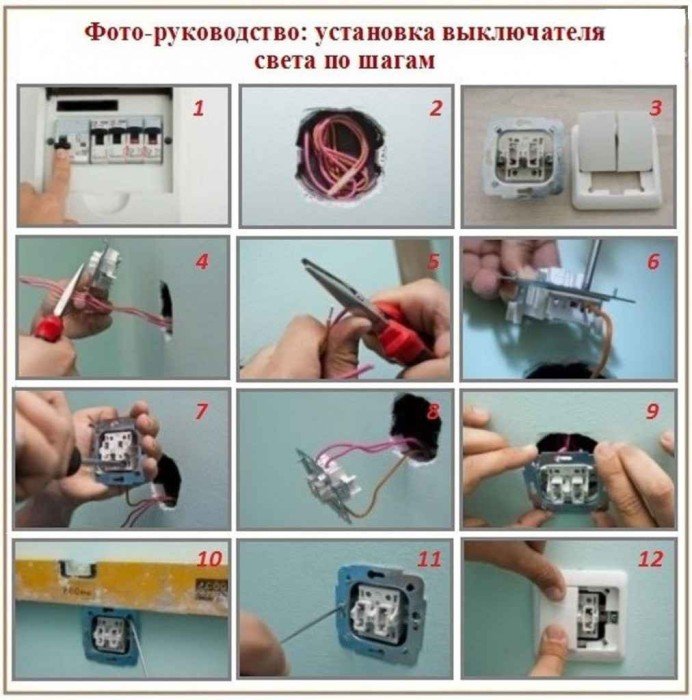
Example of step-by-step installation of the switch
Video: montage of three-key breaker
Video: three-key connection switch with socket
Possible errors and solutions
The most common error when connecting breaker is confusion with wires. To avoid it and the device worked in its normal mode, it is recommended to connect the lamps in series, observing the alternate connection of the conductors. The color marking can facilitate the task. In this case, the input, common contact coming from the junction box is fixed first.

Example of color marking of conductors
Clamping of the contacts must be tight enough so that during the installation work they do not fall out of the terminals. Sometimes it happens that switch connected and tested, but after installation in the jar, he stopped working. Then you need to remove it again and retighten the terminals. Here, by the way, you can notice that to use to connect all the lighting you need to use only the installation type of wires, marked with the letter "U" on the marking. It differs in that the inner metal part is a solid copper rod. Connection cable, consisting of twisted thread-like conductors in one vein, is prohibited.
In general, the switches are designed for a long life - up to 10 years or more. But in doing so, it is necessary to observe the correct connection and use lamps whose power does not exceed 100 watts. When overloading with high currents, copper contacts begin to burn and char, resulting in an interruption in the power supply. A preventative measure to eliminate such a problem can be the cleaning of the contacts and the additional tightening of the terminal clamps.
A little nuance. If in lighting devices established lED Light Bulbs, consuming small currents, it is not recommended to use switch With backlight - built-in LED on the case will not work.
In carrying out of electrical installation works fire and personal safety measures must be observed. The installation of the circuit breaker is interfaced to the connection of high voltage current. In order not to become a victim of an accident, one must adhere to the recommendations and rules of safe installation.