Antipyretics for children are prescribed by a pediatrician. But there are situations of emergency care for fever, when the child needs to give the medicine immediately. Then the parents take responsibility and apply antipyretic drugs. What is allowed to give to infants? How can you bring down the temperature in older children? Which medications are the safest?
How to connect two light bulbs?

If the chandelier is large and consists of five or more light bulbs, each of them can be connected to a separate switch key simply is not possible. However, the rules for installing a switch with two keys can be read in another article. So, if there is no other option besides how to attach two or more light bulbs to one switch, it will be useful to get acquainted with the following tips.
Tools and accessories
Tools that will be useful when connecting:
- Indicator screwdriver.
- Insulating tape or heat shrink.
- Knife or wire cutter.
How to connect two light bulbs: basic steps
- Before starting work, you must completely disconnect the power supply to the shield. Otherwise, you can get an electric shock, which is very dangerous not only for health, but for the life of the master.
- Now we need to dissolve all the wires in the sides. This is necessary in order to determine where the "0", and where the "phase". It is important in this case that the wires can not touch each other, since then the electricity will have to be switched on again.
- The food on the guard again turns on. With help indicator screwdriver It is necessary to check which wire is phase and which wire is zero. If during the presentation to the wire of the indicator screwdriver and light pressure of the finger on the head of the instrument the lamp lights up is a "phase". If not, it is "zero". In case the wiring consists of four wires, one of them is ground.
- Then the power is turned off again. Now you need to clean the contacts. This can be done with the help of a nippers or a knife. The length of stripping is not more than a couple of centimeters. However, the contacts must be in tight contact with each other when winding.
- If you plan to connect two bulbs to one key, then you need to connect the phase wires of the light bulb and the switch together. Also, zero wires are connected together. For this, we use insulating tape or heat shrink. If there is a ground connection, it is connected to the grounding wire of the circuit breaker.
- If you want two light bulbs to work from one switch, but from different keys, in this case you need to connect the "phase" of the light bulb with the "phase" of the switch key. Zero wires are unwound together and are connected to the zero wire not by the key, but by the entire switch. If there is ground, it is connected to the earth of the switch.
- Next, you must turn on the power on the switchboard and try if the lights turn on when you press the switch. If not, something was not connected properly. In this case, the wiring may even burn.
And how to replace burned bulbs, you will learn in our next article -
What is simple for some, for others can cause certain difficulties. Here, it would seem, a simple task - a circuit for connecting the switch to a light bulb. But how many people know how to do this? And those who think they know will do it right?
- Preparation
- Installation
- A simple option
- We hang a chandelier
- Complicating
Preparation
There are two options: when you need to lay the wiring and all the commutation, and when all the wires are already out, you just need to put everything together. We will not describe, let's touch only on some of the moments connected with the wires.
Each room must have a junction box through which all the necessary connections are made. By the rules, all the electricians are laid in the walls, at a distance of 15-20 cm from the ceiling. The fact that some, to save cable, throw it diagonally to the wall, is fraught with the most unexpected consequences: something will need to be hung up, and when drilling a wall there will be a sniper hit in current-carrying veins. Either something will happen with the wiring, and then it will need to be found and extracted from under the tile, or wallpaper (at best).
Despite the new trends - installation of a switch at a height of 70-80 cm from the floor - there is nothing to worry about if it is mounted and at 1.7 m. If you need a two-wire cable, if the two-key cable is three-wire, the three-key cable is four-wire.
We will need:
- The switch itself for connecting the lamp;
- Screwdriver;
- Pliers;
- Insulating tape;
- Caps for wires - PPE.
Installation
A simple option
The most simple circuit For single-key switch. Through it, you can connect either one light bulb, or several at the same time. It is desirable that they were not many.
From the junction box neutral wire goes directly to the lamp. The phase wire is on the switch. It is not permissible to do the opposite. Imagine the situation: you need to repair the cartridge. The switch was clicked, everything went out. You are to the light bulb, and there is a "surprise" in the form of a voltage of 220 V. At best, it is unpleasant.
 Connection scheme is elementary. The cable is laid in a wall or in special boxes. The principle of the circuit breaker is that it breaks electrical circuit. This is the same as if to take, and manually cut the wire with scissors. The current will stop and the light will go out. When the cut ends are joined, everything will be restored. Since no one will be able to do this with their hands, they have devised a switch. If you remember this principle, then all other schemes will be clear and their assembly of special difficulties will not cause.
First you need to disable the machine at the input. At the switch itself, the installation is done "under the screwdriver". In the box - with the help of PPE.
We hang a chandelier
 On the chandelier, as a rule, there are two groups of light bulbs, which are switched on separately. The connection scheme differs from the previous one in that here it is necessary to switch more than two wires through the switch.
As can be seen from the figure, the neutral wire (blue) is common to all the chandeliers. The standard number of bulbs - five, but there may be a different amount, the principle remains the same. In order to be able to separate inclusion, made a division into groups. One group - two patrons, another group - three. Two phase conductors. Depending on which phase the phase goes to, either one half or the other will light up. You can turn on the whole chandelier.
The diagram clearly shows what and where to connect. It is clear that all the ends go from the junction box and through it. 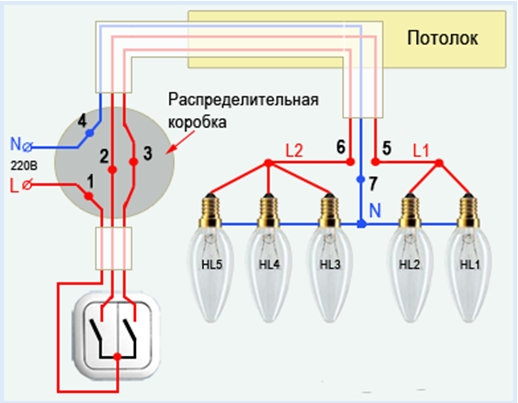
Complicating
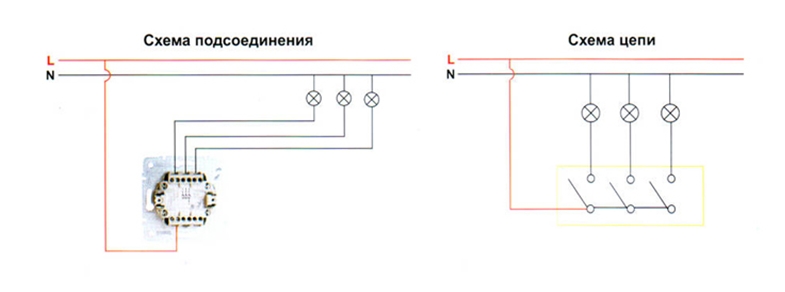
How to correctly switch a switch that has three keys? Everything is much simpler than it seems. For starters, an assembly diagram is a small example of how this can be in general terms.
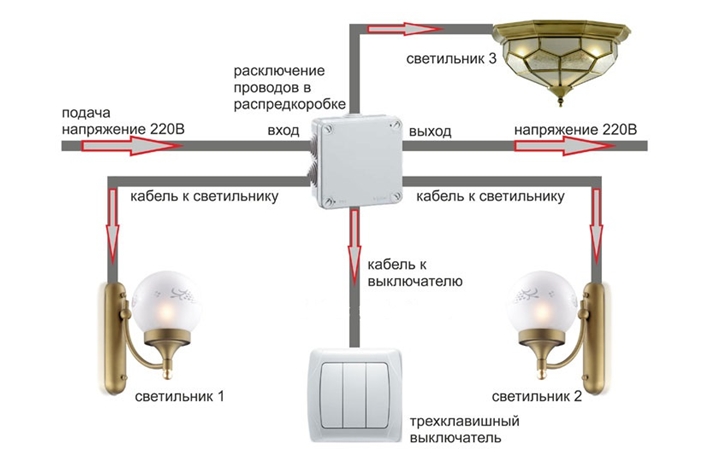
Through the box we connect three lighting devices: two decorative lamps, one ceiling. From them, the wires are assembled in the switch box, where further redistribution takes place. Take one end from each light bulb. This will be zero. We connect them together and with a common zero wire. There is one more left, only three. They are phase ones, we put them on a switch.
There are situations when in the process of repair or construction, except for lighting, you need to make more and sockets. The principle is the same, just adding the number of connections. Again, everything is done through junction box, and it is desirable that it was over each outlet. This facilitates both the switching itself and future repairs. It's not presumptuous to think that you will never break anything and do not have to repair it.
A separate shrotb is made, a two-wire (or three-core) cable is laid. It is clear that this depends on whether there is grounding or not. Then the wiring is done. In the switchbox, the null end is made common. The phase through one cable goes to the switch, and the other is connected to the outlet. For clarity, you can look at the diagram.
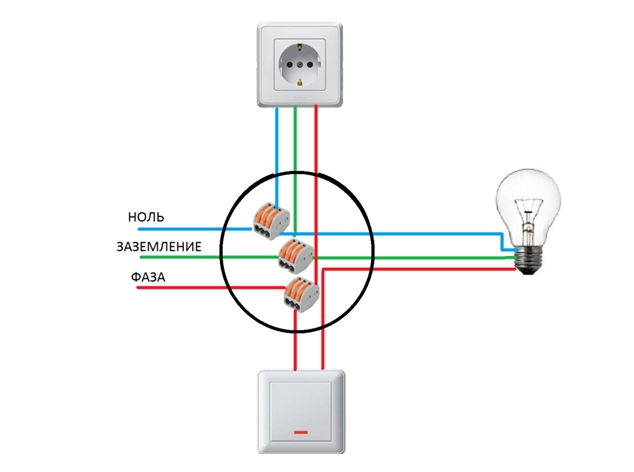
It can be seen that these are completely different types of switching, although they come from the same box. If there are no PPE caps, you can use special clamps to connect the wires. Ordinary twists do not, because they are very unreliable, and soldering under the ceiling - is also not very happy.
And some more nuances. When installing a switch with a backlight, if it is connected to a conventional incandescent bulb, then everything will be, as usual, and nothing strange. But if we screw in the housekeeper, in some cases, with the lights off, it can flicker. This happens if the LED is used for the backlight, or another similar emitter. However, when using neoni, flicker is absent, although not always. If the flickering is annoying, the backlight can be turned off.
Apparently, putting the switch from scratch, or replacing the old one with a new one, is not such a difficult task. By following the instructions clearly, you can do it in a short time and without much difficulty.
When performing work on the installation of electrical lighting networks 220V household and industrial premises, it often becomes necessary to control several lighting devices from a single point. For these purposes, a switch with two keys is used. Devices of this design provide switching on and off of lighting devices having two or more lamps. Sometimes, the layout of the wiring of the lighting network provides for the management of several groups of fixtures or individual lamps on a single luminaire. Two-key for this purpose is also suitable.
For proper operation of the double switch, it is necessary to correctly connect it. At the same time, it is necessary to follow a certain sequence of actions to ensure personal safety and safety of others. Recommendations for safe installation of two light bulbs are discussed below.
Preparatory work
Preparation for the installation of electrical switching devices (in this case switches) provides an understanding of their device, purpose, performance, operating principle and the availability of tools for their installation in domestic and industrial conditions.
Regulation of the number of included lighting devices is carried out by means of a switch having an additional outgoing contact and a separate control button. In size it usually does not differ from single keys. This is done for the convenience of replacing them with each other. The main difference is in their switching "stuffing".
The device with two keys has a working part, which includes three contacts. One of the contacts is incoming, and the other two are outgoing. The outgoing contacts have independent control of switching on and off.
During installation, it is positioned so that the outgoing contacts are located at the top. This is due to the generally accepted on / off position standard.
Working part of the two-button switch (on the left)
A phase wire coming from the junction box is connected to the terminal of the incoming contact. On the terminals of the outgoing contacts phase wires of consumers are installed: individual lamps of one lamp, individual lamps, separate groups of fixtures.
The zero wire (working zero) to the consumers is removed from the junction box, and does not pass through the switch.
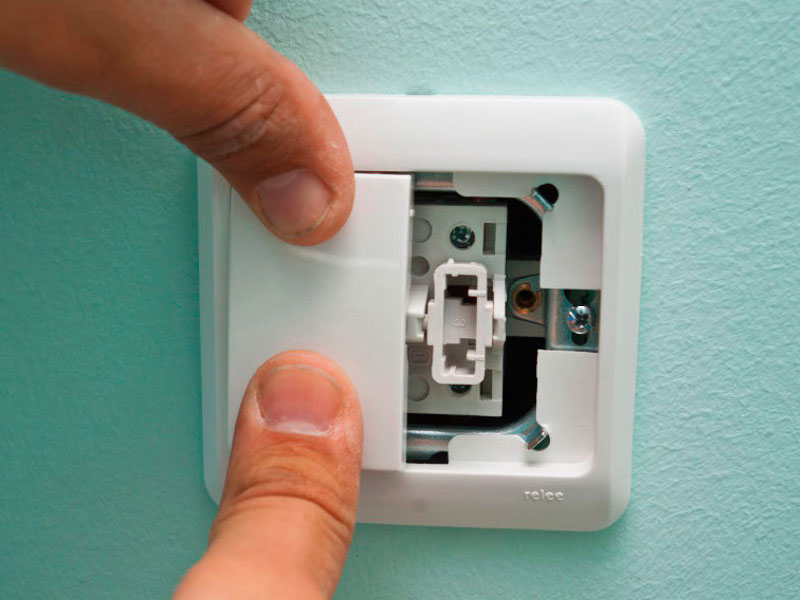
In their execution, the two-key models are divided into models for installation directly on the wall (for open wiring), and models for indoor installation in the wall (for hidden wiring).
 Switch for open wiring
 Flush-mounted switch
Scheme of connecting a two-switch switch to two light bulbs
For correct connection in the electrical network should be understood electrical circuit its installation.
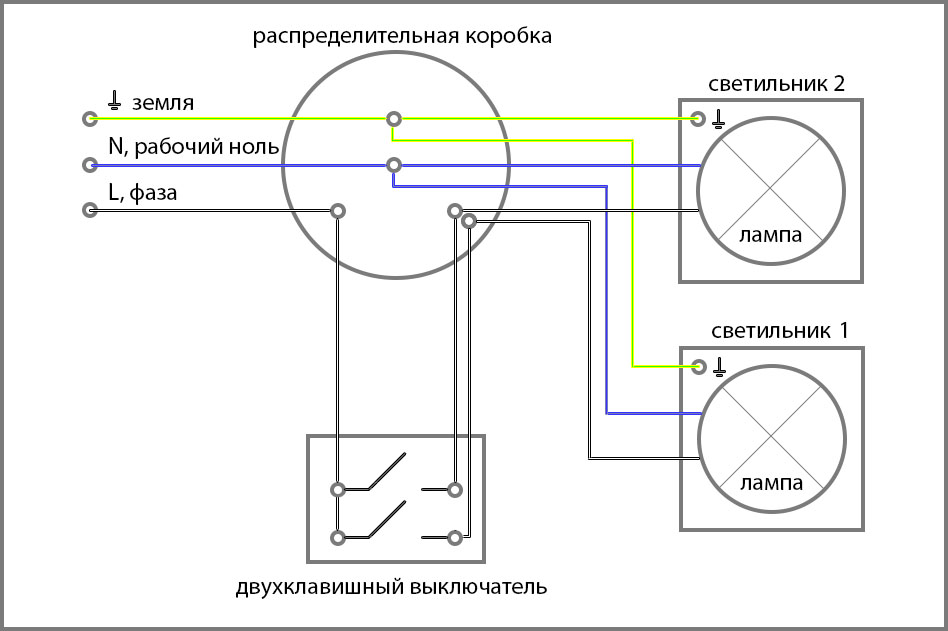 Connection of a two-key switch if there is a ground conductor in the network
Modern electrical network provides for the existence of a grounding conductor in the supply networks of all electrical consumers. In networks of electric wiring of Soviet-era houses such a guide is absent. And in many private buildings it is not always there, especially in lighting networks. This can be explained by the relatively low electric power of household lighting fixtures.
Therefore, it will be objectively considered a circuit for connecting a two-switch switch for wiring without a grounding conductor.
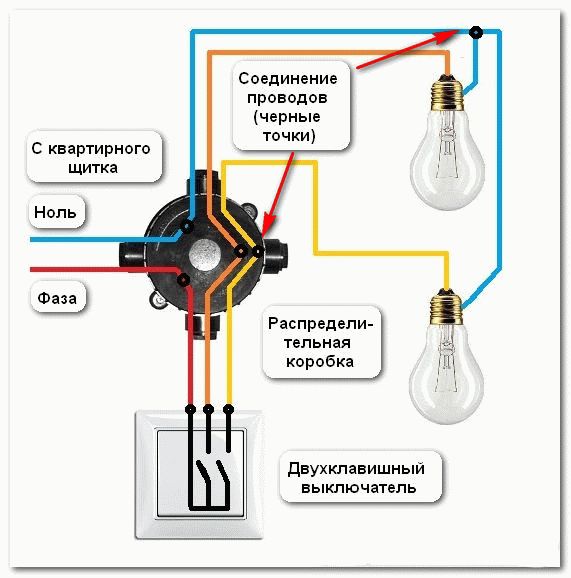 Connection of a two-switch switch to a household network without a grounding conductor
In this diagram, we give an example of connecting two lamps of a single luminaire, or two independent luminaires. In this case, the phase wire arrives at the input terminal of the switch and is routed to the consumers via two separate wires via independent outgoing contacts.
For greater clarity, there is a diagram of connecting two independent groups of lamps or luminaires connected in series.
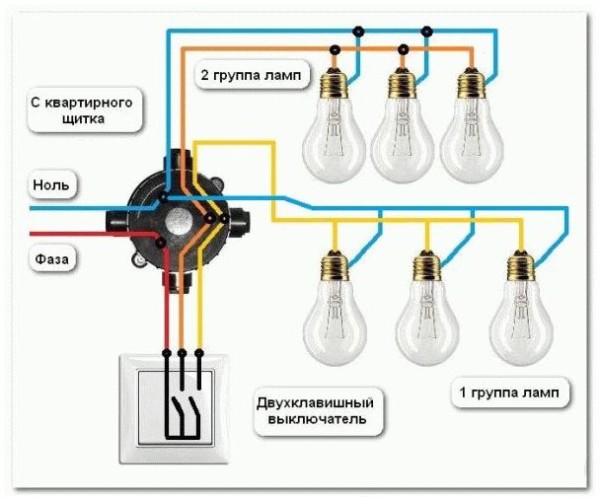 Management of two independent groups of lighting consumers
When using such a scheme, the connection of the working part of the device does not change and it is executed in a manner similar to the previous example.
What tools and materials will be needed for the installation of a double switch
To perform the installation, the following tool is required. Considered for models of two standard versions.
switch for open wiring:
- Electric drill.
- A drill with a diameter of 6 mm (for wood) or a drill with a diameter of 6 mm (for a concrete, brick wall).
- Phillips screwdriver for clamping the wire in the terminal contacts and fixing the switch body.
- Screwdriver - an indicator for determining the presence of voltage in the network.
- Knife for stripping the insulating layer of the wire. (in the absence of a special tool for stripping insulation from cable conductors). And also the knife is necessary for preparation of an introductory and departing apertures in the case of the switch for wires (cable).
- Combination pliers for flexible wire. If the wire is monolithic, the pliers may not be needed. But it is also possible to use crimp terminals corresponding to the wire cross-section (for flexible wire).
- Plug with plug 6x40 (the standard size is indicated, it can vary depending on local conditions).
- Marker or marker for marking "phase / zero" on wires (for safety reasons).
To ensure safety from defeat electric shock, the entire instrument must be equipped with insulated handles to insulate the metal parts of the instrument from the hands of the installer. On the qualitative tool, the insulation class or the voltage limit value in the network of which it is permitted to work with such a tool is indicated.
 Screwdriver set with insulated handles + voltage indicator
Switch for concealed wiring.
To install the switch in a network with hidden wiring, you will need the same tool kit as in the previous example, but with a significant addition. You will need a perforator with a special tooling - a crown for drilling holes of a standard pattern in concrete and brick walls. Since the working part is recessed into the wall, a perforator can not be avoided.
 Crown for perforator for socket, switch
And also need a special construction mixture to fix in the drilled hole of the plastic case of the switch. For this purpose, suitable construction plaster, plaster, etc.
Connection Instruction
Consider the installation process using the example of a switch for concealed wiring. This process is preferable, because the aesthetics of the home interior provides for hidden wiring.
1. Drill a hole in the wall with a perforator and a special crown.
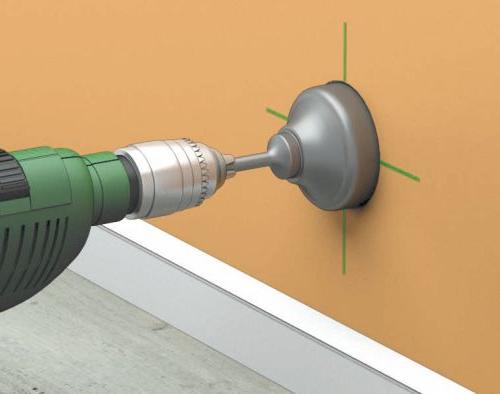 Drilling a hole for a switch
2. Remove the chiseled wall elements with a chisel or screwdriver.
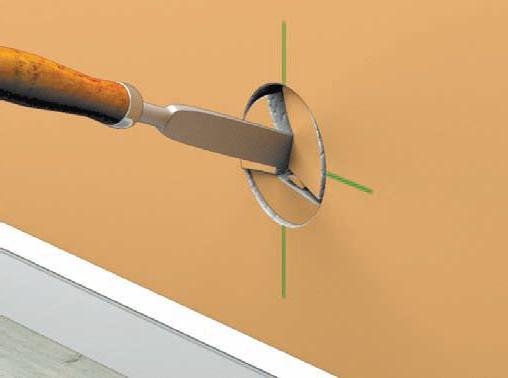 Removing Wall Elements
3. Check the compliance of the hole with the dimensions of the plastic case of the switch.
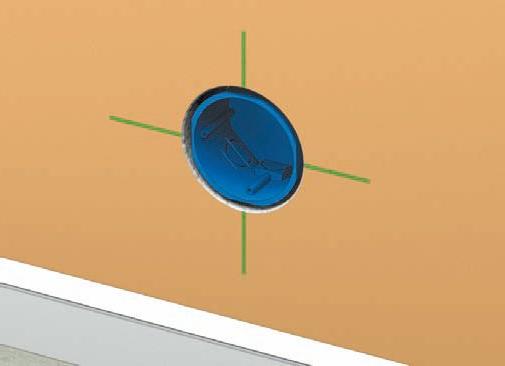 Checking the diameter and depth of the hole
4. Fencing of the fuse for electrical wiring. (Descent to the skirting board, as in this example, or to the junction box).
 Wiring spout
5. Cut a template hole in the plastic casing of the switch for electrical wiring.
 Cutting a hole for a wire
6. Wetting of the prepared hole for better contact with the construction mix.
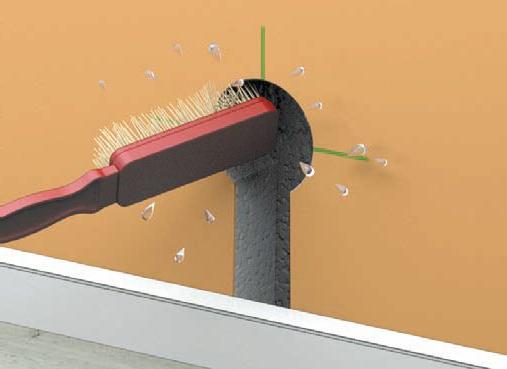 Wetting surfaces
7. Putting the building mix in the hole and installing the shell.
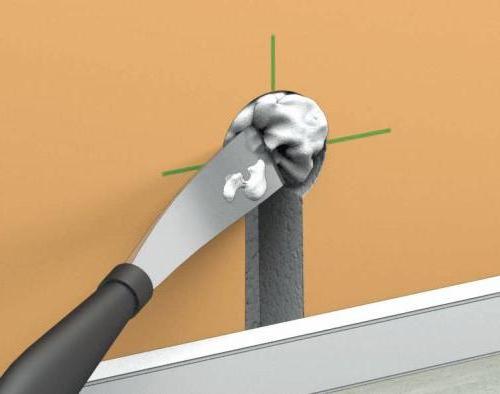 Application of the mixture
8. Installing the plastic housing.
 Fixing the necessary position
9. Remove excess solution of the mixture.
 Removal
10. Align the surface of the solution.
 Surface cleaning and leveling
11. The final position of the switch body after the solution hardens.
 The installation of the plastic housing
12. The next step is to connect the operating part of the switch and install it into the housing.
13. It remains only to install the key switch and it is ready to work.
 Setting the breaker keys
Provided that the fixtures are already connected, we apply power to the network and check the operation.
For more clarity of the connection process below is a video on this topic.
How to install and connect the switch to two keys with your own hands: video
Possible errors and solutions
When connecting the working part, you can confuse the phase and neutral wires to avoid this, you need to mark them in time.
The position of the switch keys is set as follows:
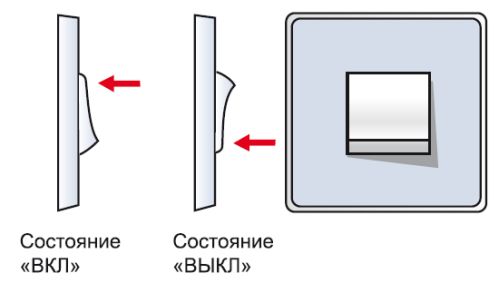 Common position of the keys when the mode is on and off
The installation of switches is not very time consuming, although it is a multi-stage process. If the above recommendations are followed and their sequence, problems should not arise. It is necessary to remember the main rule of electricians. Before starting work (installation, repair of electrical appliances and equipment), disconnect power from the network and check the absence of voltage in the workplace. It is very important to take measures to erroneously turn on the voltage in the network. To ensure that no one turns on the circuit breaker that you turned off before you start, by mistake, it should hang a poster "Do not include, people work!" Or lock this machine in the lockbox (if there is one). Safety first!
Gone are the days when the scheme for connecting electrical appliances, including luminaires, was "adjusted" for existing switching devices, taking care of the optimal location of the latter. At present, various in functionality and technical possibilities of switches, switches and so on, is such a variety that it is possible to safely make the wiring layout so that the switching on and off of the used electrical appliances is as convenient as possible for their user. A special case is lighting control from two places (points), that is, a pair of switches.
Variants and advantages of the application of lighting control by two switches
Everyone knows the classical connection scheme for a single lamp (lamp). You need 1 switch, which is located in the most accessible or convenient for lighting control: at the beginning or middle of the passage rooms, long corridors, galleries, avenues (paths in the garden); at the entrance to the room or the entrance and so on. As far as it is inconvenient, almost all faced.
And now the same and other options for controlling lighting devices, but with the help of 2 switches:
- In the passage rooms and rooms, as well as buildings with two entrances (garages, sheds, farm buildings for keeping pets or birds), especially when they are opposite. Installing one switch per input will save the unpleasant need to go in the dark to turn on the light or after it turns off. It often happens that you need to go through one door, and go through another.
- In corridors, galleries, alleys (paths in the garden), etc., especially when they are long, connecting two switches - one at each end of these objects - will provide not only convenient use of light, but also its economy. After all, you can use lighting when moving in any direction and immediately turn it off after passing this section of the road.
- In the entrance of a residential multi-apartment building or on the stairs between the floors of a private two-story house. Here too, 2 switches are both convenient and economical.
- In the bedroom. If one switch is placed at the entrance, and the other at the head of the bed, you do not have to get up from it to turn off the light when it's time to fall asleep. And vice versa, waking up, you can immediately turn on the lighting without getting up, and then turn it off just at the exit from the bedroom, without going back to the bed. Especially it is convenient when the bedroom is large.
- And in many other cases, when there is a need to manage the 1 st lighting device with two seats.

As you can see from the examples, 2 switches - it's not only very convenient, but also allows you to save electricity, that is, in the end, money. After all, you can turn off the light immediately, as soon as it is not needed. And it should not be left for the whole night, as it was in the cases with the 1st switch, for example, in long corridors, when it would not make sense to return to their beginning for de-energizing the fixtures. After all, the light was turned on to pass this corridor.
What switches are needed to control light from two points - name and design
The considered application of two switches assumes that irrespective of the position of the switching contacts of one of them, it is always possible to turn on or off the lighting at any time. The usual switches that humanity has been using since the invention of electricity, are completely unsuitable for this. After all, they are initially structurally not designed for such a job, because in one of two of their provisions, they open (break) the electrical circuit. Therefore, as they are not connected together, it's all the same, if one of them has open contacts, the second is to not include an electrical appliance. And they should be connected somehow to each other, since it is assumed that they will be used to control the operation of the same luminaire, that is, they are installed as part of the 1st common electrical circuit.
For independent lighting control, and other electrical appliances from two places, the so-called pass-through switches, which have appeared relatively recently on the market of electrical goods, are used.
They are also called pass-through switches or change-over switches and switches. And there are also cross switches, but these are slightly different and more complex devices used in conjunction with the gate to control electrical appliances from three or more points. They can be installed instead of pass-through, but they will cost more, but on the contrary can not be changed. Outwardly on the front side, these switches are no different from conventional switches. The same housing and 1 or 2 keys (sometimes another type of control part) for on-off operations.
Externally, the pass-through switch differs from the conventional switch in the following: on the reverse side of the housing, where connected, it has 3 terminals for them. That is, 3 conductors are connected to the pass-through switch. The usual switch has only 2 terminals (for the cross switch - 4). This is if the switching device is one-key.
If you need to manage 2 groups of lamps of the same lamp, that is, you need two-key (double) pass-through switches, then you need to search for devices with six terminals for connecting wiring. For dual conventional switches, only 3 terminals cross switches – 8).
And now about the internal constructive and consequential differences in the work. Supplied to through switch The chain leaves it on the 2 lines between which it makes the switch. That is, in each of its 2 positions, this switch closes one line out of it, and the second breaks. It turns out that he never breaks the chain that passes through him. How it works in practice and provides independent control with the help of 2-way switches with 1 electrical appliance is considered in the next chapter and is clearly visible on the diagrams given in it.
Connection diagrams and the principle of operation of two pass-through switches in the same circuit
To connect two pass-through switches for switching the first lighting or some other electrical appliance or several connected in series, that is, united in one group, it is possible only in one way. So it is impossible to make a mistake in this. Below is a connection diagram for one lamp.
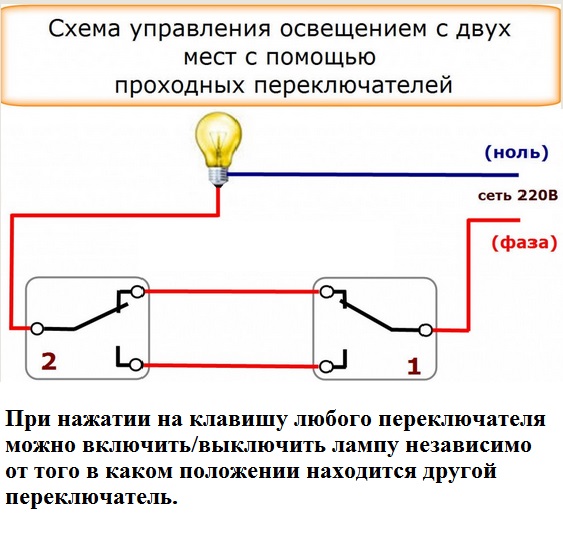
In this type diagram it can be seen that the loop-through switches are connected in series one after another in the break of the circuit between the consumer of electricity and the phase. And they are connected they must be 2 wires. In the following diagram of two switches for one light bulb, you can more clearly view the operation of the entire circuit as a whole.
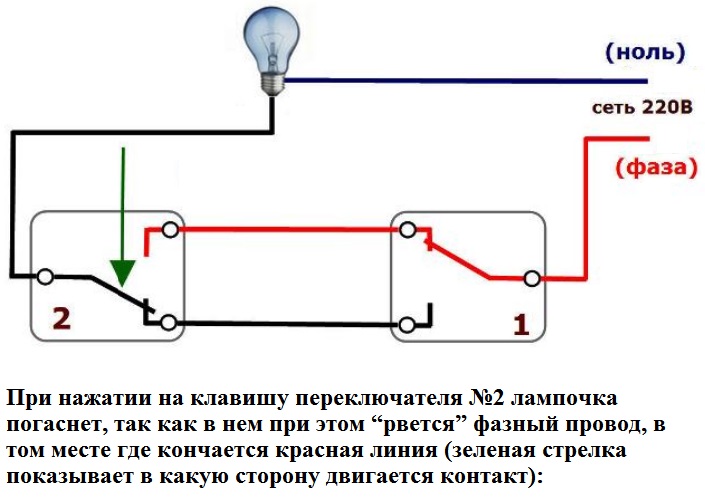
In the previous figure, the electrical appliance was switched on, and this was turned off by switch No. 2. Obviously, the same action could have been made by switch No. 1. And according to the current position of the switches it is clear that any of them can be re-energized with an electric appliance.
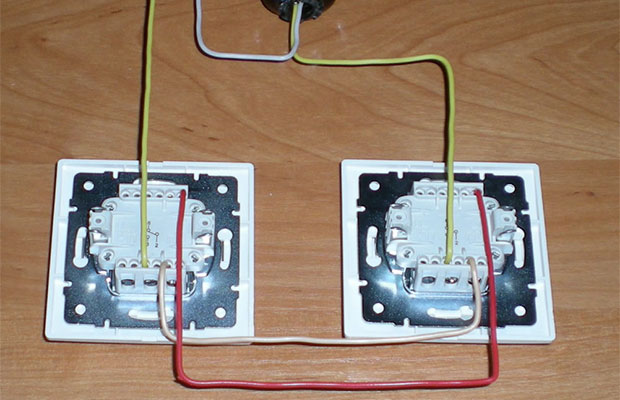
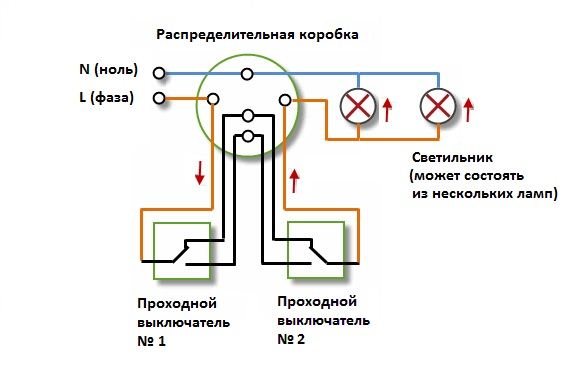
It is very easy to assemble such a scheme. In the switches, just as shown in the figures, the input (common) terminal for phase or zero is located on one side of the housing, and 2 outputs are on the other. So we boldly connect them, and in any order, 2 wires to each other. And then, to the already connected switches, we lead the rest of the wiring: to one of them, to which zero is fed, and to the other - phases. Since you connect all electrical devices through the junction box, the following diagram shows the correct assembly of the entire circuit with its use.
To turn 2 groups of electrical appliances on and off, dual (with two keys) pass-through switches are required. The following diagram is just for such a circuit, assembled using a junction box.
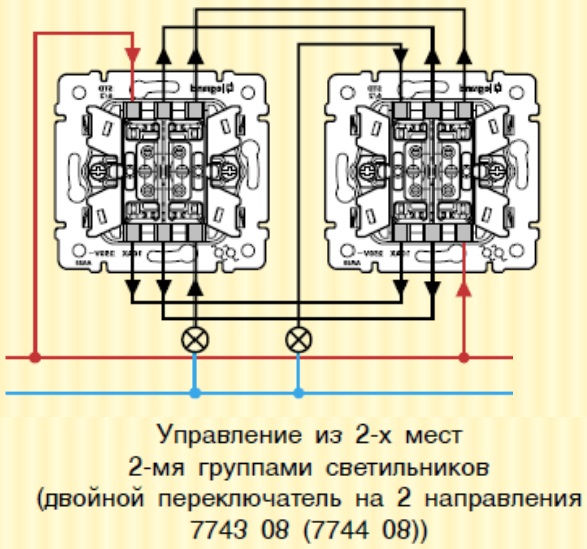
In the figure it is clearly visible and in the comments to it it is signed that pass switches of 2 different modifications will be required - one with the connection of the phase from above, and the other - from below. Despite the seeming complexity, and this chain is easy enough. On the switches, in the same way as it is shown in the figure, there are marks in the form of arrows, suggesting which wire to start.
It is difficult to imagine life without artificial lighting. There is a certain impression of a return to the Stone Age, when people lived in dark caves.
But even at that time, as a lighting used fire. So what are we, highly intellectual individuals who created and studied such a wonderful science as an "electrician", worse than a caveman ?!
We are not cavemen, we create the future. Think for a moment: the first incandescent lamp was created by the Englishman Delaru at the beginning of the 19th century, and today in the 21st century we are trying to figure out how to establish double-switch for lamps. Funny thing progress, do not you think?
Do not rush to be ashamed of your inexperience or inability to deal with electronic devices. After reading this text, you will have all the knowledge to install and draw a diagram of connecting a two-button switch to two lamps.
Before starting any work related to the installation of wiring and the connection of various devices, turn off the power on the shield. Observe the safety rules!
If the building is outdated and there are problems with wiring, then you have to sweat:
- not much if the wires were mounted open way;
- strongly if closed.
With the latter option, anew strokes are made and wires are laid.
For a more detailed introduction to the topic, how to connect double switch and connect it to two light bulbs, we recommend viewing the video:
Unit Installation
First of all, clean the ends of the wires: one input and two output, which connect directly to the lamps. Clean the wires from the insulation layer by 10 cm.
 The input phase is connected to a terminal or a screw terminal, which is separate from the other holes and is called the input one. Two output wires are attached using the other two terminals / clamps. This connection option is suitable for dual-key devices that do not have additional modules.
The modular device is connected in a slightly different way. The input cable is inserted into the terminal of the module that is subscribed the Latin letter L. Nearby is the second terminal. They are both connected by means of a wire of short length. Output wires are connected in the same way as on single-hull devices.
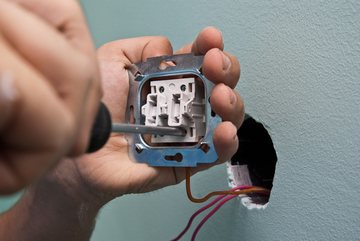
After completion of the procedure, the switch installed in a junction box and bolted in the jar. Some models have removable keys and frames. They are attached at the end of the installation.
We bring to your attention one more training video, how to connect two lamps to a double switch:
Learn to do everything with your own hands - in life it will come in handy!
So, now you know how to connect a two-button switch to two light bulbs and connect it to two chandeliers or lights. It not only increases the self-esteem of any man, but also significantly saves money that previously went to the electrician's call.