Antipyretics for children are prescribed by a pediatrician. But there are situations of emergency care for fever, when the child needs to give the medicine immediately. Then the parents take responsibility and apply antipyretic drugs. What is allowed to give to infants? How can you bring down the temperature in older children? Which medications are the safest?
Wiring in the bathroom should be safe and at the same time functional. The old standard, when a lamp is installed in the middle of the room, and outlets and switches are taken out of the premises, has long been not practiced. To date, there are waterproof electrical accessories and automation that will completely protect a person from damage electric shock. Next, we'll talk about how to conduct wiring in the bathroom with your own hands and what requirements are imposed on it.
Primary requirements
So, among the basic requirements for wiring in the bathroom are:
- the line must necessarily have a ground loop;
- on the group of lamps and sockets in the room, a separate automation must be installed - and;
- all wiring elements must be waterproof;
- bath, sink, electrical appliance housings, risers and earthing bar must be combined into a potential equalization system;
- if possible, choose lamps that work from a safe voltage of 12 V (ideally suited in this case, because they are durable, consume a minimum of electricity and still have a good glow).
As for the way of installing the wiring in the bathroom, there are no strict restrictions on the rules of the EAE. You can use both external and hidden cable laying on the walls. The only nuance - if you need to choose a cable of the appropriate marking, that it was intended for rooms with high humidity.
If all the requirements are fulfilled, then with no problems concerning electrical safety in the future you will not come across.
Installation instructions
Step 1 - Create a scheme
First you need to determine the wiring diagram in the bathroom. You must consider what kind of electrical appliances will be installed, what type of lighting is chosen, and no less important point - what kind of heating will be present.
- The junction box, for reasons of electrical safety, must be installed outside the room.
- On the whole area it is necessary to place at least three outlets: for, for a hair dryer near the mirror and for an electric boiler or a boiler (if it is present).
- The switch, by analogy with the box, is displayed in the next room, next to the entrance door.
- As we have already said, automation is installed on each group of wires separately: sockets, lamps, powerful technology.
- Wiring in the bathroom is laid in the wall under the ceiling, parallel to the floor. To the outlets the line drops perpendicular, strictly down. If you decide to make a hanging or stretch ceiling, the wires can be drawn through it (between the profiles or under the film).
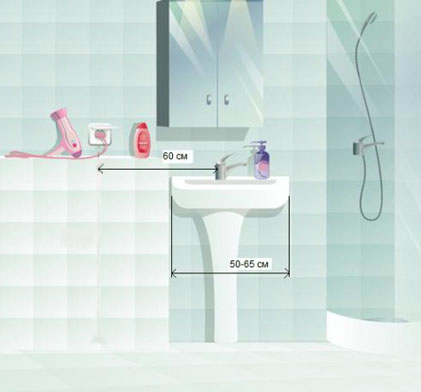
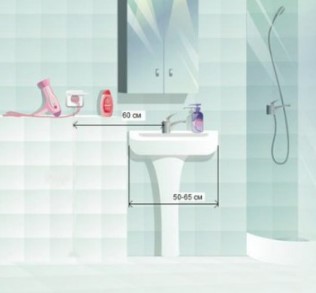
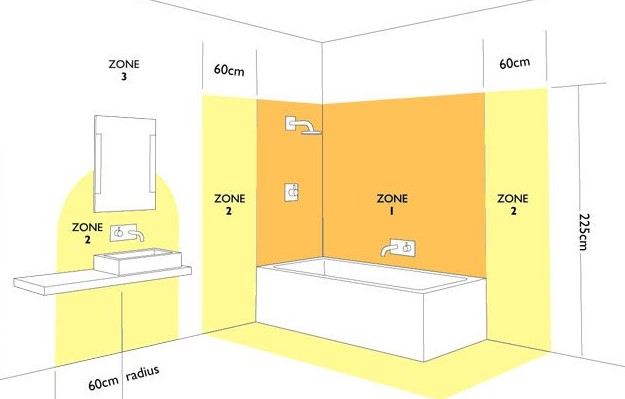
Please note that all outlets and switches must be at a safe distance from the water source - at least 60 cm. Take this fact into account so as not to put your life in danger.
Drawing the wiring diagram in the bathroom, you can go further - to the calculation of the amount of materials.
Step 2 - Select the accessories
At this stage it is necessary not only to choose the appropriate wiring elements, but also to determine their technical characteristics.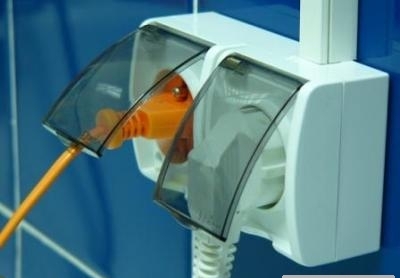
In order to make wiring in the bathroom with our own hands, we recommend choosing the following materials:
- The cable is three-core, copper, cross-section 2.5 mm 2 for sockets, 1.5 mm 2 - lamps, 4 mm 2 - household appliances (in this case, if a powerful electric boiler is installed). The best option is to use a foreign cable, but the Russian analogue will be a successful replacement for price and quality.
- Dowel clamps for.
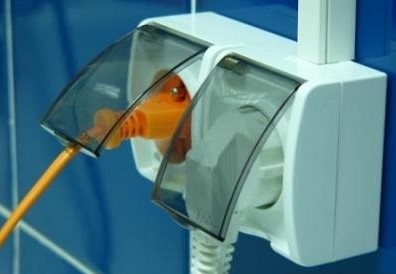
- Waterproof sockets and switches, with IP degree of protection not less than "44" and splash-proof cover. Also, the products must necessarily have a grounding contact.
- Waterproof, whenever possible, it is better to use spotlights, t. they are easier to mount, neatly look on the ceiling and also can operate from 12 V.
- For a potential equalization system, the power wire is 1 * 6. To him additionally need to buy tips.
Step 3 - Get Started
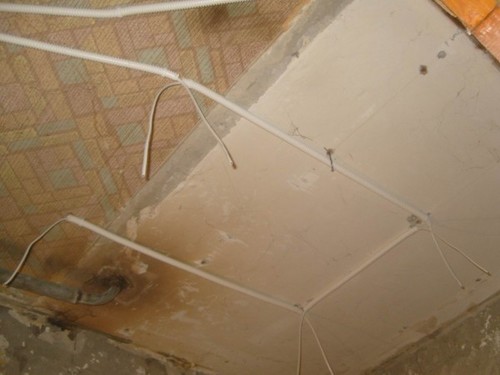
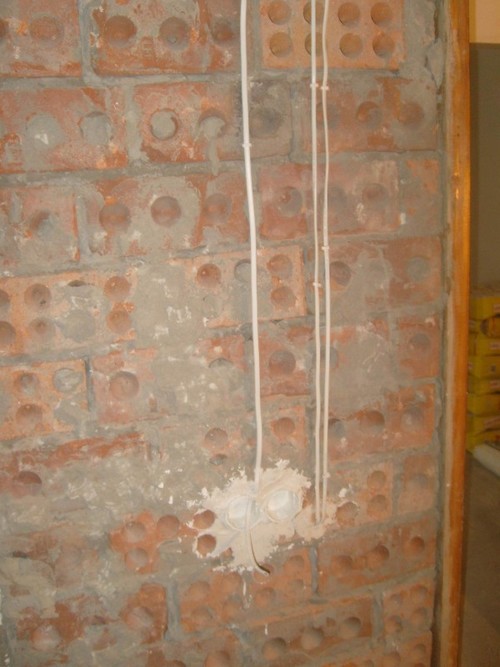
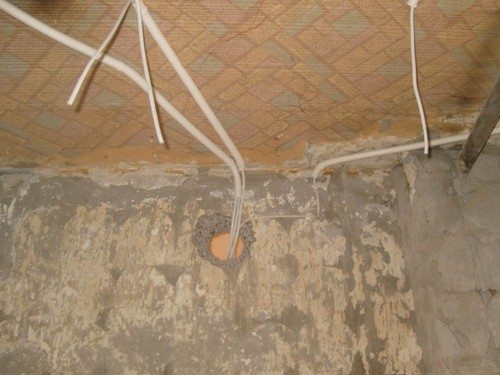
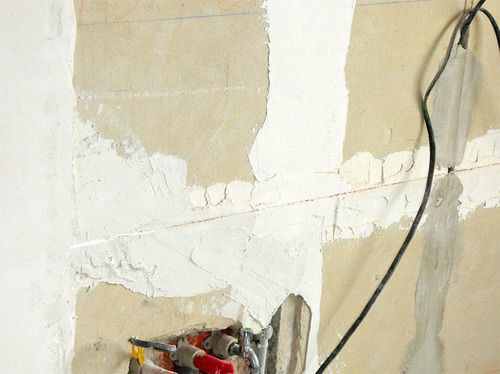
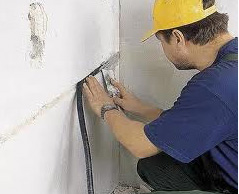
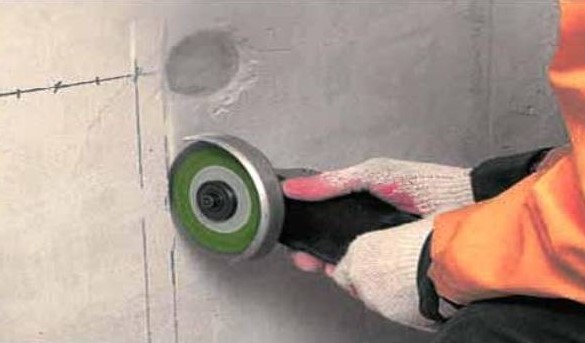
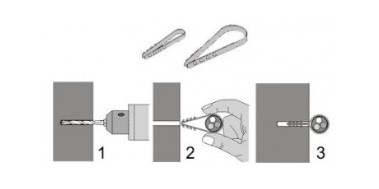
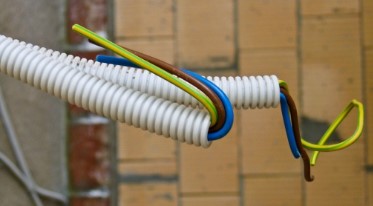
So, to begin with, it is necessary to create a special groove in the walls in accordance with the wiring diagram in the bathroom, stitches, under the cable laying. Grooves also need to be made for sockets, switches junction box. To do this, you can use a drill with a special crown, a diameter of 68 mm. 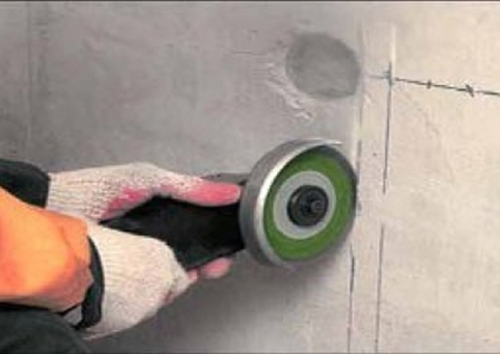
Next, the podzoetniki and the box are installed in their seats and securely fixed with a solution. 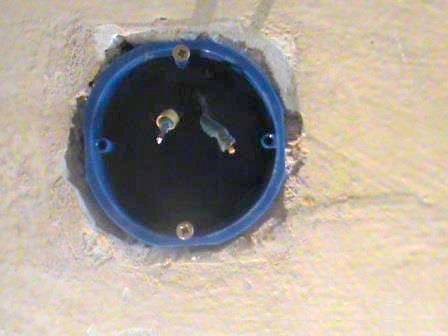
After this, it is necessary to fix the harness itself in the stitches using the clamp dowel or the grandfather's method - grab the mortar every 20 cm. The ends of the cable are peeled from the insulation and passed to the junkets. 
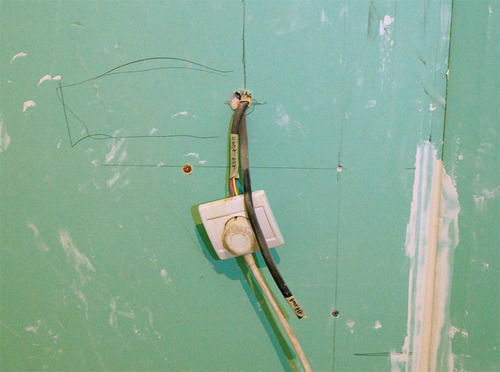
Now you can install the core of the sockets and switches in the seats. We draw your attention to the fact that it is better to fix the decorative cover after all the repairs so that it does not get dirty during the work.
When the wiring is fixed in the wall, you can switch to the RCD by yourself. Connect them do not rush, because. you will first need to check the correctness of the wiring in the bathroom. 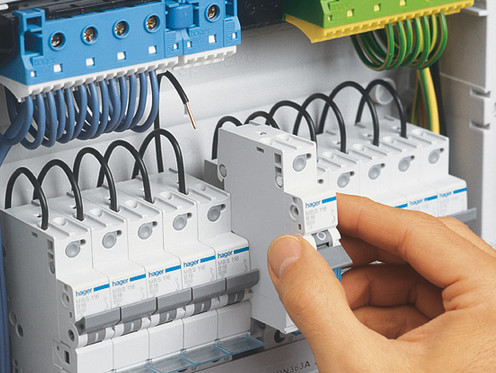
When the wiring in the room is finished, the multimeter needs to check the line for availability. If it is missing, you have done everything right and you can proceed to the decorative decoration of the walls.
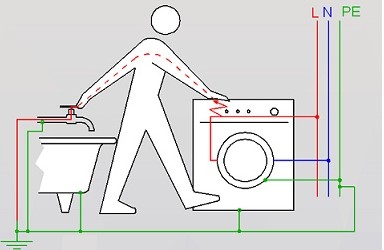
There remains one no less important nuance, to which a serious approach must be provided - it is necessary in the bathroom. For this we take our single-core copper wire and connect the body of a washing machine, a boiler, a sink, a bathtub and risers of cold and hot water. All these "points" need to be connected to the earthing bar installed in your input shield. 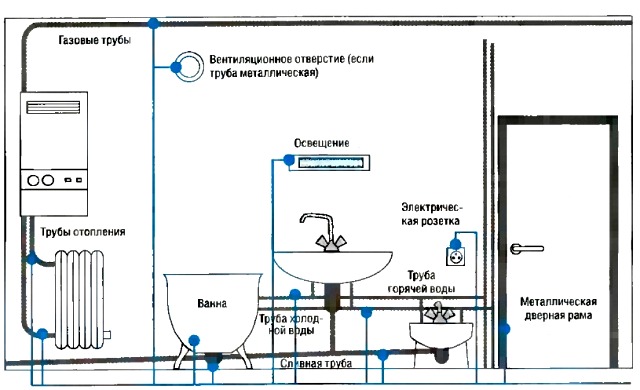
We draw your attention to the fact that if there is no grounding bar in the switchboard, be sure to implement it on a safe, PE wire.
Also it should be noted that it is best to use heating for heating, which you can easily put on the floor in the home. That's the whole technology of electrical work. As you can see, you can carry out wiring in the bathroom with your own hands, because the device of the system is nothing supernatural!
Overview of wiring in the bathroom
Finally
Today, suspended plasterboard ceilings, as well as plastic panels are popular. If you decide to use them, it will only facilitate electric installation work. The fact is that when wiring the wiring in a bathroom under a false ceiling, it will not be necessary to create shtroby, but simply lay the cable in a protective corrugated pipe, as shown in the photo. Gofra, in turn, is fixed without problems by clips to the profile.

Another important point on which I would like to stop your attention is the lack of grounding in the apartment board. Indeed, it happens that the land wire can be absent. In this case, you must necessarily on a new, three-core, after which it is necessary to make a system of equipotential bonding, 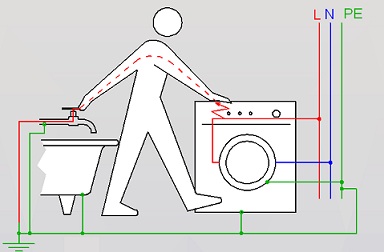
That's all I wanted to tell you about how to make wiring in the bathroom with your own hands. We hope that the information was useful to you and useful in electrical work!
Related material:
Overview of wiring in the bathroom
Like( 0 ) I do not like( 0 )
Many still know the times when the socket in the bathroom was a curiosity, and was an element of increased danger. Also, not so often as now, there was a need for an outlet in this room. After all, electrical appliances, for which it was required, was a minimum. Now everything has changed. In this room, various electrical appliances are widely used, which can not be used without a wall outlet in the bathroom. Therefore, the need for wiring in this room is obvious.
Safety, first of all!
Any electrical appliance can cause an electric shock, so both the sockets and the wiring must be installed correctly with their own hands. You can use additional materials with video and photos, so as not to violate the rules.
The norms regarding the installation of sockets in the bathroom are set forth in the relevant literature and GOST. And they are in many respects correlated with electrical appliances, which will be used there. This means that, for example, to install a washing machine in the bathroom there are some requirements, for the use of electric razors - others.
Of course, it is desirable that the wiring is hidden, because it is obvious that in this room the humidity is increased. This means that there is a risk of contact wiring and water, and this is very dangerous.
However, it is not necessary to consider that in the bathroom only wiring in hidden form is possible. This is only the recommended rate. Wiring can also be laid open, but metal hoses and pipes can not be used at the same time.
We make a safe wiring
If you comply with all safety requirements, then in the bathroom you can use any electrical appliances.
By the degree of danger of electric shock, rooms are divided into three types:
- Premises without increased risk of electric shock.
- Premises with increased danger. They fulfill at least one of the conditions: high humidity (more than 75 percent), increased temperature (over 35 degrees), conductive coatings.
- Particularly dangerous premises. They have high humidity (up to 100 percent), and two or more high-risk conditions are being met.
If electrical appliances are used in premises with a special risk of electric shock or increased danger, then there are certain features. For example, the separation of such premises into protective zones. Therefore, the location of the cables, the installation of the sockets and the switches must be determined based on the requirements for the protective zones.
In addition to the installation standards, there are also requirements for materials used for laying wiring in a room with high humidity. They must be heat-resistant and have protection from water.
Mounting the sockets is an important step in the wiring
As already explained, the installation of the sockets depends on the instruments used in the room:
- according to safety rules, such outlets must have grounding. For electric appliances by the type of electric shaver, a separating transformer can be used;
- all connection points must be carefully insulated, and the wiring itself is desirable to be hidden;
- do not place sockets on cold walls where there is condensation. At the same time, according to norms, the distance between the outlet and the bath or sink should be more than 0,6 m;
- the best option - sockets with protection from moisture. And let them cost more than standard ones, but thanks to the use of special lids and seals they successfully counteract the ingress of moisture into the mechanism;
- if you connect powerful electrical appliances, it is worth to acquire a protective shutdown device that protects against electric shock. You can use three-pin sockets with a three-wire cable. Therefore, the same washing machines can not be used with an extension cord;
- when using powerful electrical appliances you need a separate line and a circuit breaker;
- undoubtedly, all work on the arrangement of the outlet and wiring should be done by qualified and experienced specialists. Of course, there are enough photos and video materials on the web, where the process is described in detail by yourself, but you should not overestimate your strength, because it can affect your safety.
Today the bathroom is not at all the small room with walls painted with oil paint, whitewashed ceiling and a lonely light bulb over the door , as it was in the recent past.
In it today install a washing machine, a water heater in case of switching off the hot water. More and more you can see in modern apartments a whirlpool bath, a shower cabin with a stereo system, exhaust fan to improve ventilation performance, and ceiling built-in lamps and beautiful decorative lighting.
In the bathroom we use electric razors, a hair dryer and other electrical devices. By its electrification, the bathroom is already confidently ahead of the rest of the rooms in a modern apartment.
Often we are in the bathroom without clothes, and in conjunction with the presence of metal pipes, cases of electrical appliances under tension, splashes and leaks, this room becomes the most dangerous in terms of obtaining an electric shock.
To prevent the possibility of falling under voltage, you must comply with the requirements for laying wiring in wet rooms.
Requirements for wiring harness in the bathroom
Part of the rules for laying electrical wiring in wet rooms, we already touched on in the article about connecting the washing machine to the mains.
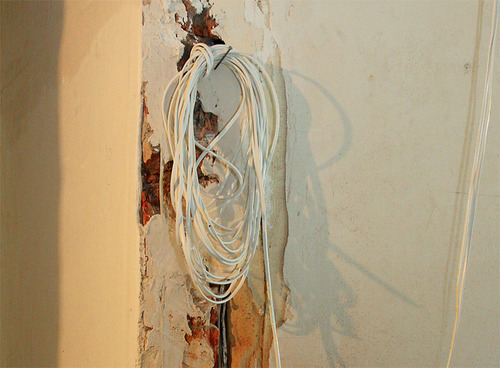
 In accordance with these rules, the wiring should only be laid secretly. Do not open the wires openly, in cable ducts or flexible sleeves.
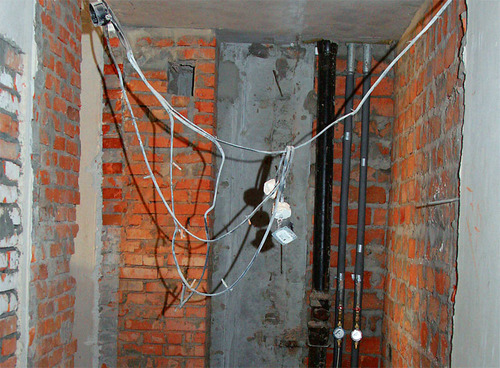
Therefore, before repairing the walls, you need to take care of first of all about laying electrical wires to all consumers and sockets. To do this, it is necessary to patrol the walls, lay electrical wiring in the stems, and then carefully plaster.
Wires should choose copper non-flammable (for example, marks VVGng or VVGng-LS with a low level of smoke emission).
All connections must be made with a three-core cable with mandatory grounding device . In this case, twists are not allowed. All connections are made only by a whole piece of cable of the required length, laid from the box.
The washing machine is better to be connected with a 2.5-mm-long cable, laid directly from the electrical panel.
When laying the cable, try to avoid places where later any shelves, mirrors or something else will be mounted. This will prevent you from accidentally damaging the buried wiring while drilling.
Connecting the electric lighting and sockets in the bathroom
 Lighting is best done with safe 12-volt halogen light bulbs with the installation of the power supply unit on the wall outside the bathroom.
When installing the sockets, observe the following rules. The distance from the washbasin, bathtub or shower should be at least 60 cm.
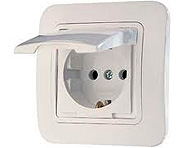 The socket must also have 3 contacts. The degree of dust and moisture protection of the outlets must be at least IP44. The socket should have a protective cover that closes the contacts at a time when nothing is included in it.
When choosing bathroom fixtures, also be sure to pay attention to their moisture protection. The lower limit of moisture protection must be at least IP44 (splash proof). It is better to hedge and purchase luminaires with protection IP56 (protection from a jet of water).
***
As you can see, the installation of wiring in the bathroom has its own characteristics. But it is better to do everything once correctly than to suffer from an electric shock afterwards.
Your electrician insists on hidden wiring in the bathroom, and you do not want to wallroof? Listen to the expert! When organizing electrical wiring in the bathroom, many features of this room should be taken into account.
- 1 of 1
On the picture:
Pay attention to the walls: no wires are drawn to the TV. Absolutely all the wiring is hidden in the wall.
Do not touch the wiring! The authors of this lamp seem to be sarcastic over our fears: the bulb of this model is ignited only from touching bare wires. But the exceptions only confirm the rules - with wiring jokes are bad. In the bathroom, all wiring should be hidden.
On the picture: model Bingoingo from the factory Alt Lucialternative, design Jukanovic Admir.
Recall that any work related to laying a new one or replacing the old electrical wiring should be done by a qualified specialist. "Self-initiative" in this matter can cost you life. So this article has a general cognitive character and in no case is an instruction for the performance of electrical work.
Wiring Requirements
Since the bathroom is classified as a "wet room", there are special requirements for wiring. This is not surprising: after all, accidental contact with an electrically conductive surface, which in "dry" conditions would cause only unpleasant sensations, can become fatal in a moist environment. In addition, in the bathroom the person is in nap form, and this also increases the likelihood of the sad consequences of electric shock. Without going into the electrotechnical details, let's just say that these facts are associated with a decrease in resistance in the humid environment and a significant increase in the current that passes through the body in an electric shock.

- 1 of 1
On the picture:
Leading manufacturers of sanitary ware produce their own line of furniture for bathrooms. Often - with integrated sockets that comply with all safety rules. You do not even need to think about where to look for a suitable frame for three sockets with covers.
The opinion of designers.
In accordance with the "Rules for the installation of electrical installations" (and all the requirements of this document must be observed, otherwise you will not receive an apartment admission certificate or a country house in operation) only concealed wiring is possible. It is forbidden to lay wires with a metal sheath not covered with insulation, and also their placement in metal pipes or sleeves. The cross-section of the wire must correspond to the load on it. All electrical outlets must have a degree of protection of not less than IP44 and be equipped with covers that close the contacts. It is not allowed to find electrical panels, switch boxes and switches in the bathroom.
The exception is only for switches with a protection class not lower than IP44 located under the ceiling (they are controlled by a cord, or a motion sensor, or a remote control). To protect against electric shock, in case of insulation damage, at least one of the following measures must be taken: grounding (zeroing), protective shutdown, equipotential bonding, use of isolating transformer, low voltage, double insulation.
Measures for protection against electric current
In bathrooms only concealed wiring is allowed, and all outlets must be equipped with covers that close the contacts.
On the picture: 2 sockets with protective covers from the Meljac factory.
Ideal - the application of all the above-mentioned methods of protection. But in domestic conditions, the most effective and appropriate is the use of two of them: grounding and protective shutdown. We will discuss them in detail.
There are different opinions about the necessity of grounding electrical appliances. Nevertheless, we strongly recommend that it be provided. In the event of a leakage of current to the metal case of an electrical appliance, the surface of a bath, mixer or other device to which we often touch, the grounding will put a dangerous load on the ground, that is, the probability of electric shock will be minimal. In the homes of the new construction (later the late 1990s), grounding is provided initially, and it will only be necessary to connect all the metal or connected devices (including mixers and a bath, if it is metal) to it.
- 1 of 1
On the picture:
It is not necessary to understand literally the frames of advertising shooting and to be guided by them at arrangement of an interior: to usual table lamps in a bathroom there is no place.
In old houses, where there is no ground, the central heating radiators or sewers are sometimes used as "land" (they also go underground!). Do it categorically is forbidden, since it is not known what and where it is connected to them and does not "wipe" out to them in some place, even in the next quarter, wiring. The result of such an imaginary "grounding" can be directly opposite the desired. A more accurate solution will be to find out whether the distribution board is grounded on the staircase (this information will be provided by the EEA or the housing office). If yes, then a ground wire for the bathroom is laid from the panel. Its cross-section should not be less than the thickest of the phase wires used in the apartment.

- 1 of 1
On the picture:
Do not use radiators and towel rails for grounding!
Understand the type of RCD! If a washing machine with a speed controller is installed in the bathroom, as well as light source controls and other electronic devices (audio equipment, television) that can give a permanent (and not variable) leakage current, type A RCDs should be installed. AC-type devices are effective only for variable (sinusoidal) current.
On the picture: model MP3 mirror from Antonio Lupi factory.
In addition to grounding, it is recommended to provide residual current devices (RCDs). So, if there is a washing machine, a water heater or some other device with a big load on the wiring, then a separate RCD and a circuit breaker is necessary. These devices for a fraction of a second (from 0,8 to 0,01 s) will de-energize the electric circuit, if insulation is damaged on it or the person touches the current-carrying vein.
Here it should be indicated that the leakage current required for the RCD to trip and the rated current of the RCD for the bathroom should be lower than on the common switchboard, so that when the appliance operates, only the bathroom, and not the whole apartment, is de-energized.

- 1 of 1
On the picture:
Often the bathroom is used as a place of permanent registration of the washing machine. Be sure to connect this device through its own outlet with its own "automatic".
How to calculate the sectional area? To do this, you need a caliper and a calculator. Recall that the area of the circle is equal to the number π multiplied by the square of the radius (S = π r2). Accordingly, it is necessary to determine the wire diameter (using a caliper), divide it by 2 (find the radius), multiply the resulting number by the square and multiply by 3.14 (the number π). So, for example, if the core diameter is 1 mm, then the cross-sectional area will be (1/2) 2 3.14 = 0.785 mm.
- Do not save on wires. Purchase a cable with a copper core in double non-flammable insulation (the lettering contains the letter H or Hg). Copper wire is more durable than aluminum, in addition, the latter always has to take a larger cross section than copper. By the way, buying a cable, it makes sense to check the area of its section: often it is less than the claimed.
- It is inadmissible to directly connect copper and aluminum. For example, an old aluminum wiring, with a new copper wire. Over time, there will be oxidation, which can lead to the destruction of the conductor. To connect the conductors from different materials, use the terminals (mounting blocks). And in general, it is better to avoid connections by the "twist" method, they are unreliable.
- Do not skimp on the protection equipment. These are the basic devices that ensure the safety and durability of your home electrical system. Quality automatic circuit breakers, RCDs or differential automata can not be cheap. We recommend using mechanical RCDs - they are much more reliable than electronic ones, since their operation does not depend on the voltage in the network or external power source.
- Avoid connecting multi-wire strands of wire under the screw (for example, in terminals and counters). Such a connection is unreliable, since thin wires are distributed under the end of the screw and, as a result, only a few of them are pressed.
Wiring in the bathroom must necessarily be safe. The old standard, when in the middle of the room you can install a lamp, and the outlets and switches must be taken out of the bathroom. But this method has long been practiced by no one. Wiring in the bathroom should only be done by professionals.
Basic requirements for wiring in the bathroom:
- choose lamps that work from a safe voltage - 12V. In this case, you will lED lamp. They are durable and determine a minimum of electricity.
- all wiring elements must be protected from moisture.
- the line must have a ground loop.
- a group of luminaires and sockets shall be equipped with an RCD and a circuit breaker.
You can use external and hidden cable laying on the walls. For open installation, it is advisable to choose a cable that corresponds to the marking so that it is suitable for rooms with high humidity.
If you fulfill all the requirements, then in the future you will not encounter any problems with regard to electrical safety.
Installation instructions
Step 1 - Create a scheme
First, determine the wiring diagram in the bathroom. Think about what electrical appliances you have, will, and where they will stand. And also, what heating there will be present.
- the junction box must be located outside the room.
- the switch with the box is taken out to the next room.
- automation is installed on each group of wires separately: sockets, a lamp.
- in the bathroom there must be at least 3 sockets: for a hair dryer, washing machine and electric boiler.
If you have a false ceiling, then the wires can be carried through it. Please note that all outlets and switches must be located 60 cm from the water.
Step 2 - Select the accessories
You need to choose suitable wiring elements and determine their technical characteristics.
To make wiring in the bathroom yourself, we recommend you choose the following materials:
- cable three-core, copper, cross-section 2.5 mm for sockets, 1.5 mm for luminaires and 4 mm for household appliances.
- dowel clamps for fastening to walls.
- waterproof sockets and switches.
Step 3 - Get Started
First, according to the scheme, it is necessary to make special grooves in the walls - shtroby, under the laying of the cable. Also make grooves for sockets, junction box and switches. To do this, use a drill with a crown, diameter 68 mm.
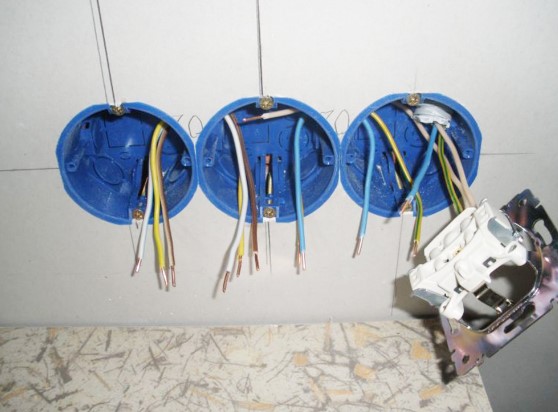
After that, fix the harness in the stitches yourself using the clamp dowel. Or you can use a proven grandfather's method - grab a mortar every 20 cm. Protect the ends of the cable from insulation and thread them to the sub-labels.
Now you can install the core of the sockets and switches in the seats. Decorative cover attach better after repair, because it can get dirty.

To install the circuit breaker and RCD, you can go after the wiring is fixed to the wall. Just do not rush to connect them, because you first need to check the correctness of the wiring in the bathroom.
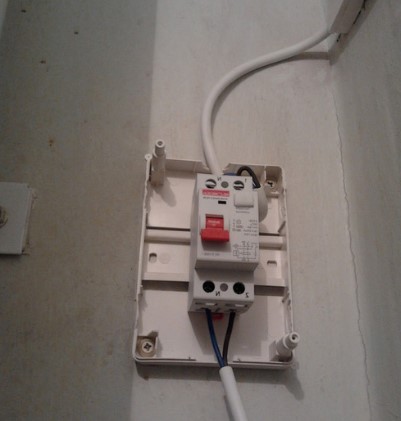
After making the wiring in the room, be sure to check the multimeter line and the presence of a short circuit in the network. If it is not, then you have done everything right. Then you can proceed to the decorative decoration of the walls.
The next step is the system of equalizing the potentials in the bathroom. To do this, take a single-core copper wire and connect the body of the washing machine, the sink, the boiler, the bathtub, etc. All these points must be grounded with a grounding bar, which is installed in the input board.
Pay attention to the fact that if your shield does not have a grounding bar, then make sure to replace the electrical wiring in the apartment safe.
For heating, it is best to use the electric floor under the tile. You can put it on the floor yourself. This does not require a special effort.
Finally
To date, the most popular are suspended plasterboard ceilings and plastic panels. If you use them, it will make electrical work much easier. Because when wiring the wiring in the bathroom under the suspended ceiling, it will not be necessary to lay the strobes, simply place the cable in a protective corrugated pipe. Gofra is fastened with clips to the profile.
In the apartments there is often no grounding. In this case, you will need to replace the wiring. If you are installing wiring, then remember that the wiring in the bathroom must be grounded.
That's all I wanted to tell you. We hope that our information was clear and useful for you!