Antipyretics for children are prescribed by a pediatrician. But there are situations of emergency care for fever, when the child needs to give the medicine immediately. Then the parents take responsibility and apply antipyretic drugs. What is allowed to give to infants? How can you bring down the temperature in older children? Which medications are the safest?
LED lighting the ceiling with their own hands, the matter, generally speaking, is not new. With LED-based lighting design (LED, Light Emission Diod), radio amateurs started experimenting back in the 70's as soon as the LEDs appeared on sale. The main obstacle to its wide distribution was the imperfection of the diodes themselves - a limited color range and a "sharp" spectrum. Too bright a light from the first light-emitting diodes cut eyes.
Now the LEDs give a light of all the colors of the rainbow with a smooth, "soft" spectrum. On sale there are special assemblies of light-emitting diodes for LED design - LED strips, power supplies to them and controllers, allowing smooth adjustment of color and brightness of radiation. Now people can be engaged in the technique is not versed. There are several options, so consider the most popular and technically most difficult: lighting the hanging and stretch ceiling. All the rest will be made easier.
Types of LED lighting
The suspended ceiling can be illuminated in four ways:
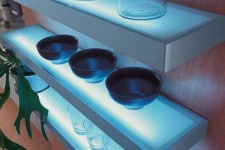
- Contour diffuse illumination - LEDs are located on the shelf (bottom row in the figure) and shine up. The backlight forms a continuous light strip.
- Directional illumination - LEDs are mounted on a slope and shine along the ceiling. On the main (base) ceiling, there are divergent rays.
- Spotlight (The "starry sky"). LEDs shine from the ceiling straight down. It is more difficult to make such a highlight; tape here can not do, and we need some (however, elementary) technical knowledge.
- Figured backlight. LEDs are placed in small ceiling plafonds. For the device of such illumination, except for technical knowledge, skills of the house master are necessary also.
Ceiling lighting with tape
The contoured and directional illumination of the ceiling by the LED ribbon is the easiest way of lighting design and at the same time a broad field for creative imagination. Technical details of it are reduced to the choice of tape, power supply and some subtleties of installation. We'll talk about the installation below, but for now let's consider how to choose the right technique.
LED strip selection
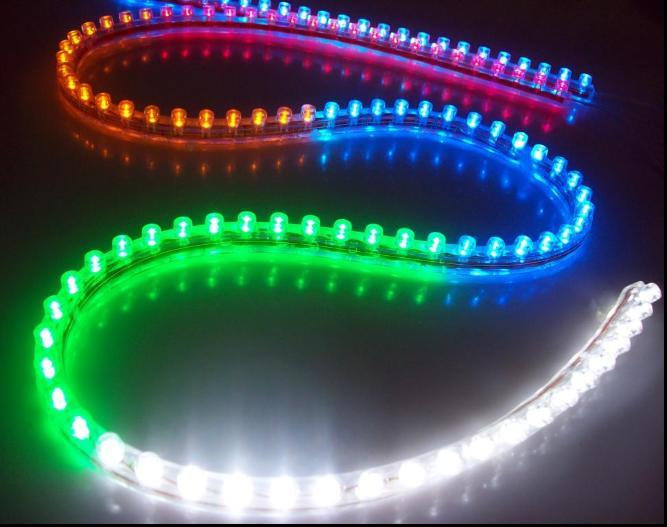
- Color ribbon. Here the choice is unambiguous - a full-color RGB tape with a controller. The price of the tape itself is the same as the one-color, and the controller costs less than the ribbons of complementary colors. The question is, why then do monochrome tapes? For special illumination on the big extent, when the price of the equipment matters: show-windows, trees, large halls.
- Density of emitters. The density of the radiators on the tape can be 30, 60 and 120 per meter. For contour lighting, of course, it should be more - 60 or 120. But for directional lighting, it is better to take a tape with a density of 30 or 60. If the dimensions of the recess allow it, it is better to install two tapes: on the shelf - 60 and 120, and on the shelf the slope is 30 and 60. Then you need 4 power supplies with controllers, but this installation will give a wide range of light effects: after all, tapes can be turned on and adjusted together. You can get a double color border, alternating rays, etc.

- Power tape. LED stripes are indicated by SMD letters and four digits, for example SMD 3028. The first two digits indicate the power consumption of the tape. The tape SMD 6035 will be more powerful than the above. Also, the power of one meter of tape is indicated in her passport. For the outline illumination, 8 W / m is enough; for directional - 5 W / m. Better to put on the shelf tapes for 7 and 12-14 watts, and on the escarpment - 5 and 7 watts. This will make cheaper, without adjusting the brightness, controllers and simplify the color adjustment.
- Total power backlight. This parameter is calculated by the length of the light strip. Measure roulette, we count how many meters of tape it takes, and multiply by the power of the tape meter.
- The power supply and the controller are selected according to the power required to illuminate the corresponding light strip. Of course, the supply voltage must also be suitable. LED strips are available with an operating voltage of 5, 12 and 24 V. The same should give the PI, and the controller must also be designed for this voltage.
Installation of contour and directional illumination

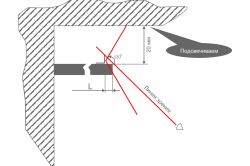
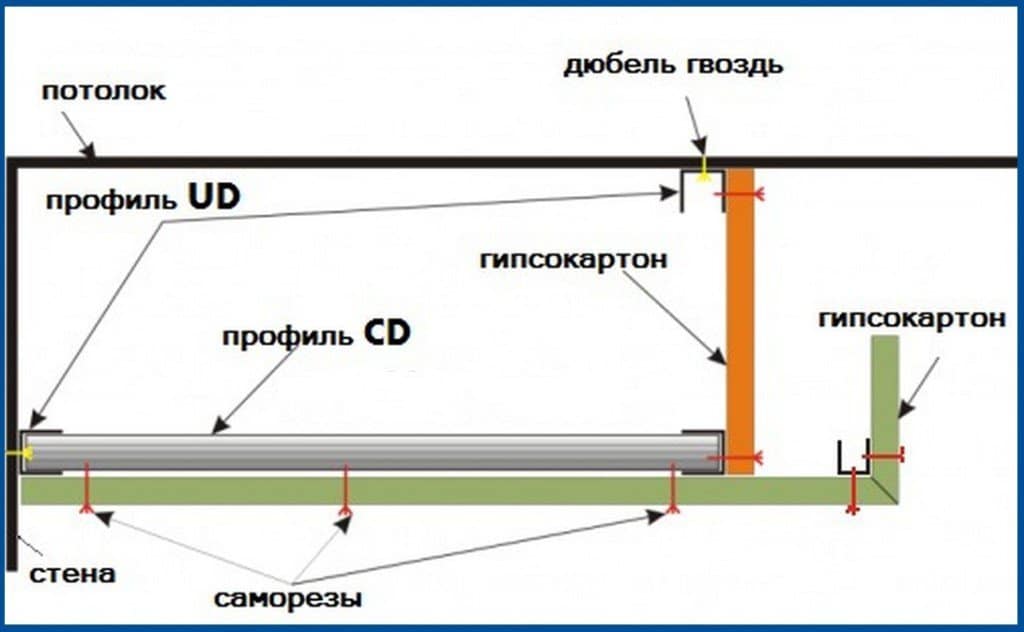
How to mount the tape in the plasterboard ceiling, it is clear from the figure. Let's give just a few tips:
- LED stripes are mounted on velcro; The adhesive layer is applied from the back of the tape and is covered with a protective film. Before assembling the tape, select the appropriate corner for the shelf and reclining of the PVC corner, and fix it in the recess with small screws. To PVC Velcro adheres tightly, but from plasterboard can eventually peel off. If the suspended ceiling is highlighted, the PVC corner is mandatory: in fact for the smallest repair of the lighting it will have to be removed.
- Gently solder the wires to the straps. Their plastic base and LEDs themselves are afraid of overheating. It is better to use flux-solder for soldering, soldering POS-61 or similar, with a melting point not higher than 160 degrees, and soldering "with one pincushion". If you do not have much experience in soldering small parts, it is better to invite a master for soldering.
- Do not connect more than 3 m of tape together. Current-carrying tracks in the mass of the plastic base can not withstand a large current. Sections of 3 m long are connected to the controller by separate wires
- In case of self-wiring, observe the polarity and purpose of the wires: + from the IP to the + controller; respectively and -. From the controller + V, R, G, and B - to the corresponding terminals of the tapes.
- Cut and trim the LED strips ONLY on the cut lines marked by the manufacturer. The exception is the last section, but it is necessary to cut with sharp scissors or cutter-cutters in one motion exactly in the middle between the diodes.

connection diagram light diode tapes to the power supply and controller
As you can see, the hidden lighting of the ceiling with your own hands is done quite simply and already allows you to get a great aesthetic effect. To strengthen it, especially since you have already gained experience, you can by using other types of highlighting.
Video: installation of LED tape on the ceiling in the "Apartment issue"
Backlight "starry sky"
Components and components
For the "starry sky" tape is no longer suitable, you need separate LEDs. First of all: do not try to include a lot of LEDs directly into the 220 V network. Uninformed people sometimes reason: aha, in a flashlight 3 diode glows from 6 V; then 100 diodes can be turned on in 220 V after rectification.
It is impossible, it will end in an accident and in the literal sense of the word burnt money. For batteries, the internal resistance increases with increasing current, and the current through the diodes is limited. At the mains, the internal resistance is practically zero. The quenching resistor does not save: the LEDs do not hold the reverse voltage of 220 V (310 after rectification), they will immediately pierce, and a short circuit will result - a short circuit with all its consequences.
Therefore, for the "starry sky" you need the same IP, as for the tape, but at 5 V. The power of the IP is calculated based on the number of LEDs: 10 W per 100 LED. Extra power IP does not hurt. Simply, since enough for the "starry sky" 20 diodes, the IP is the most simple and cheap. It is also desirable to purchase a controller-interrupter for 4-8 sections of diodes. Then the stars will flash like real ones.
When soldering individual LEDs, observe the polarity: the positive terminal of the diode is longer and is indicated by a key, and the precautions are quite easy to break. Also, do not forget to put an insulating tube - "kembrik" on each pin, otherwise after installation, the hassle will not be short-circuited.

Mounting the "starry sky"
The easiest way to illuminate the "starry sky" is to provide a stretch ceiling: the LEDs are simply glued to the base ceiling with drops of building silicone. It remains only to correct them, so as not to shine very much to the side, and enjoy the spectacle of the starry sky.
If the ceiling is gypsum plasterboard, it is necessary to cut an additional plate directly into the ceiling niche, drill holes in it according to the number of diodes, close the semitransparent plate on the front side, mount the electrical part and install the entire structure in a ceiling niche. It's not a matter of minutes, and requires a certain skill. But, if the plate is finely corrugated, then the "stars" will give prickly rays, like real ones. If, moreover, the image of a real starry sky with nebulae, galaxies, etc. is glued on the cover plate, and the holes for the diodes are drilled in accordance with the position of these stars, and with the help of the damping resistors, the brightness of the luminescence will be amazing.
Video: ceiling "starry sky" - overview and installation
Figured backlight
For curly lighting in the false ceiling, they drill a feather or a circular drill - a "ballerinka", a centrifuge, holes for small plafonds, into which the LEDs are placed. A typical solution is one, directed down, in the center, and 4-6, giving the rays along the ceiling. But, of course, the choice of a specific solution is entirely the matter of the taste of the master and his household.
About colors and flashing
Important: The ceiling lighting has a serious psychedelic effect. First of all, flashing - you can not use the frequencies 0.5 Hz (every two seconds), 2 Hz (twice a second) and 7 Hz (seven times per second). They coincide with theta and alpha rhythms of the brain and can, especially under red light, cause even an epileptic fit.
It is absolutely unacceptable for a quick and sharp flashing with the help of simple interrupters, for example - from an emergency flashlight. It is necessary to apply a special controller, when connected to which the diodes will flare up and go out smoothly. And with any, even the slightest deterioration of health at or after watching the flashing lights, blinking should be turned off. Especially - if you hear a noise in your head, there are spots before your eyes, your head turns.
The color of the highlight also has an effect on the psyche:
- Green and yellow-green - calms, relaxes.
- Yellow and yellow-orange , like the light of incandescent lamps, is mentally neutral.
- Blue, turquoise and aqua - pacify, tune in for serious conversation or in-depth meditation.
- Blue - strains, forces to gather, guards, sharpens wits.
- Combination yellow from blue - can cause hysteria without any reason.
- Red - alarms, excites. At a party in tipsy guests red highlighting is better not to include: impressionable subjects may behave inadequately. But in the matrimonial bedroom the red light can have a beneficial effect.
The result
Installation light diode illumination the ceiling is quite feasible for the person with the initial skills of the home master. The appearance of LED ribbons on the market made lighting design accessible to any person who knows how to do something with his hands and has an artistic taste.
Lighting the ceiling with an LED strip is a very popular way of obtaining unusual interiors in modern dwellings. The additional popularity of this technique is attached to the fact that all the installation work can be done by oneself, without seeking help from specialists in the field of electrical engineering.
1
The active development of innovative technologies allowed designers to develop a whole range of new techniques that make it possible to radically change the visual perception of various living spaces. By installing a modern lighting system using diode tapes, you can literally transform any apartment or house, make a home truly original and cozy.
By and large, the LED ceiling light was tried to perform in the 1970s. It was then that the first diodes began to appear on the market. But in those years of wide distribution, new lighting was not received due to the fact that it had not the most pleasant spectrum for the human eye (too sharp) and a small color range. Now these problems are solved. Diodes with a soft spectrum and with any color shades are on sale. And most importantly - in our days an amateur lighting design can be practiced by almost any house craftsman.
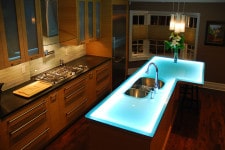
Diode illumination in the apartment
It is enough to purchase a suitable set for creativity, which includes special controllers, power supplies and diode tapes, and arrange a home with your own hands in the desired light version. LEDs allow you to decorate any ceiling surface. The most difficult to do by yourself is the lighting design of the hanging and. But with the right approach to the matter, this problem becomes solvable. And without the extra costs of effort and time.
Ceiling lighting with the help of lED strip carry out in different ways:
- Pointed. In this case lighting position so that they throw light straight down. The most famous option for point-wise LED lighting is the so-called starry sky.
- Directed. Instruments are placed in a special way on the slopes. Due to this, they shine along the ceiling surface.
- Broken (contour). Under such a scheme, diodes form a continuous strip of light on the ceiling (they are directed upwards, not downwards).
- Figured. In this case, lights are installed in the ceiling light shades, which makes it possible to create a special lighting configuration.
With your own hands, you can make all the above schemes for any ceiling (tension or the most common). But first you need to determine the characteristics of the diodes that you plan to use.
2
The first characteristic on which to pay attention is the color of the diodes for the ceiling. It can be different. And you can decorate the ceiling as a single-color LED strip, and multi-color. Control of glow of products with several colors is carried out remotely. In residential buildings, as a rule, use a backlight from radiators of different shades. A single-color products are usually installed in public institutions, in exhibition and trade halls, where the total length of lighting is high. For the price, by the way, the ribbons with one and several colors are no different. They are about the same.

LED Ceiling Lights
The next important parameter is the density of diodes on one tape. They can be 120, 60 or 30 for each meter of the product. If the directed illumination of the ceiling is arranged, the pros are advised to purchase ribbons with a density of 120 or 60. But contour lighting with their own hands is better done with products from 30 (in large rooms - with 60) emitters. Ideally for a stretch ceiling it is desirable to use just two tapes with different density. On the slopes in this case, you need to install products on 60 (30) emitters, and on the shelves - 120 (60). But such an option is possible only when the niches for the installation of diodes are relatively large.
Next, we determine the power of the LED strip. Such products are marked with SMD letters. After them there are figures, they indicate the power. For example, if you have two products labeled SMD 6035 and SMD 3028, you know that the first tape will be more powerful. Also, the power of a particular radiator is easy to find out in his passport. In practice, directional illumination is most often performed by tapes with a luminous intensity of 5 W / m, and a contour line of 8 W / m. If you put several products at once on the slopes and on the shelf, choose the radiators at 5-7 and 7-17 W / m, respectively.
The controller and the power supply for the LED strip should be selected taking into account the power of the lighting product. It can operate from 24, 12 or 5 V. For the same indicators, both the controller and the power supply must be calculated . In cases where the ceiling lighting can get wet (negligent neighbors from the top, constant high humidity in the room), it is desirable to install tapes, in the marking of which there are IP letters. This type of lighting equipment has a special waterproofing coating based on silicone. It perfectly protects the lighting fixtures from moisture.
3
LED strip for a conventional or stretch ceiling is mounted on the frame. It is made from (GKL), making a kind of cornice (shelf, niche). The frame can be located along the perimeter of the ceiling or be hidden between the second and the first levels of the surface of plasterboard sheets. Make this shelf with your own hands is easy.

Prepare the skeleton of the ceiling for the installation of lamps
Its installation is as follows:
- Step back from the ceiling slabs by about 10 cm and place the first level of gypsum boards on the skeleton of the galvanized metal profile.
- Connect the next part (second level) to the assembled structure. Here it is necessary to leave enough space between the ceiling and the wall surfaces, so that the light from the diodes would pass into the room without problems.
- You trim the second level of the frame with sheets of gypsum board, forming a shelf for mounting the LED strip.
- Lead the wires to connect the lighting to the mounting slot and connect them (temporarily) to the GCR. For these purposes, use a conventional painting tape or tape.
Now you need to make the putty on the ceiling, perform its final finish, and then proceed with the installation of modern diode lighting. Ceilings of tension type are usually mounted special skirting boards, moldings and cornices of polyurethane. And they are already installing LED emitters. Due to the fact that these polyurethane elements have a variety of types of images, stucco and original finish, it's easy to create a unique decoration by your own hands. And to supplement it with original diode lighting equipment.
4
LED strip is usually sold in five-meter long spools. If a contour highlighting of the ceiling is made, several such coils are connected in one piece. It is not recommended to consistently connect more than three reels. In cases where the perimeter of the room where the installation of diode tapes is performed is more than 15 meters, parallel connection several sites.

Installation of LED strip
When connecting the LED strips with their own hands, you must carefully monitor their polarity. Incorrect connection will result in the failure of all products when they are turned on.
The tapes are attached to the frame without the slightest problem. There is an adhesive tape on the back of them. It is covered with a film. You just need to carefully remove this cover and mount the product on the ceiling. It is undesirable to glue the LEDs directly to the GCR. Over time, they can move away from the drywall. It will be optimal to choose angles from polyvinylchloride for slopes and cornices (if the installation of diodes is performed on a stretch ceiling - from polyurethane) and fix them with universal screws. And then to stick to these additional details a tape.
After placing and connecting to the wires removed from the frame, the LED strips must be connected to the power supply unit (PSU) and (if multi-color products are used) to the controller. If the created lighting system has a power of more than 50 W, install several power supplies with low power. Such devices are small in size. They are easy to disguise in the plasterboard shelves on the ceiling. If you use blocks of 70 W, they can protrude from the frame and thereby spoil the appearance of the ceiling surface.
The very process of connecting tapes to the PSU with your own hands is elementary. You just need to connect the correct wires and terminals. When this is done, turn on the backlight and check it. If everything works fine, praise yourself for the fact that you were able to create an unusual light decor in your home with minimal financial costs.
- Types of LEDs and features of the choice of LED strip
- How to properly install the LED backlight
- Preparatory stage and preparation of materials
- Which tools are mounted backlight
- Description of the stages of installation of the frame for a niche
- Recommendations for the performance of installation work
Increasingly popular is the use of LED lighting for stretch ceilings, which can reflect light well and create the illusion of height. The ceiling installation by the hands of plasterboard is very often accompanied by the installation of LED lighting.
It should be remembered that the lighting should be in harmony with the interior.
LED lighting of the ceiling with your own hands can be arranged only if you have certain skills in working with electricity.
LEDs in their manufacture are mounted in special tapes, making the installation convenient. Low energy consumption and long service life allow the use of LEDs in the advertising industry.
You can create LED lights yourself. The ceiling lighting should be installed by hiding the ribbon with the LEDs behind the skirtings of the ceilings or in the recesses so that the lighting can not blind the eyes. In any case, the lighting should be reflected. You can create such a tape with your own hands by changing the electric lamps on the LEDs.
The voltage level to which the LED strips are designed can vary depending on the number of LEDs on the tape. The installation scheme for LED strips is not particularly difficult, so that the ceiling lighting can be mounted even by a high school student who has an idea about electrical circuits.
Before the device, LED illumination is calculated depending on the required number of running meters and the power of the tape, which is determined by the type of LEDs. The determining indicator of the power level is the number of LEDs located on one running meter of the tape.
Types of LEDs and features of the choice of LED strip

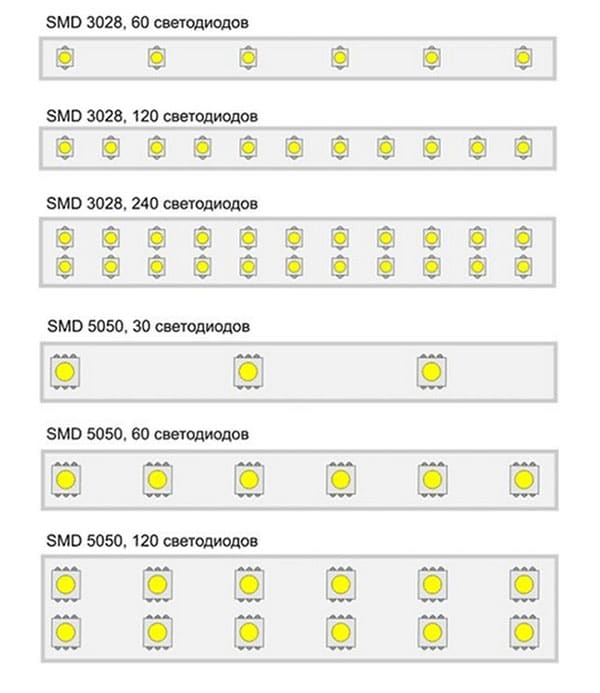
There are two different types of LEDs, the distinguishing characteristic of which are their overall dimensions. In order not to make a luminaire from LEDs, you can buy LED tapes, the types of which are: SMD 5050, SMD 3528. The following power indicators can be distinguished, depending on the number of LEDs on 1 running meter:
- 4.8 W - 60 pieces; 7.2 W - 120 pieces; 16 W - 240 pieces for SMD 3528.
- 7.2 W - 30 pieces; 14 W - 60 pieces; 25 W - 120 pieces for SMD 5050.
When choosing the backlight, you pay attention to whether it is a multicolor or one-color one, which affects its cost. If the tape is multicolored, then it is necessary to purchase a controller that allows you to control colors that depend on the crystal in the semiconductor. You can select three colors of LEDs: blue, red and green.
If you need to take for lighting installation 10 m backlight from SMD 3528 LEDs, then if there are 120 LEDs per 1 running meter, the power consumption will be 72 W. Together with the LED strip, you usually purchase a device called a controller, as well as a power supply required to connect the tape.
The power supply and the controller should be selected when purchasing, taking into account their power reserve, which is about 30% of the set value. Before connecting, you should determine the power indicator of the power supply, depending on the type of tape and the number of LEDs located on 1 running meter.
A ceiling with a contour highlighting presupposes the presence of a backlight SMD 3528, which has 60 diodes per 1 running meter. To this end, you can use the tape brand SMD 5050 (30 diodes). With full or partial illumination of the room, a SMD 3528 tape with a density of 120 diodes is required. You can use the backlight SMD 5050, which has 60 diodes on 1 running meter.
Back to contents
How to properly install the LED backlight
Back to contents
Preparatory stage and preparation of materials

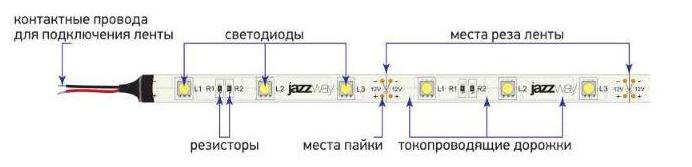
Before you make the LED backlight, you need to solder and connect the tape, then check the quality of its connection to the controller, power supply and outlet. In order to properly cut and weld the tape, connecting each wire at specially marked locations, it is necessary to pay attention to special labels.
Before assembling, you must pre-purchase stronger wires of the required length to replace the former backlight wires, which are very thin and can break. Having repaired the thin wires of the tape, the new ones must be firmly fixed in each of the controller and power supply sockets equipped with a special terminal box. In this case, installation of limit switches having a cross section of 0.75 mm2 is required.
When the length of the illuminated section is more than 10 m, individual sections of the tape are connected by means of parallel connection. The lengths can be taken as 5 meters in length. To fix the lighting to the wall, you need to prepare a polystyrene cornice, attaching it to the wall.
For the installation of the tape, you can use not only the selected substrate, but also a special metal, that is, a profile made of metal or aluminum. To secure the tape was reliable, the surface is cleaned from chips, dust is removed from it and degreased with alcohol.
For installation you should have at hand copper wires section 0.75 sq. m. A connector, or connector, as the wires are called, can be used in several colors. This will not create confusion between the colors of the LEDs. One-color wires can be used by gluing on them a colored insulating tape.
Back to contents
Which tools are mounted backlight

Tools necessary for work: drill, nippers, marker, hacksaw, gon.
Make the LED ceiling lighting will help the following tools:
- Nippers.
- Soldering iron.
- Solder.
- Tweezers.
- Flux.
- Ladder.
- Hacksaw.
- Corner.
- Marker.
- Drill.
To cut the wire, use pliers or pliers, having cheeks on their side, necessary to snap the wire.
To make a beautiful and reliable lamp from LEDs with your own hands, you must use a soldering iron. A soldering iron with a minimum power of 25 watts is required.
One of the most popular types of solder has a PIC brand, that is, a tin-lead solder. The melting point of the solder is determined by the percentage composition of tin and lead, it can reach different values. The PIC solder, being soft, has a melting point of 300 ° C.
Tweezers, being a necessary thing in the process of soldering, are used for the convenience of supporting parts and wires. However, tweezers can perform the function of heat dissipation, because when overheating, the LEDs can stop performing the lighting function.
Fluxes are used in soldering, since they contain the content of acids and metal salts. Very suitable for soldering is not only rosin and flux, but also aspirin. Work with acetylsalicylic acid must be extremely carefully and carefully, as its vapors on heating can strongly irritate the lungs and nasopharynx. If soldering acid is used, it is rinsed after rinsing with water, since the reaction can continue and proceed to the details of the backlight.
Light effects have long and successfully been used by designers as a decorative element or for the selection of various functional zones. But not everyone of us is so friendly with the electrician to mount the lighting equipment as he wishes. But with the advent of LED ribbons, it is possible to arrange additional light sources and various interior "chips" with their own hands, not only in living rooms, but in the kitchen. Therefore, we suggest to learn everything about LED ceiling lighting with ribbon: how to install, choose the right accessories and use for the original design of the room.
To illuminate the suspended ceiling, there are several types of illumination - from various "point" devices to a system with conductive paths, on which diodes are attached. The latter option is interesting in that it does not require special skills for installation, consumes a minimum of electricity and can be used to illuminate any interior element. Agree, this decision deserves attention, so we will consider it in more detail.
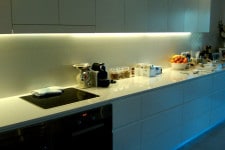
Light effects can be an interesting accent for the kitchen interior:

Interesting! LED backlighting is considered the most profitable in terms of savings, because 1 diode will cost only 0.65 kW / h for 12 hours of trouble-free operation.
Types of LED lighting
For decorative lighting in the store, you can offer tight "rulers" on a rigid substrate or duralight - cords with a 360 degree glow angle. But the most widespread was the board on a flexible basis, which we used to call LED ribbons.

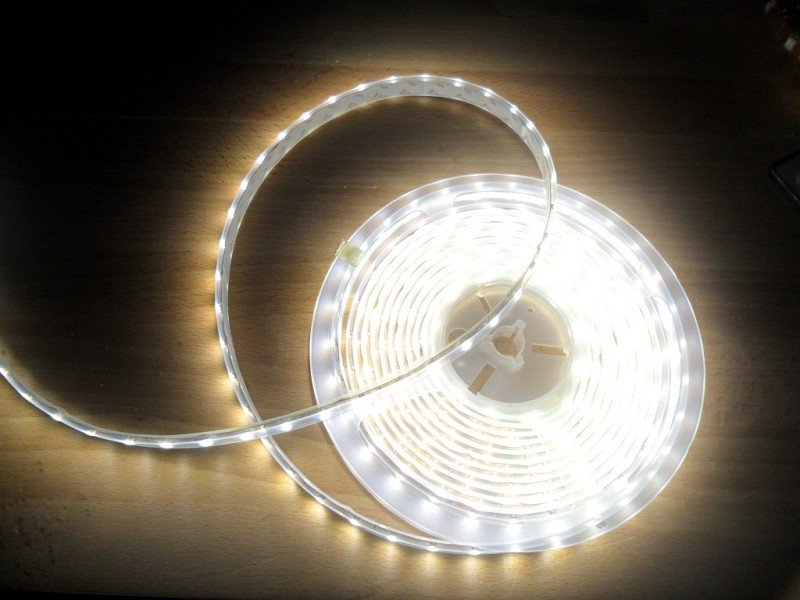
Plates with diodes are released wound around round reels, this protects the system from creases and other damages
LEDs can be used as a primary, additional light source or simply for decorative purposes. Therefore, choose the option that is most suitable for your interior and ceiling configuration.
- General lighting - implies a complete replacement of traditional lamps with LEDs. To do this, several powerful tapes are installed around the perimeter and behind the stretch ceiling film. True, this option is rare, as the purchase of a large number of diodes will have to spend an impressive amount.
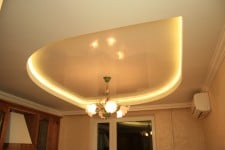
- Outlining contours - conductive paths with diodes installed behind the cornices or in specially equipped niches along the perimeter of the ceiling, create muffled diffused lighting and visually increase the height of the room.
- Figured illumination - with a light of LEDs, you can highlight a certain zone, emphasize various protrusions or depressions in suspended structures.

Flexible tapes can accept even the most convoluted and curvilinear forms
On a note! LEDs can be used not only for ceilings, but also for the design of a working apron, floor podiums, window and door openings. Tapes effectively emphasize the contours of furniture and technology, with them it's easy to focus on pictures, beautiful dishes and other accessories.
Variants of LED decor for the kitchen:
Backlight "starry sky"
Speaking about the original light solutions, of course, one can not mention the hit of recent years - the highlight with the romantic name "starry sky". True, this kind of decor is easiest to arrange for stretch ceilings. The principle of operation is quite simple: behind the canvas or film are placed LEDs of different diameters and radiation strength, which create an effect reminiscent of the flicker of stars.
To arrange such a highlight, select individual LEDs of different power and size, which need to be soldered into the network, and then glued to the base ceiling with building silicone. This is the most difficult stage, because, in addition to observing the polarity, it is important to conclude each conclusion in the kembrik - an insulating tube that will protect your "sky" from short circuits. For a more realistic effect, several miniature light bulbs can be pulled out, making neat punctures in the film.
Then, select and install the power supply, the power of which is calculated by the number of crystals (100 watts will require 10 watts). It is also worthwhile to purchase a controller-breaker for each section of 5-10 diodes. With it, "stars" can not only shine, but also blink.

Selecting a stretch ceiling film with a picture on the space theme will increase the realism of the "stellar" effect
On a note! If you want to set "starry sky" you can and in gypsum cardboard ceiling. But for this you have to cut out a niche in it or drill holes according to the size and number of light points.
How to choose and install an LED strip
Manufacturers provide us with so many Led solutions that it's no wonder that people who are far from an electrician are confused and confused. But since the purchase depends correct installation diode illumination and its work, we will try to disassemble in order the most important technical nuances.
Varieties of LED ribbons
All systems with LEDs can be classified according to several parameters: the type of attachment, the number of diodes, color, power. What specifically to pay attention to depends on the design idea that you wish to translate into using light effects.
For example, for decorative lighting, the most important parameter is the color shade of the glow. And according to this characteristic, the tapes are divided into monochrome and multicolor. The first light emits only one tone when turned on. And not necessarily traditional white, it can be red, green, yellow, purple or bright-green color. Of non-standard options is worth noting tape with ultraviolet or infrared luminescence.

Choose a highlight for any interior
Despite the wide range, the choice of gamma backlight should be approached with caution - psychologists claim that the long-term exposure to color has an effect on the psyche. So, to "calm" tones, which can safely be used for kitchens and living rooms, include all shades of greenery and turquoise, as well as yellow and orange colors. Red, pink and burgundy lights should be left for the bedroom. But the bright blue lights are alarming, the person unconsciously strains and feels uncomfortable. The combination of dark blue with yellow is generally not recommended for impressionable natures - such a backlight acts depressingly and can cause a nervous breakdown.
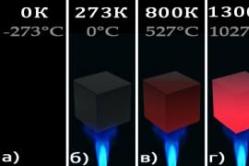
Please note that even a classic white color can have different shades and radiate a radiance of warm or cold light. These "temperature" nuances are important in creating an organic interior, you can determine them by examining the documentation. So, the illumination with the indicator 3000-3500К will emit warm light, 5500-6000К - neutral, 6500-7000К - cold.
Important! For outdoor installation, you should pay attention to the color of the base so that the tape does not get out of the general background. In addition to the standard white, you can find a gray, brown or transparent substrate.
Multicolor RGB systems can change shades one at a time or glow with all the colors of the rainbow at the same time. But they are much more expensive than monochrome analogs and work only in combination with a transformer and a controller that sets the color switching mode.
One of the most important parameters from a technical point of view is the power of the LEDs and the density of their placement. The most popular are Led bands with 60 and 120 diodes per 1 m, but there are other options - 30, 72, 90, 240, and the bulbs can be arranged linearly or in several rows.
Varieties of Led-systems for the density of LEDs
Important! The smaller the gap between the diodes, the brighter the backlight and more energy consumption. For decorative purposes, enough 30-60 diodes / meter, but if you plan to replace the main light source, you should choose a tape with 120-240 bulbs.
Inspection and purchase of tape and components
To determine what material is suitable for the implementation of your ideas, study the notation on the board. Standard household lighting tapes have the abbreviation SMD (short for SurfaceMountedDevice - "device for surface mounting"). The digits indicate the size of each LED. For example, SMD 3528 means that the parameters of 1 diode are 3.5 by 2.8 mm.
On a note! The most common are 3 types of LEDs: small - 3020, medium - 3528 and large 5050.
The intensity of the glow directly depends on the size of the diodes and the density of their placement on 1 m of the ribbon. With density, we figured out above, and now we'll show you how to find out the power of the system, because the choice of the power source depends on this.

Power consumption of illumination at different frequency of placement of LEDs
To calculate the required footage, arm yourself with a tape measure and measure the perimeter of the highlighted area. The resulting digit is multiplied by the meter power of the selected type of tape and you get the value that should be used when buying the power supply (transformer), and for multi-color products - and the controller. These accessories can be designed for 5, 12 and 24V, but if you do not plan to replace the main lighting, enough devices at 12V.
Important! The total power consumption of the backlight should not be more than 80% of the rated power of the transformer.
LED strips have a different protection class. This indicator affects their ability to withstand the effects of moisture, dust and other negative external factors. To determine it, you need to find on the package an abbreviation with the letters IP (stands for IngressProtectionRating).
- IP 20 - are designed for indoor use and do not have a seal.
- IP 65 - suitable for backlighting, contact with water: working apron, washing, aquariums, etc. Such material can be used not only for internal works, but also on the street.
- IP 68 - fully isolated systems that are allowed even for use in water.
Determine the presence of protection can be even with a visual inspection - ribbons that are not afraid of the wet environment, will be flooded with a thin layer of transparent silicone.
Important! To illuminate the ceilings (including in the kitchen), you can use a conventional board, designed for outdoor installation. The fact is that the silicone layer not only muffles the intensity of light, but also leads to the heating of the substrate and the surfaces touching it. Therefore, do not use protection where there is no need.
Mounting the LED light yourself
To independently install the lighting on the kitchen ceiling, it is important to know that by the type of attachment all the tapes are divided into:
- Self-adhesive (the most common) - mounted on a sticky base, which is equally suitable for wood, plastic or glass. Deficiency - glue with time, from humidity or several re-gluing, can "go away".
- With fasteners - fixed using special brackets-clamps on any material. Such installation will be more reliable, but it will take much more time and effort than a tape on an adhesive basis.
Important! Tapes are produced in 5-meter rolls, but most sellers offer retail sales and lengths of the required length. The places for divisions are most often indicated by the image of scissors, it is necessary to cut them strictly along the dashed lines, so as not to damage the chain.
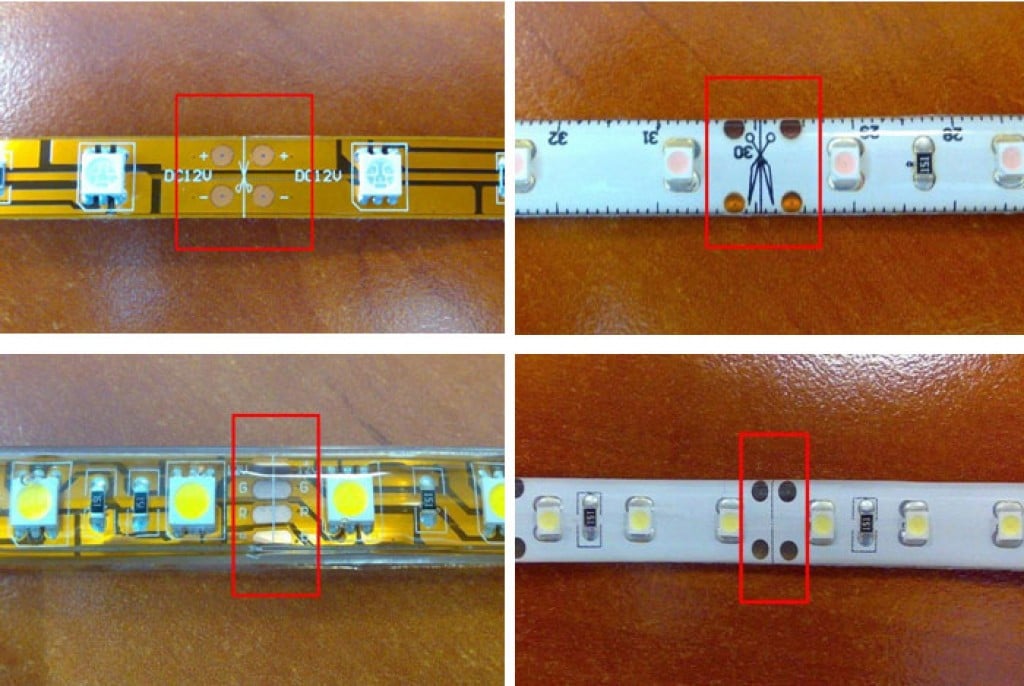
On some tapes the places of cuts can be indicated only by a vertical line
With self-assembly, consider one more important feature for any LED products - thermal conductivity. The fact is that manufacturers have not yet managed to achieve 100% efficiency from miniature crystals, therefore some of the energy is dissipated in the form of heat, which heats the surfaces touching the tape. And since in the kitchen high temperatures are a common thing for powerful or often located LEDs It is worth considering the insulation, for example, to attach the substrate to a thin aluminum profile. But if we are talking only about decorative lighting, you can do without it.
To assemble the path necessary for highlighting the selected zone, place the cuts with a connector or a conventional soldering iron. Note that the temperature of the device should not be above 260 degrees, and the exposure time is a maximum of 10 seconds.

Connection scheme for a single color track
The connection is made according to this principle:
- In single-color cards, the "plus" and "minus" contacts are soldered.
- In multi-color RGB 4 wires are combined with the same name contacts on the block, focusing on the marking (R-red, G-green, B-blue, fourth-12 or 24 V).
- Connectors N and L connect the power cord of the transformer.
- In the RGB ribbons, an additional controller is connected to the power supply. It is important here not to confuse the plus and minus terminals, otherwise the device will fail.
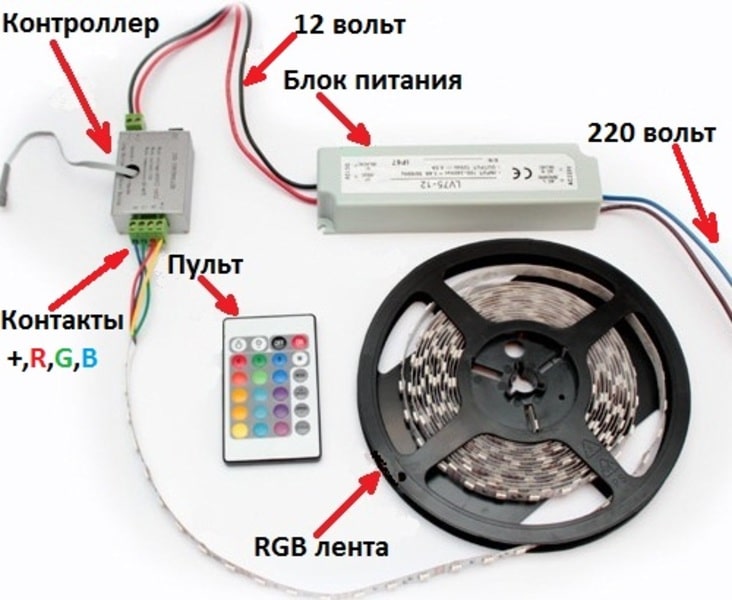
Ready-made set for color lighting
Important! The maximum length of a circuit designed for one transformer is 15 meters or 3 standard reels. If your site is bigger - you'll have to use one more power supply.
Depending on the type of finish of the kitchen ceiling, there are various options mounting ribbon lights. The easiest way is to hide the decor in suspended plasterboard constructions, but even if your kitchen has a smooth, single-level ceiling, you can arrange light effects with a conventional eaves.
Installation of tape in the plinth to the ceiling
This method of installation is applicable even in the case when the repair of the kitchen was long behind. It does not require any special alterations, the main thing is to buy a beautiful ceiling cornice, suitable for the general interior design, and glue it on "liquid nails" at a distance of 80-120 mm from the ceiling. To make the design come out even and look impressive, it's worthwhile to make the markup under the level.
Important! When choosing the cornice, pay attention to its thickness - through thin walls the ribbon can shine so brightly that the skirting itself will shine.
When the plinth is installed and the glue is seized, we act step by step:
- We clean the surface of the cornice from dust and degrease.
- Remove the adhesive backing from the back of the tape.
- We attach the LEDs to the wall or from the side of the eaves. True, many experts do not trust the factory "self-glued", and recommend to insure the construction with silicone glue or double-sided tape.
- Attach the power unit (and for multi-color RGB - and the controller), observing the polarity.
- We check the voltage in the board itself and all components - they must match. Now you can connect the power supply to the network of 220 watts.

Step-by-step installation of lighting in the ceiling skirting
Installation in gypsum plasterboard cornice
Installation of lighting in suspended ceilings is best performed at the stage of their erection. For this, a standard construction of metal profile and gypsum boards is used, which provides an open or closed niche for the LED array.
Such tools and materials will be needed:
- Drywall and self-tapping screws.
- Metal profiles CD and UD.
- Dowels and screws.
- Hacksaw and hand scissors for metal.
- Drill, screwdriver.
- Level, measuring tape measure.
- Pencils or markers.
- LED strip with accessories.
The algorithm is as follows:
- Creates a drawing of the future box, on which the marking is done.
- A frame is built. For this, with the help of screws and dowels to the walls, the UD-profiles are screwed, and CD-elements are fastened to them, in turn. The recommended step is 50 cm. Then perpendicular to the ceiling are set pieces of 10-15 cm in height and connect with the profile on the ceiling so that a niche is formed.

On a note! The design can consist of one or more levels. In any case, it is important to keep a gap of at least 10 cm for the passage of light from the diodes.
- The finished frame is covered with plasterboard sheets, the joint laid in the joint. At the ends of the structure, a niche is left to hold the LED strip. The outer perimeter needs to be covered with a rim to mask the constituent elements of the backlight.
The device gypsum cardboard cornice for hidden illumination

Create a bright or muted strip of light will help right choice height of protective edge
Important! Do not forget to provide a place for power supply units and a controller in the design.
- Seams are masked with putty, and after complete drying, priming and painting.
- Now it's time to mount the backlight. The ribbon needs to be fixed to the adhesive base directly to the plasterboard (in addition, clamps or an aluminum profile can be used). The light from the diodes should be directed from the bottom up. Then you can connect the system to the current conductors, not forgetting the observance of the polarity.
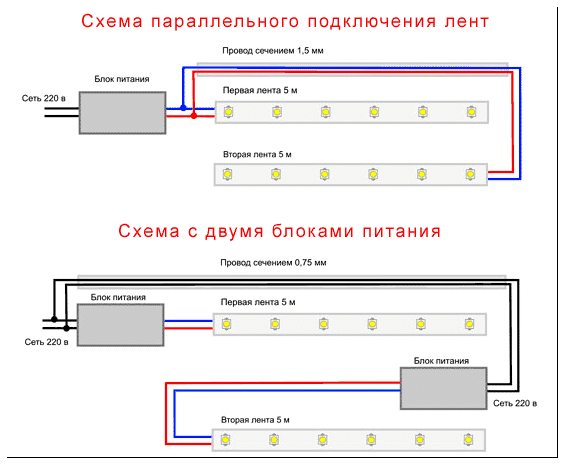
Connection diagrams with one and several transformers
Video: LED strip installation
To visually demonstrate the work on the installation of lighting, we suggest studying a small video-selection of educational materials:
- How to connect LED strip - important nuances that will help to properly mount the lighting circuit.
- How to make gypsum cardboard cornice for hidden illumination - one of the options for arranging the U-shaped box under the LED strip.
As you can see, you can handle the installation of LED lighting yourself. Therefore, the main task is to correctly choose the length of the material, the transformer and the controller, taking into account the configuration of the ceiling of the kitchen and the expected decorative effect. But if you doubt your own strength or the accuracy of the calculations made, it is better to entrust the purchase of components and installation of lighting to a qualified electrician.
This article is devoted to LED lighting. In it, I'll talk about how the LED ceiling light can be implemented, whether the ribbon can be used as the main lighting, and how much the LED lights are advantageous against the background of other light sources. The material will be built in the form of answers to the most popular questions from potential buyers. So, in a way.
Market Review
- Which LED lights can offer a modern market??
Here are their main types:
- Tapes that are LEDs on a flexible conductive substrate. Tapes can have a supply voltage of 12 and 220 volts;
Tapes powered by 220 volts use d.C. and are connected via a compact rectifier (diode bridge).
- Panels are LEDs on a rigid substrate, provided with a diffuser. Often, the panel is a combination of a diffuser and cut into short pieces of LED strip;
- Spots - lamps that give directional light due to the built-in reflector;

- Sofitises - compact light fixtures built in the ceiling, giving scattered light;
- Searchlights.
- How economical is LED lighting?
The latest generation of LEDs provide a light output of more than 100 lumens per watt of power. For incandescent lamps, this figure is 10 times worse, for compact luminescent ("energy-saving") lamps - by 1.5 - 2 times.

Tape
- How to choose LED strip for ceiling lighting and for basic lighting?
For hidden illumination, the main criterion is low heat release. As a rule, it is installed in a ceiling niche, on a plinth or molding, which implies a rather bad heat sink. Therefore, for the role of lighting, a tape with a power of no more than 5 watts per meter is usually purchased.
Which LED strip to choose for lighting the ceiling by the color of the glow?
Color should be selected based on the functionality of the room and its overall design. So, the red light will be appropriate in, but clearly not in place in the kitchen, and the "acid" green light will by no means fit into the style of the retro living room.

Curious solution - RGB tape, able to change the color of the backlight.
If you choose the tape for the role of main lighting, two other criteria are important to you:
- Colorful temperature. The most accurate color rendering is provided by illumination with a temperature of 4000 K;
However: for the eyes more pleasant light with a temperature of 2700 - 3000 K. According to the spectrum, it is closer to an incandescent lamp than to daylight.
- Specific luminosity per running meter. It should be at least 1000 lumens. Optimum combination of luminosity and power consumption (from 1000 lumens and not more than 18 watts per running meter) is currently provided (July 2016) by the bands with smd 5630 and 5730 LEDs; older smd 5050 at the same consumption inferior to them by luminosity in half.
Nuance: the same LED can have different luminosity depending on the voltage applied to it. However, with increasing voltage, energy consumption inevitably increases, and after it - the heat emission of the LED. Tapes with a power of more than 18 watts per meter have to be mounted on the heat-conducting aluminum profile.
- Which tape is best - with power from 220 volts or from 12?
Unconditionally the second. Its only drawback is the need for an external power supply, while a 220 volt powered tape uses a compact rectifier mounted on its connection to the power cord.

Advantages outweigh it in full:
- The diode assembly, powered by 12 volts, is just three diodes with several resistors. It is by segments of three light-emitting diodes that a low-voltage tape can be cut. When powered from 220 volts, cutting is only possible by meter;
- Failure of one LED will lead to the fact that two more light sources will go out in the common with the defective part assembly. In the 220-volt ribbon, all the details in each meter section are connected in series, and burning any one of them will mean that the tape meter will go out completely;
Curiously: the tape with 220 volt power, purchased by me to illuminate the exit to the courtyard, served only a year. It was extinguished by meter sections as the single smd-parts burned out.
- Finally, do not forget about security. 12 volts at any closure can not lead to fatal consequences.
Fixtures
- How are ribbon LED lights?
They consist of an aluminum profile with a fastening system, a tape attached to it with a sufficiently high luminosity and a plastic lens - matte or prismatic. As a rule, the cost of such lamps significantly exceeds the total price of components purchased at retail.

- Which is better - soffits or LED panel?
It all depends on the key requirements.
At the same power, one bright light source always gives better coverage than a few weaker ones. Therefore, from the point of view of economy, the panel wins. But it loses in uniformity of illumination: soffits allocated on a premise, will not create a shadow.
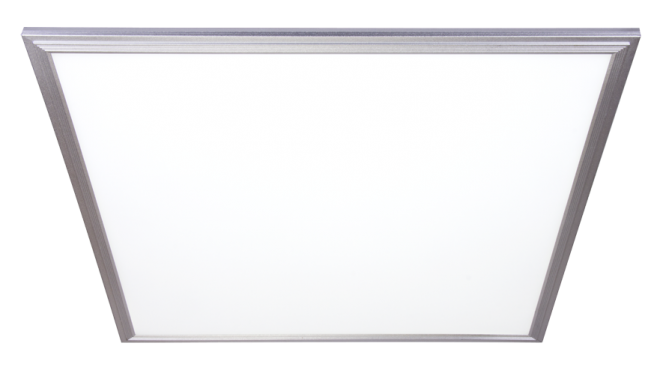
LED panel with a power of 36 watts. The size is 600x600 mm. The luminosity is 3200 lumens.
Lamps
- What kind lED lamp better?
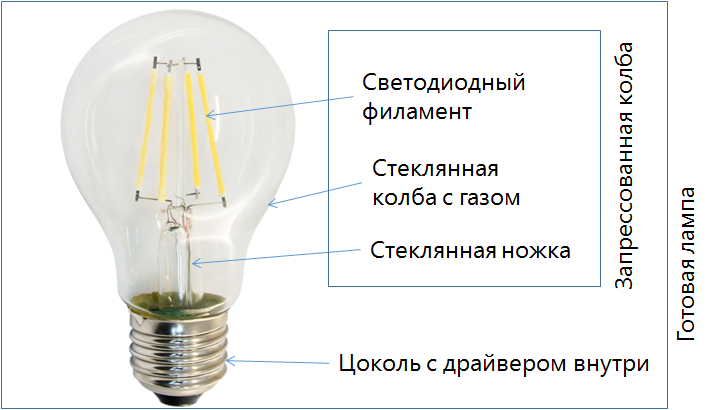
If we evaluate the efficiency, the proximity of the spectrum to the solar spectrum and, correspondingly, the accuracy of the color rendering (that is, the correspondence of the color of the illuminated object to visible light daylight), then the unconditional leader will be lamps on LED strands (they are labeled as filament).
These lamps are interesting, among other things, in that their appearance is very similar to incandescent lamps: the same glass bulb is used, and the LED filament is very similar in appearance to a spiral.
The obvious drawback of filament lamps is that they give scattered light, while lamps with a scatterer in the form of a hemisphere create a bright beam directed in one direction. If you plan to install a lamp in a spotlight, your choice is a lamp with a semicircular diffuser.
Power
- How to calculate LED lighting?
When selecting the total luminosity of light sources, one should be guided by the sanitary norms prescribed in SanPin 2.2.1 / 1278-03.
The unit of measurement in the table given by me - lux - corresponds to one lumen (unit of luminosity) per square meter of area. Luminosity in lumens is always indicated on the packaging of any lED Light or a lamp. For example, for a children's room of 20 square meters, it is recommended to use light sources with a total luminosity of 20 * 200 = 4,000 lumens.
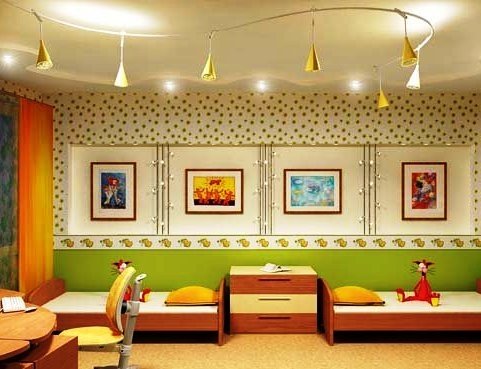
Nuance: the actual luminosity of light sources is often lower than the declared one. The cause is both the dishonesty of the manufacturer, and the light absorption by the scatterers and shades (especially dusty). Therefore, when calculating, it is better to increase the value obtained by 20 to 30%.
Installation
Basic lighting
- How to properly place the LED tape on the ceiling as the main lighting ?
The self-adhesive tape is glued to the heat dissipating profile. It can be embedded and invoiced.

If the power of the tape is less than 18 watts per running meter for the heat sink, it is enough to glue the tape onto any surface with non-zero thermal conductivity. I, for example, in this role made a cover made of PVC cable duct. The temperature of the tape during prolonged operation does not rise above completely safe for LEDs 45 - 50 degrees.

- How to fix a led-profile in a ceiling from a gypsum cardboard?
Depending on the design, the profile can be glued by any universal glue, liquid nails or hermetic into the previously cut groove or fixed to the ceiling through the holes drilled in it with self-tapping screws with countersunk heads. Do not forget to straighten the holes so that the self-tapping screws do not interfere with the tape sticker.

Another option for fixing the profile is using an additional profile - the holder.
- How to mount a led-profile on a panel ceiling?
Screws with plastic dowels. Step - no more than 50 cm, otherwise the profile will depart from the ceiling. The remaining gaps can be carefully filled with acrylic putty.
- How to install a diffuser on a profile with an internal LED strip ?
Acquired in the complete set with a profile the plastic diffuser latches in it on all length. The latch design is similar to that used in cable channels.

By the way: the scatterer absorbs 25 - 30% of the light. In the future, its light absorption increases due to dust and clouding of plastic. In my opinion, it is better to use flat aluminum profiles without a transparent cover.
- How to glue a tape without a profile to the plasterboard ceiling?
A strip of plasterboard directly under the tape is enough to paint any glossy paint or enamel. Gloss gives an ideally smooth surface on which the self-adhesive tape is held securely.
Another solution is to paste a strip of plastic on the GKL (for example, half the length of the universal corner made of PVC). As a glue, you can use liquid nails or silicone sealant.

This is why it is forbidden to connect tapes in series. A large current can lead to overheating of the tire and melting of the plastic backing of the tape.
Backlight
- Which ceiling skirting board for LED strip is better to choose?
The main criterion is the maximum wide vertical. Skirting will be glued only to the wall along the perimeter of the ceiling, so a large area of gluing will ensure its secure attachment.
The skirting board material with the power of the tape within 5 watts per meter can be any: when working, the LEDs are practically not heated. Their operating temperature of 35 - 40 degrees will be completely safe for both polyurethane and expanded polystyrene.
- How to attach a ceiling skirting to the wall?
I used acrylic putty for this purpose. With the same success the plinth can be glued to liquid nails or any universal glue.
Important: the wall under the skirting board should not be strewed. Unstable plaster must be pre-treated with a penetrating primer for concrete bases.
- How to install the ceiling lighting with LED strip?
The concealed illumination is pasted on the upper shelf of the skirting board at the minimum distance from the wall or on the wall itself above the skirting board. The optimal distance between it and the ceiling is about 5 centimeters. The distance from the tape to the edge of the baseboard should not allow the viewer to see the illumination from the opposite end of the room.
- How to minimize the heating of the backlight power supply?
- Ensure free air circulation in the area of its location. On the practical side, this means that the BP should not be installed in closed niches;

- Select the power of the PSU to cover the total capacity of the tapes or low-voltage fixtures connected to it by at least 30%.
Conclusion
I hope that I managed to satisfy the curiosity of the reader in the field of LED lighting. As always, you can study additional materials by reviewing the video in this article. Waiting for your additions and comments. Successes, comrades!
October 23, 2016g.If you want to express gratitude, add a clarification or an objection, something to ask the author - add a comment or say thank you!