Antipyretics for children are prescribed by a pediatrician. But there are situations of emergency care for fever, when the child needs to give the medicine immediately. Then the parents take responsibility and apply antipyretic drugs. What is allowed to give to infants? How can you bring down the temperature in older children? Which medications are the safest?
Outdated or non-working kitchen stoves change over time to modern models with enhanced functionality. Installation of a stand-alone device does not cause any difficulty - just plug in the supplied plug. Complexity arises when choosing a built-in surface. User induction connection the hob requires basic skills and knowledge. In the review step by step, we will learn how to properly connect the device, and the basic requirements for power supply.
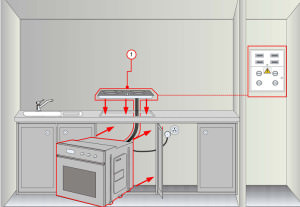
First, we prepare a place where induction cooking equipment will be connected - it is better to prepare the outlet beforehand. For safety reasons, select a grounding device. For the socket it is necessary to lay a separate branch from the switchboard and connect it to the circuit breaker of the RCD. To it lay copper wire with a cable cross-section of at least 4 mm². Depending on the type of outlet, the cable is selected three- or four-core.
When choosing a location, consider the following points:
- the device should be installed without any distortion, on a flat surface;
- it is not recommended to place the device above the dishwasher;
- foresee space for ventilation - the hob must not overheat;
- ensure a small gap between the contacting vertical surfaces and the back of the device;
- it is recommended to place the appliance over the oven.

Necessary equipment and tools
To connect the electrical panel, prepare the following equipment:
- screwdriver, knife;
- connecting cable, calculated for the thickness of the surface (4-6 sq. mm);
- clamp-adapter;
- tester for checking the conformity of the phase of connection to the colors of the wire.

The set includes, as a rule, a cable consisting of four main wires, denoting:
- phase (black and brown),
- zero (blue color),
- earth (yellow-green color).
Note! The device is connected through a separate protective device RCD, to which no other household appliances are connected.
Number of phases
Installation of all new models of European production is designed to connect the equipment to a network with a different number of phases. In our houses there are two standards: a three-phase network with 380 V and a single-phase network with 220 V. The choice of the necessary connection scheme depends on the wiring in the house.

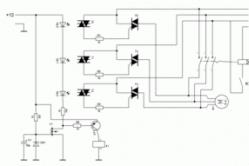
The standard layout of the hob is presented terminal group, consisting of five denominations labeled for convenience in numbers, and one ground, which is indicated by:
In electrical engineering, the following conventions are used:
- phases are designated as L1, L2, L3;
- zeros are N1 and N2;
- pE grounding.
After understanding the wiring and wiring diagrams, it is necessary to study the instructions. The manufacturer's recommendations show all the connections and detail the main installation steps. After the chosen scheme, we turn to practice.
Connecting the unit to a single-phase network
This type of connection is used when a wire consisting of a of three cores. To install the panel, perform the following steps.
- Unscrew the metal plate on the back of the panel with a screwdriver.
- Using jumpers (they are supplied with the device), connect the terminals under the numbers "1", "2", "3" and connect the phase wire (brown, black or white).
- To zeros (contacts under numbers "4", "5") connect the blue wire.
- Connect the yellow-green wire to the protective terminal.
- Install the device in place and tighten the screws of the connecting cable tightly.
- Check the strength and tightness of the connection, as well as the performance of the kitchen panel.

Before installing any type of cooking equipment (panelsAeg Bosch, Siemens, Electrolux, Hansa, Samsung and others), on the cable of which there is a plug, first check the matching of the contacts and power wires inside the outlet. In some devices they are different - in this case we disassemble the outlet. Determine the correspondence of the connection using a special multimeter. If necessary, the wires can be swapped.
Connecting the device to a three-phase 380 V network
To install the device, use a cable with five cores, in which there are such parameters: 3 phases, protective grounding and "zero".

The induction plate should be installed in the following sequence:
- To the terminal at the number "1" we connect the 1st phase wire (black, white or brown), at the second number - the next one, to the "3" terminal - the remaining one.
- The jumper connects the terminals under the numbers "4" and "5", and to them - the neutral wire (usually blue).
- To the "grounding" terminal of the pe marking, we connect a yellow-green wire.

Note! The order of connecting the phase to the contacts of the device is not so significant, that is, there is no difference what color wire the user will connect the first.
How to connect the plug to the cable
If the plug has four contacts, then they must be connected to the marked colored wires of the cable when connecting them. However, there is another option. In the event that the socket is three-contact, a problem arises - four cores in the presence of 3 contacts. The output is simple - the black and brown wires from the phase are twisted together and connected to the "Phase" contact.

To summarize, I would like to note that the installation of a hob is connected with electricity, so certain skills will be required during installation. From a competent connection depends also on the safety of people. If there are any doubts, it is better to entrust the connection of equipment to professional masters.
When it comes time to change the old kitchen stove to a new more modern appliance, the main problem you face is the connection. Correctly connect the induction panel in the same way as an electric stove. If you have never done this, then read the simple tips.
Installation of the plate is carried out in several stages, in this article we will consider each of them in detail.
- Select the location and prepare the hole for installation.
- Cable connection and operation check.
- Installation of a surface in a table-top, its fastening and hermetic sealing.

Select a location
The hob must be installed exactly, without any distortions and fixed with screws or other fastening devices. It is important to provide sufficient space for ventilation so that the panel does not overheat. It is not recommended to be placed above the dishwasher. Between the back wall of the induction panel and the nearest vertical surfaces there should be a gap of a few centimeters, and below there should be a small free space.
Connecting to the network
The main tool with a direct connection is a screwdriver. To connect an electrical appliance, you need to purchase a three-core network cable designed for the power of your panel. Most often take a cable section of 4 or 6 mm square. Cable for 6 mm square. more reliable and suitable for powerful panels with four burners. The length you choose is such that you freely reach the socket. A cable usually comes with 4 wires, two of which are phase (brown and black wires), one is zero (blue), one is ground (yellow-green).

If you flip the induction panel, you will see a circuit on its lower side that has been squeezed out on metal or printed on paper, and a small box in which the terminals for connecting the wires are hidden.
On the diagram you can notice such notation:
- L1, L2 - respectively phase 1 and phase 2;
- N - neutral wire;
- PE - grounding.
This is a common European marking, and it can be easily determined by it where to connect. Please note that the hob can be connected to a 220 volt network and to a 400 volt network (the domestic network is 380 volts).
When single-phase network To connect the two phases in the set plate is a special jumper, which is located near the output of the wire. It is extracted and inserted between the contacts of the phases. To connect a four-wire cable to a three-pin access point, you must twist the black and brown wire and connect them to the phase wire of the network.
The mains socket in which the cable plug will be connected must be grounded, rated at 25 amps and the power consumption of the hob. If the plug and socket do not match, it is necessary to replace one. Adapters and extension cords can not be used.
You can connect the device directly to the meter on a separate line. This is even better, since additional switching is eliminated.
Checking
As you can see, it's not so difficult to connect the cooking surface yourself. When you have connected all the wires, you must turn on the instrument and check how it works. If everything was done correctly, then you can insert the induction plate into the hole, fix it and seal it. On the contrary, it is not recommended to do it, since with a fixed device it is not convenient to manipulate the wires.
When buying a kitchen stand-alone electric stove, in most cases, to connect it, simply plug the plug into an outlet. But many people do not get the full set, but only the upper part - the hob.
We offer you to consider how to connect the hob Electrolux (Electrolux), Zanussi, Bosch (Bosch), Gorenje, Hansa, Samsung (Samsung), Siemens, Ariston and others, as well as the cost of such connection in specialized companies.
Theory of panel connection
The hob, built-in type, is connected to a separate line with a socket capable of withstanding a current of 32 to 40 A and ensuring reliable grounding. The supply cable contains three copper wires of at least 4 mm². Modern electrical wiring in the apartment also allows you to connect to a four-wire power cable.
Sockets for connecting panels are of two types:

If you independently connect the hob with the existing plug on the end of the cable, it will not be difficult. But to connect the power cable from the plate, where there is no end of the plug, you already need some knowledge.
For example, from the panel a cable leaves, which has four cores, and only three power wires leave the wall. This means that the panel needs a connection of two phases, and there is only one in the apartment.
In this case, the technology is as follows: the brown and black wires from the cable from the hob are twisted together and connected to a phase conductor, a power line that exits the wall. The blue wire of the cable (neutral) is connected to zero wire power supply. There remains a protective earth wire of yellow-green color, it is connected to the same ground wire in the power line.
In the event that wires from the same color come off the wall, use a multimeter to find out which one is zero and which phase, and determine the integrity of the grounding conductor. The resulting connection of wires must be insulated.
Before connecting the hob, which already has a plug on the cable, it is necessary to check the conformity of the power wires and the contacts inside the outlet. Sometimes they may differ. To do this, the socket is disassembled, and with the help of the multimeter, the connection is determined, if necessary, the wires are swapped.
- The connection of the electric hob involves the installation of a separate circuit breaker and a RCD, these devices are selected in such a way: for a 16 A socket, a circuit breaker with a current of 25 A is required and a RCD of 40 A. A simultaneous use of the power supply line of the panel is not permissible for connecting several power devices.
- The body of the hob must be necessarily grounded, not to the body or the wire from another appliance, but to the receptacle terminal, by a separate wire from the panel.
- Already, most manufacturers sell equipment that is equipped with a protective earth bar, it simply needs to be connected to the grounding wire in the apartment.
Induction panel: connection in steps
The connection of the cooking induction panel to the network is not fundamentally different from the installation of a conventional hob to make sure of this, below is presented step-by-step instruction. Consider how to connect the induction panel to the mains.

Step 1. Power cords are of 2 types: three-wire, early version, and four-core, a newer version. To connect an embedded panel, you must purchase a power cord that matches your power outlet in the kitchen.
Step 2. Open the connection cover. Look for a rectangle on the back of the panel, covered with a metal plate. Unscrew it with a screwdriver.

Step 3. Connect the cord and the terminals.
After removing the back cover, you need to find the terminals of the device. First insert the cable clamp into the hole. The cord is held by means of a plate. This is to avoid falling out of the wire. Then run the cord through the cable clamp. While the screws do not tighten.

Step 4. Remove the copper plate.
Right above the hole you need to find the wires. If the induction plate of the old sample is connected, then there should be three wires, if there is a new model, there will be four wires: two phase, one neutral and one ground.
The neutral terminal is located in the center, the phase conductors on either side of it, and the ground terminal is at the bottom. Before you start connecting the wires, you need to check whether there is a copper jumper that connects the neutral and ground wires. If you find it, just unplug it.
Step 5. Connect the wires.
Align the wires with the terminals. The cable is connected to the panel using a brown phase wire, a neutral blue wire and a yellow-green ground wire.
To connect the wires, you need to unscrew the screws of the terminal connection and install the wire in their place.
The first is to make a ground connection, this is a yellow-green wire. Then the neutral (blue wire). Then connect the brown phase wire to one of the two phase terminals. Between the two phase terminals we install a copper jumper, which we removed from the neutral wire. This connection is suitable for apartments where 220 V supply voltage is used. Tighten the screws of the supply cable.
Check the strength of all connections, otherwise the machine will not stand and you will need to repair not only the terminal board of the induction panel, but the entire wiring.

Step 6. Tighten the power cord.
After connecting, make sure that the power cord is tight, it should not hang, but it can not be pulled.
Step 7. Turn on the induction panel.
After the power cable is connected and the voltage is applied to it, the panel is switched on and checked for its operability, in accordance with the passport data.
For proper operation and convenient control of the induction panel, an electronic control system is used, unlike a gas hob where adjustment is effected by mechanically turning the shut-off valve. This solution is quite convenient and functional. You can monitor the mode of each cooking section of the panel in real time.
Video: installation and connection of the hob
The price for connecting the hob to the supply network of the apartment, in specialized stores in such cities as Minsk, Moscow, Omsk, Orenburg, Penza, Samara can vary from 500 to several thousand rubles, depending on the city and the complexity of the work. But, as you can see, independent connection of this technique does not require special knowledge and is easily performed on a photo, even without work experience.
Built-in hobs are available in rectangular or hexagonal shape, their width is from 25 to 90 centimeters, and depth is 60.
The choice of the panel is determined by the presence in the apartment of one or another energy carrier. If the gas is connected, the choice is obvious in favor of using the gas panel because of its economy.
When connecting the unit to the a country house, you can choose a combined, then the kitchen in any case will be provided with energy, because you can use gas in the cylinders.
Panels are dependent and independent:
- Dependent devices are called devices, which work with the oven. Control is usually located on the body oven, sometimes on the panel itself. It should be borne in mind that hobs of even one manufacturer are not always compatible with ovens, and when buying, you need to pay attention to it.
- Independent hobs have their own control panel and can work autonomously.
Connection Features
One of the most important conditions for connecting power electrical appliances, including hobs, is outlets. In old houses built before 1950, grounding was not performed. Here you will need the advice of a professional electrician and, possibly, additional work. It is also necessary to check the presence of the ground terminal on the outlet.
Important Conditions correct connection:
- When connecting powerful outlets, an indispensable condition is the installation of a separate protection circuit for this circuit. It is installed in front of the counter. Ideally, connect powerful consumers with the installation of a separate shield to avoid high loads on the network.
- To make a connection, it is necessary to use a copper wire with a cross section of at least 6 mm 2.
- In single-phase wiring there must be 3 wires, in the three phase 5.
- Selection of cable for wiring and sockets should be given technical parameters connected device.
- Installing Power Outlets It is possible on any non-flammable surfaces that are resistant to heat.
Selecting the cable and sockets, it is necessary to take into account the total power of electrical appliances, which can be included in the power circuit. It can be a refrigerator and a washing machine or dishwasher and much more. It would be illogical for each device to make a new wiring.
Accordingly, you need to select and sockets.
Example the right choice powerful connector:
According to the design, such sockets can be of three types:
- Socket Outlets - Mounted in the wall penetration. Such connectors are the safest in operation, although they require additional work.
- Overhead - mounted directly on the wall. At low labor, the plants are exposed to various contaminants, moisture ingress. Require regular maintenance in the form of cleaning and tightening contacts.
- Combined - in fact, it is a more complex model of hidden outlets. They have double protection, therefore they are the safest.
Installing the sockets for the hob and oven yourself
The process itself is simple, but it is necessary to study the PUE7 (rules for installing electrical appliances).
Connection scheme can be applied the following:
The set of materials and tools is not original and is usually available:
- Hammer drill with a drill bit of the correct diameter for making an opening in the wall for.
- Drill and drill bit of the required diameter for drilling holes under the jar.
- Plastic inserts in accordance with the holes under the escutcheon.
- Screws for fixing the jar.
- Screws to install the socket housing.
- Screwdriver, corresponding to the profile of the fasteners used.
- Crimper to clean the ends of the wires, if the knife is used for this purpose, it must be ensured that the wire metal does not undercut under the mop.
- Soldering iron and solder, if twists are carried out, they must be dispersed.
- Insulating tape.
In this way, you can connect any electric hob, including the induction hob.
The order of performance of works:
- Both external and internal socket , can be connected directly through the terminals on the plate. To access them, simply unscrew the cover at the rear of the appliance and remove the protective device.
- To connect correctly It is necessary to pay attention to color marking of wires, and to connect contacts of only one color. When using a single-phase network, you need a red wire, there is a jumper between the terminals.
- The jumpers can be replaced by loops from the wire, applying for them a cross section of at least 6 mm 2.
- For the production of a layer, 380 volts of jumper cables are not installed in the network, and the wires are connected directly to the terminals. In this case, it is necessary to control color marking wires and their numbering
- When using a plug with a ground terminal, it also needs to be connected, the ground wire has a yellow-green color.
Connecting gas equipment and 4-core wires
If the choice has fallen on the gas hob, its connection is not difficult, provided that earlier similar equipment was also used. It is enough to purchase a flexible gas hose, specially designed for these purposes.
An indispensable requirement is to shut the tap on the gas riser before performing work. After making the connections, the joints must be checked for leaks with the tap on the riser open.
The test is performed by applying soap foam to the joints and observing to detect swelling bubbles on the foam layer. Their absence indicates the reliability of the connection made.
If there is no gas distribution in the building, it is impossible to make a connection yourself, it is necessary to involve gas services.
If the hob does not have a plug, and the cable consists of 4 cores, then the device needs a 2-phase connection. At the same time, the apartment is single-phase.
In this case, you can proceed as follows: two wires of the hob - black and brown, you need to twist together and connect to the phase of the plug. Connect the yellow-green ground wire to the ground terminal of the plug, the terminals are usually signed.
The last blue wire means "zero", it must be connected to the corresponding plug terminal. That's all, the problem is solved.
Differences by type of management

Touch hob
The control panel can be made in two versions - mechanical or sensory. Mechanical, with rotating handles, is much more familiar and this indicator is often decisive.
The touch control is controlled by touching the buttons, it is necessary to get used to it and it will seem very convenient. In addition, care for such a hob is much easier.
Materials for the hob are used differently, it can be:
- Aluminum - the surface of it is well-kept thermal and mechanical loads, it tolerates impacts well, but with care for such a surface, you can not use abrasive cleaners, because there are scratches. Aluminum hobs are quite affordable.
- Panels of glass ceramics - the most expensive products of this class, they are chosen for a stylish look and easy maintenance. The most significant drawback is that they can easily be broken even by a slight blow. Otherwise, such a panel is quite convenient, it quickly heats up and also cools down quickly, and the heating occurs only on the included cooking zone, the rest of the surface remains cold.
- Enameled metal surface - has a nice appearance, can be executed in different colors. They are easy to maintain and represent the most budgetary version of products of this class.
- Stainless steel surface - easy to care for, retains its appearance for a long time, it is also not recommended to use a cleaning agent with abrasive additives for such products, it is considered average in price level.
Panels are equipped with various heating elements, each of which has its own characteristics:
- If the choice is stopped on an enameled, aluminum or stainless cooking surface, they are equipped with heating elements in the form of disks, they are usually called "pancakes". Inside such a device, a spiral is placed. They heat up and cool down for a long time, the disadvantage is also that these devices lose their appearance quickly, and caring for them causes a lot of trouble.
- Glass-ceramic panels can be equipped with various heating elements: induction, rapid, halogen or hot plates Hi-Lite.
Induction heaters

They are considered the most economical and effective. The induction unit heats only the bottom of the dishes, while the cooking surface remains cold. The peculiarity is that special dishes are needed for working with such a surface, which is intended for these heating elements. Panels with such heating are the most expensive in the market.
Rapid burners

The most simple on the device. It's just an electric spiral, which, unlike the "pancake", heats up and cools down in 12-15 seconds.
Halogen Hobs

Characterized by the fact that, in addition to the heating spiral, special halogen lamps are used that produce a large amount of heat. They heat up and cool faster than rapid ones. Disadvantages is the heating of the entire surface of the hob, in contrast to the short life of halogen lamps, which are subject to periodic forced replacement.
Hi-Lite Surface

As a heater, a ribbon placed in an asbestos body is used. Temperature control is continuously variable, which allows you to set the temperature most accurately. They are characterized by rapid heating and cooling.
Gas burners

They are used most often and are the most popular. A characteristic feature is the rapid regulation of the flame, hence the rapid preparation of food. Preference for gas burners is explained by ease of use and cheapness of the energy source.
- If your apartment house are regularly applied, then there is a certain privilege to pay for electricity and it makes sense to purchase electric hobs. Otherwise, their use is unprofitable.
- When performing wire twisting during wiring, be sure to get them. Otherwise, the twist will sooner or later start sparking, overheating with predictable consequences. Do not forget that most fires are due to a malfunction of the wiring.
- Before starting electrical work, it is not out of place to get the advice of a knowledgeable person and to follow it.