Antipyretics for children are prescribed by a pediatrician. But there are situations of emergency care for fever, when the child needs to give the medicine immediately. Then the parents take responsibility and apply antipyretic drugs. What is allowed to give to infants? How can you bring down the temperature in older children? Which medications are the safest?
It is not at all necessary to call a professional electrician to the house to connect a new chandelier to the switch. One- or two-key - it does not matter. This is a fairly simple job, which can be carried out qualitatively and independently, while saving money. The main thing is to follow the step-by-step instructions, listen to advice and clearly follow the recommendations given by experts in the field of electrical wiring.
Connecting the chandelier
Whatever the chandelier, the connection principle for such lighting devices is practically the same. And it's simple enough. And, it does not matter - you need to connect the chandelier to a single switch or to a double switch. Installation, of course, is different, but both are easy.
So, any light is on, if two obligatory wires are connected to it:
- phase;
- and zero.
 And the chandelier is the same bulb, and to connect it, one conductor from the junction box must be attached to the chandelier directly, and the second one also to it, but already with a break, the role of which is performed by the switch. And in no case through this switch you can not start the conductor zero. The safety technique is strictly prescribed to conduct it exclusively directly - from the junction box to the lamp (chandelier). Without any breaks!
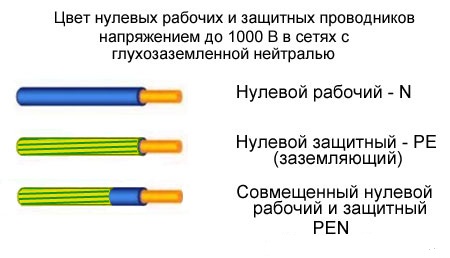
Before the start of the connection activities, it is necessary to make sure that the wiring engineers who wired the wiring initially correctly blossomed the wires:
- the working zero conductor must be blue or blue;
- protective zero conductor - yellow-green.
 To check if the conductors were correctly masters, it is necessary, armed with an indicator screwdriver, to look at where the zero point is coming from the junction box (or directly from the ceiling), and where is the phase.
Here everything is simple: if the sensor of the indicator touched the wire, it means it's a phase, no - it's zero. Before the procedure, the indicator of the screwdriver can be checked on any object under voltage - in the socket or floor panel, for example.
From the ceiling wires can go in different ways:
How to connect a chandelier
Connecting different chandeliers is possible to different switches:
- single-key;
- and dvuhkvushnym.
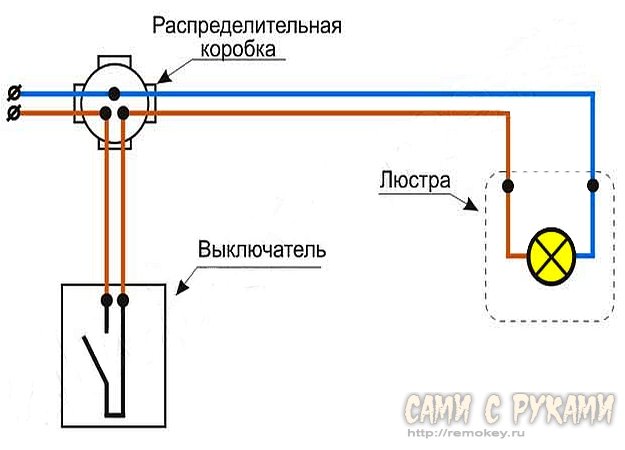
Connection via a switch with one key

The simplest scheme for connecting a chandelier is when a wire pair emerges from a hole in the ceiling. The connection process is then extremely simple: the wires are connected in pairs, and that's all. Even the sequence of such a connection is not important. That is, the blue zero-wire in the junction box is directly connected to the zero-wire, but already in the chandelier. A brown phase-wire from the power source all in the same junction box goes first to the switch, and then to exactly that phase-wire, but already in the luminaire (chandelier).
Connect the wires with the use of screw terminal clamps. Twist the wire pair can and pliers, but it will be necessary to isolate the ends of the wires with the help of special caps. These are mandatory safety requirements.
But the tape (or PVC tape), which many people are accustomed to "wind" the wires, it is better not to use. It will dry up with time, and, of course, the quality of the insulation will suffer.
In the chandeliers of a certain design, there is no preliminary integration of the lamps, and then the wire pairs go from each of the bulbs.
When the chandelier is more than one lamp, with its connection there is no problem. The chandelier's null wires are assembled, connected and then connected to the network zero-wire. The same is true for the phases, but they are connected to the phase-wire from the switch.
The process of connection is the twisting of single-color wires. And then the resulting twists are connected to wires that are moving along the ceiling to the one-key switch.
Video instruction for connecting a single-switch switch is presented below:
Connection via a switch with two keys
 Many today are interested in the variability in the regulation of the degree of illumination of different rooms in an apartment or a country house. Therefore, the question of how to connect a chandelier to a double switch that allows you to turn on the chandelier lamps not only at once, but also in stages, can be especially relevant.
Let's start with the fact that almost all the wiring in the city apartments or country mansions is now carried out using a three-wire cable containing wires in multi-colored braids. And to the mounting place of any chandelier, there are also three different colored wires from the two-button switch. And first you need to determine what is the purpose of each of these wires.
It is clear that one - zero-wire, and it is common for the entire set of lamps. And the other two are phase ones, passing through different switches.
Today there is, unfortunately, a clear color wiring diagram that all electricians would adhere to. Therefore, the wires of different firms are intertwined in different ways. So, before you connect existing wires, you need to clearly determine their purpose. This can be done with a special indicator (or indicator screwdriver - also a good tool). And it is obligatory with the switches on. Where the indicator detects the voltage, there will be a phase where there is no zero conductor.
If the house does not have an indicator, the process is insignificant, but it will become more complicated. I'll have to de-energize the room completely, disassemble the switch. More precisely, it will only be enough to remove the cover from it to see what color and from which key the wire goes directly to the chandelier. Naturally, the conductor does not pass through any keys.
In principle, the connection of the chandelier through the two-key switch is similar to the process of its connection and through one-button. The only difference is that the phase lamp conductors are divided into 2 sections. And one twist from each tube group is connected (together) to the zero conductor. The remaining pair of twists are connected (individually) to the remaining pair of wires.
Connecting the chandelier to a double switch allows the user to adjust the room lighting by lighting the lamp in a stepwise fashion.
A short video-instruction for connecting a two-switch switch is shown below:
Several chandeliers on one switch

Possible and such an option for lighting residential and commercial premises. It is ideal where you have to include several lighting devices in one or several rooms at the same time.
The connection is made as follows: chandeliers (or a group of LED / halogen lamps (if halogen, then with the installation of a step-down transformer)) are connected by parallel connection. In this case, each of the fixtures:
- connected to the switch via a separate junction box;
- or the placement takes place in a single junction box.
It all depends on what kind of electrical wiring will be selected.
Connecting one chandelier directly to two switches
 In order to realize in practice the electrical circuit for connecting a chandelier or a group of halogen (with the installation of an additional step-down transformer) / LED lamps with 2 different switches, special "pass-through" switches will be required, which are structurally different from the usual ones. In addition, there are three contacts in their wiring diagram:
- common lead to the phase conductor or directly to the chandelier;
- a pair of auxiliary contacts for connecting the switches to each other.
This kind of electricity distribution must be carefully thought out in advance (and if the apartment or office repairs, then before the start of repair activities). Otherwise, it will take no more or less to build another wiring in the room. Well, and the subsequent cosmetic repairs do, of course.
Safety during installation of chandeliers with connection to switches
Those who are going to independently connect the chandelier to any of the above-described switches in any of the ways described above, it is worth repeating once again that installation work on the installation of luminaires and qualitative connection of switches must be conducted in compliance with safety regulations. And the following rules are mandatory for execution:
- Any electro-measures are carried out only when the corresponding branch of the wiring is completely de-energized (and you do not have to be content with the "off" position on the switch, it is better to switch the switchboard to the corresponding position).
- It is impossible to connect wires copper with aluminum by twisting. This is fraught with fire.
- It is necessary to avoid contact of live wires and open for testing.
- It is necessary to closely monitor the wire marking, when you need to connect the chandelier to a single switch, and even more so to a two-key switch. The zero wire is always marked with the letter "N", the phase - with the letter "L".
- Determine on which of the wires is the phase, and at what zero, should be using a special indicator screwdriver. And touch the bare ends of the wires must be strictly alternate.
- Electricity is connected for the testing period of the wires, but immediately after the end of the process it is necessary to again de-energize the necessary installation site.
- Wiring must be carried out using special terminal clamps or by twisting with the mandatory subsequent insulation of the tips of the wires with protective caps.
In principle, independently connect any chandelier is easy and short-lived. And most importantly - inexpensive! You just have to follow the instructions and take your time. Then all by all means will turn out, and the chandelier will shine a premise how it would be desirable to people, there living or working.
Lighting is one of the most active "participants" in creating an interior. And here, not only the brightness of light, the ability to change the power of lighting, but also the lamp itself, which is a bright detail in the interior, is important, and must be properly connected.
Before proceeding directly to the connection, you need to check the condition of the lamp itself. It is necessary to check the strength of all connections and the condition of the wires, inspect all the cartridges and the quality of connecting them to the wires. Glass shades, if any, are best removed and put aside to install them after the chandelier is connected. First of all, when connecting the luminaire, as with any other work with electricity, you need to remember the utmost caution, which should always accompany work of this kind.
Scheme how to connect a chandelier with a one-button switch
Blue wire: zero
Red wire: phase
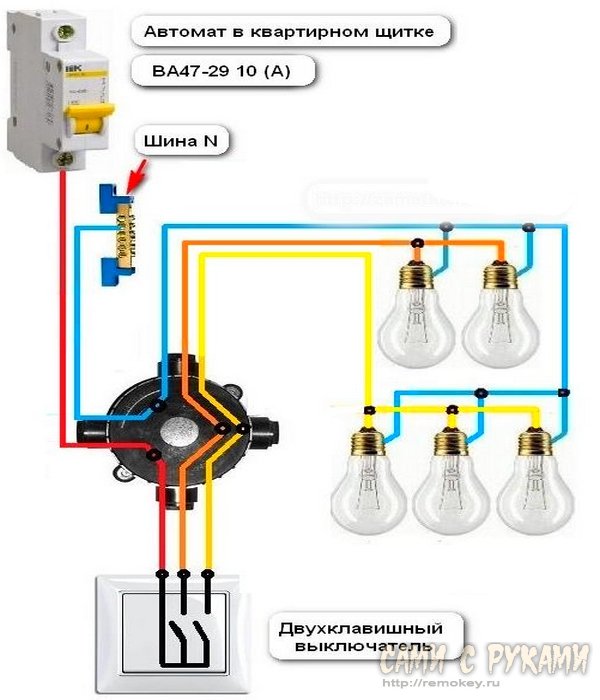
To connect a lamp with several lamps, most likely, you need a switch with 2 keys. Then, with a single key pressed, for example, 2 lamps (with a 5-horn chandelier), and when the second lamp is turned on, 3 other lamps will turn on. If both keys are pressed, then all 5 lights will light up.
Video: How to connect a chandelier to a two-key switch
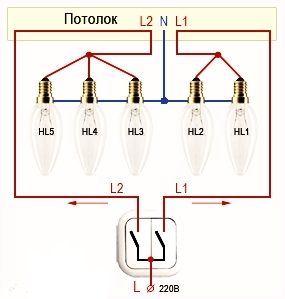
Scheme how to connect a chandelier of 5 lamps to a two-button switch
Blue wire: zero
Red wire: phase
The manufacturer, as a rule, outputs wires from the tube of the luminaire, where they are laid out, outward and connected to the terminal board. Usually these wires are three. If only 3 horns are provided in the luminaire model, then there may be 2 wires. Of 3 wires, 2 phase and 1 zero. The terminal strip must be marked for each wire. The phase is marked with the Latin letter " L» (« L1"And" L2"For different groups of lamps), and zero is denoted by the letter" N". If there is a ground, it is marked with a screw symbol. If there is no marking, you will have to manually determine the phase and zero. It is necessary to carefully separate one wire from 3 and take it aside. The remaining two wires should be carefully connected to the outlet, observing extreme care. When you connect to the outlet, the first group of lamps will light up. After that, we change one of the wires to the one that did not participate in the first connection. If the second group of lamps is switched on, the wire remaining in the socket is zero. If the bulbs do not light up, change the wires. As a result, with the wire remaining connected, when one or the other of the remaining wires is connected, one or the other group of lamps lights up. The wire that remains connected all the time is zero, it should be noted.
Modern wiring has a 3-wire system, so there must also be 3 wires on the ceiling. Before connecting, you must determine which of the wires is null. This is done with a screwdriver-indicator. Before work it is necessary to switch off the voltage. After this, you need to rid the ends of the wires coming out of the ceiling from the insulation and spread them to the sides, away from each other. Now you can reconnect the network and press the keys on the switch. Now you need to touch each wire one by one with a screwdriver-indicator. If the indicator lights up - this is the phase, if not - zero. After checking it is better to somehow mark the zero wire.
When the wires are defined, you can start the connection. Voltage must be switched off again. Lamp hang on the ceiling hook and connect the wires on it with wires on the ceiling. Zero, respectively, connects to another zero wire, and the remaining wires - with any of the 2 free on the ceiling. It should be remembered that it is better if the wires in the luminaire and in the system are the same. Do not connect the copper cable to the aluminum directly. Only through the terminal strip. Otherwise, the connection point will overheat, which can lead to a short circuit and even a fire. The luminaire can also have a ground wire, which remains free during the connection.
If the switch is not already installed, then it will take time to install it. Only the phase conductors pass through the switch. The phase and zero on wires suitable for the switch are also determined using a screwdriver-indicator, if there is a voltage in the network. Once the wires are clear, you can turn off the electricity and connect the switch. It is important to remember that to connect the wires better through the terminal blocks, when working with wires, you need to turn off the electricity.
When a chandelier or a multicolor lamp is hung up, electricity is connected and the connections are insulated and cleaned, you can connect the voltage, check the luminaire again. If you do not like the matching of the pressed key and the light to be turned on (for example, you want to light a smaller number of lamps when pressing the nearest key), you just need to change the phase wires in places. If everything is in order, you can install the lights, remove the garbage (if any) and use a new light source.
When designing and organizing the lighting of various rooms, a suspended ceiling lamp is used - a chandelier. It is designed to create a quality shadowless light flux throughout the entire area of the room. The size of the chandelier, the number of light sources, shapes can be completely different. At the same time, its main task is a uniform light saturation of the entire room. The light source used in the chandelier can be: 
- Incandescent lamp;
- Fluorescent lamp (most often compact energy-saving light bulbs);
- Lamp and lamp based on LED.
In any case, the chandelier has also decorative properties, they serve as a decoration for any residential or non-residential premises.
Buying or ordering, this is worth considering how to hang a chandelier.
How to install a chandelier
When installing any chandelier, you need to consider that this lamp is quite bulky and heavy, so it's worth taking care of the mechanical part of the question, that is, how to hang a chandelier and what to attach it to. The situation can be different, often in the apartments there are already pretty strong hooks. However, it is not necessary to install the device hoping for the strength of the old hook. Therefore, it is recommended to fasten such multilamp fixtures with dowels or anchors. The number of dowels depends on the weight of the chandelier and its attachment. It is advisable to disassemble it before installation, and remove all easily broken, fragile elements. 
Preparatory work
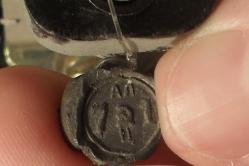
Before you mount the mounting and install a ceiling chandelier, you must ensure that it is powered. How to do it right? For this, in the lighting system, which can be made with protective earthing and without it, find: phase, zero and protective ground wire. Often, the ground wire is taken in green, if the wiring is already done, it may look like it is shown in the figure.
A grounding wire that serves to protect people from electric shock should be connected to the metal part of the chandelier if there is no grounding bolt installed by the manufacturer.
If the wiring is done by yourself, then the chandelier must be powered from the circuit breaker. The field of which by means of an indicator screwdriver or a special probe you need to determine the phase wire.  This procedure is performed in order to connect the phase wire to the switch. If the wiring already exists, then you need to turn on the power, before that, separate the wires separately from one another so that there is no short circuit, and carefully find the phase wire at the place where the ceiling will be located in the future where the new chandelier will be located.
Connecting the chandelier to the switch
Connection and installation of the chandelier can be carried out only with the power supply disconnected. Electric current is dangerous for human health and life. The simplest connection of a chandelier to a source of electrical energy is the installation and commissioning of a single-lamp chandelier to a single-key switch. In this case, you only need to find a phase wire that connects to the light switch and connect the wires in the area where the luminaire is installed. Then insulate the connection points. It should also be taken into account that copper and aluminum wires can not be connected, as they enter into a chemical reaction and oxidation will occur, which will affect the contact in this place. A poor contact will warm up and sooner or later it will burn out.
How to connect a two-key switch to the chandelier
In order to connect a chandelier to a double switch, you need to understand and understand how it is arranged. The double switch has one common input, which is connected to the phase conductor, and two outgoing contacts going to the bulb or a group of lamps. Each switch with 3 pins or two has a contact designed for a certain current, which is indicated both on the switch package and on the body itself.
How to connect a chandelier with 2 lamps
If you connect such a light source to a single-key switch, the lamps are simply connected in parallel, but this, in turn, is not very convenient and not economical. In order to connect a chandelier to a two-key light switch, one wire from one lamp to another wire from the other must be connected, this will be the zero wire that is directly connected to the junction box. This method of connection can be detected if wires have already been removed from this light source. That is, you need to connect a chandelier with three wires. One of them will be the common zero (indicated by the blue color in the figure). Check this with a multimeter or any ohmmeter. Connecting a chandelier to a double switch will ensure an efficient and importantly economical lighting. 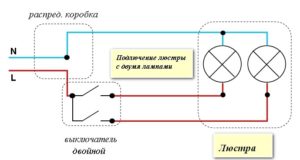
Connecting three-way chandelier to a two-button switch
The connection of a chandelier to a ceiling light, which consists of three light sources and having a so-called three-shrouded design, to a single-key switch is similar, as in the situation with two lamps. Only the load current has to be taken into account, therefore, depending on the power  sources of light flux, you need to select and wire. By the way, the formula for calculating the current is simple, you only need to divide the power by the supply voltage. However, the wire should be taken a little with a margin both in length and in section so that it does not get warm. If the wiring is done in an ordinary apartment, then the copper wire of 1 mm2 is enough for the chandelier, this wire will withstand this load. It is recommended to connect the trumpet chandelier through the two-key switch. This way you can arrange the inclusion of light bulbs - from one key two lights come on, and from the other one. If both keys are on, all three lamps are on. Again, the phase conductors from the light energy sources are connected via a switch.
How to connect a chandelier with 5 lamps
Connecting a chandelier with five lamps can be considered similar to the connection of three and four lamp, it all depends on the number of keys of the switch. If it is one, then the connection of the lighting sources takes place in parallel. If a two-key or three-key switch is used, it is worthwhile to divide the lamps into groups. When connecting the five-way chandelier to the two-key switch, the zero conductor for all lamps remains common. The lighting control via the switch is provided by feeding the phase to a certain group. 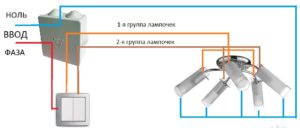
It is also worth noting that the installation from the box to the luminaire is better to produce solid conductors without twists, this rule must be met not only if you connect a five-lobe chandelier to a two-button switch, but absolutely any luminaire. The connection in the junction box and the connection in the chandelier is best done through so-called terminals. Clamping of conductors in them occurs through a bolted connection or a special mechanism with a latch. 
How to connect a chandelier with a remote control
Chandeliers with remote control are rather fashionable and convenient. This type of luminaire is often equipped with LED or neon light-emitting equipment. This kind of light is considered very economical, but it is not designed for 220 volts. For this purpose, inside or separately there is a device called a driver and performs not only a depressing function, but also stabilization, short-circuit protection. The LED chandelier with remote control at a distance is distinguished by the presence of a change in the illumination (power of the luminaire), changing the lighting spectrum (cold or warm tint), the timer, and the sound indicator for searching the remote.
Connecting a chandelier with a control panel does not necessarily mean that you do not need to put a light switch. But the connection of a chandelier with a two-button switch in this situation does not make sense. Just in these multilamp luminaires there is a special controller operating at the frequency of the signal sent from the remote control and regulating the modes of the device. On the market you can find separately sold controllers with consoles for every taste and with a lot of functions. 
In any case, connecting and mounting any luminaire at a height you need to follow safety rules not only with electrical equipment, but also with ladders, supports, so that the installation of the ceiling chandelier went without any problems.
Video about installing and connecting a chandelier
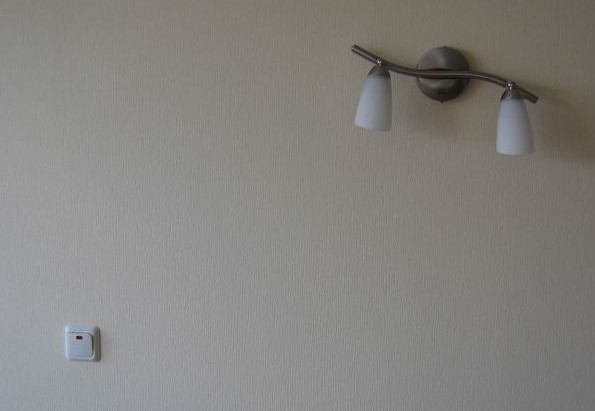
Fixtures of sconces have long been very popular on the territory of our country. Their main feature is that they always emit diffused light, which is suitable for reading or simply creates comfort in the house. Many people use them as additional lighting in the bedroom, in this article we'll tell you how to connect your scrambled hands with no extra difficulties.
Connecting the lamp sconce: the main ways
In total, several varieties of sconces can be named, it is not difficult to connect them, however, there are certain features. Therefore, learn about each type separately.
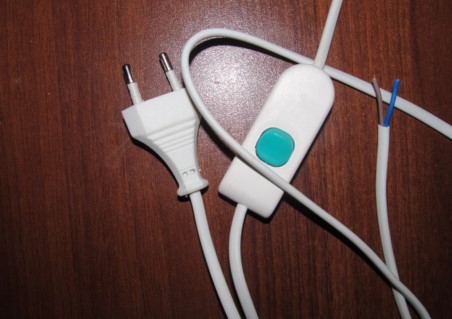
Model on the rope
Here we will look at how to connect a wall with a switch-cord, in fact, there is nothing complicated in this. It is only necessary to conduct all the wires to the connection point and select the height, it is desirable to install a wall at an altitude of 1-2 meters. Then we connect all the wires to each other, there are three of them: L - phase, PE - earth, N - zero. Find out . 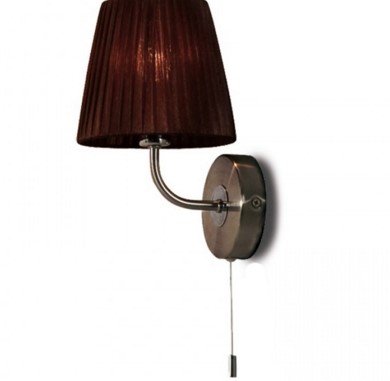
All wires need to be connected accordingly identical. Then we fix the sconce on the wall and use it. Look at how to connect the sconce with the switch-lanyard video, so it will be clearer what's what.
Sconce with switch
 This is an ordinary alternative to rope sconces. Installation instructions are similar, one here needs to be connected only according to a special scheme and use all possible advice on the rules of electrical work. Such seriousness is connected with the fact that you will not see the wire, and if you do something wrong, you can cause a closure. This type can be used for.
So, how to properly connect the sconce, the scheme is as follows: 
- Phase must go to the switch.
- The phase from the switch must return to the lamp.
- Zero and ground in this case are connected directly.
Wall bracket without switch
 Another way to call the sconce directly to the network without switches. In this case, everything is connected only in a direct way - the cord is inserted into the socket, and everything starts to shine. This method is considered excellent, because you do not need to hammer the wall and think about how to connect everything, everything is simple here.
However, answering the question, how to connect the sconce with the switch-cord, we remembered one feature. After all, you can put a string that will tear the chain. So you can not touch the socket all the time, come up, turn it on and everything works fine. See how the circuit looks in this case. 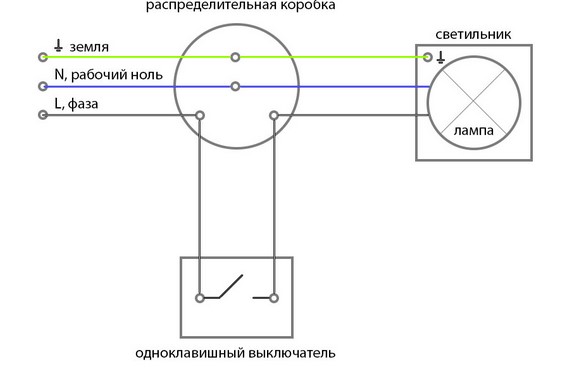
How to connect the sconce: detailed instructions
Here we will tell you how to connect the wall to the 220 volt network. Follow the following recommendations, then everything will be in perfect order:
As you can see, everything is very simple. If you become unclear after our instructions or your sconce is a little different, check out other video tutorials