Antipyretics for children are prescribed by a pediatrician. But there are emergency situations with fever when the child needs to be given medicine immediately. Then the parents take responsibility and use antipyretic drugs. What is allowed to be given to infants? How can you lower the temperature in older children? What medications are the safest?
Irina Kamshilina
Cooking for someone is much more pleasant than for yourself))
Anyone who has never tried lard has lost a lot. With any side dish, soup or just a piece of bread - in any form this product tastes amazing. It is easy to pickle it at home. There are so many recipes that even the most picky gourmet will be able to choose the right one. A few of the most popular are presented below.
How to pickle lard
There is more than one option for delicious salting of lard. This is done using the dry method, in onion peels or brine. The latter is considered the simplest and most accessible. A classic is salting lard in brine at home in Ukrainian. The traditional method includes the following steps:
- Take about 1.5 kg of bacon, cut it into large long pieces.
- Then keep them under pressure in brine for 3 days.
- Then all that remains is to take out the product, dry it and season it again with garlic.
- Store in the refrigerator.
How to choose
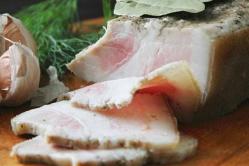
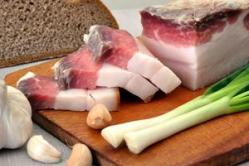
It is better to purchase the product on the market. It should be pure white or with a pinkish tint. If the piece is gray or yellow, it means it is no longer fresh. In addition to color, it is important to pay attention to the veins - there should be fewer of them. The fresh product has a soft thin skin and a sweetish smell. If you press on it with your finger, the dent should remain. These are the basic tips on how to choose the right lard for salting.
How long does it take to salt?
The specific time may depend on the preferences of the cook. There are two opinions:
- One cold or hot salting lasts for 3-5 days, but no less.
- Alternatively, it takes at least 3 weeks to kill all bacteria contained in the product.
How to marinate
It doesn’t matter whether you use a classic pickling recipe or, for example, a dry method, always use the following additives:
- pepper mixture;
- salt;
- cloves;
- sugar;
- vinegar;
- garlic;
- Bay leaf.
Spices can be taken according to your taste - there are no strict restrictions regarding them. You should only be careful with fresh herbs, because they shorten the shelf life of the finished product, and mold may even appear. The best option is to use dry herbs, cumin, and dill seeds. It is recommended to boil the water-based marinade. You can pour it in immediately or after it has cooled.

Recipes at home
By salting lard at home with the addition of your favorite spices, you will get the most delicious and aromatic product. Be sure to try this, because the recipe is very simple. This appetizer can be served even to guests at a party. They will definitely appreciate the dish and even ask for your recipe. Offer them and try one of the ones below.
Hot salting
- Preparation time: 3 days.
- Number of servings: 3 persons.
- Calorie content of the dish: 790 kcal.
- Cuisine: Ukrainian.
- Difficulty: medium.
Ingredients:
- peppercorns – 8 pcs.;
- garlic - a few cloves;
- salt – 7 tbsp. l.;
- water – 1 l;
- lard – 0.8 kg;
- bay leaf – 4 pcs.;
- cloves – 2 pcs.
Cooking method:
- Cut the lard into 3-4 pieces, wash them and dry them.
- Put water on fire, add salt, spices and chopped garlic. Bring to a boil and cook for a couple of minutes, pour into a salting container.
- Next, press the lard under the brine on top with a plate and let cool.
- Then place on the refrigerator shelf and leave for 3 days.
- After this, blot each piece with a paper napkin and dry it.

Cold salting
- Preparation time: 5 days.
- Number of servings: 4 persons.
- Calorie content of the dish: 750 kcal.
- Purpose: for lunch / dinner / holiday table.
- Cuisine: Ukrainian.
- Difficulty: medium.
According to the classic recipe, lard is marinated in cold brine in a jar, which is convenient for preparing for the winter. The appetizer turns out no less juicy and aromatic. On average, the entire process takes about 6 days, although it can take a little less, but not less than 3 days. This technology is also called the wet method. Spices with garlic are also traditional for it.
Ingredients:
- rock salt – 35 g;
- garlic – 4 cloves;
- fresh lard – 500 g;
- dry mustard - 1 pinch;
- bite 9% – 25 ml;
- water – 400 ml;
- khmeli-suneli - to taste;
- pepper mixture - 1 tsp;
- bay leaf – 4 pcs.;
- peppercorns – 6 pcs.
Cooking method:
- Season boiling water with salt, all the spices and bay leaves. Stir and cook until the salt dissolves. Next, pour in vinegar and add garlic cloves. Leave the marinade to cool.
- Wash the bacon, dry it, cut it into pieces measuring 5x4 cm, place them on the bottom of a sterilized jar.
- Then pour in the marinade, roll up under the lid, and keep in a dark place for 5 days.

How to salt in a jar
- Preparation time: 5 days.
- Number of servings: 3 persons.
- Calorie content of the dish: 782 kcal.
- Purpose: for lunch / dinner / holiday table.
- Cuisine: Ukrainian.
- Difficulty: medium.
This recipe falls into the “quick and easy” category. Here, the pickling process itself will take more time, while preparing the ingredients will take about an hour. How to salt lard in brine in a jar? A whole piece is cut into several small slices, placed in a jar and filled with brine - all that remains is to wait until the product is saturated with spices.
Ingredients:
- salt – 1 tbsp.;
- garlic – 5 cloves;
- spices - to your taste;
- lard – 1 kg;
- water – 5 tbsp.
Cooking method:
- Salt the water and boil for a couple of minutes.
- Divide the main ingredient into several small pieces, grate each with chopped garlic. Place the slices in a 3-liter jar, pressing down lightly. Add the remaining garlic.
- Next, pour the now cooled marinade into the jar. Throw a towel on top and leave it where it is darker for 4-6 days.
- After this time, freeze the pieces using the freezer.
Try other methods too.

With garlic
- Preparation time: 6 days.
- Number of servings: 4 persons.
- Calorie content of the dish: 732 kcal.
- Purpose: for lunch / dinner / holiday table.
- Cuisine: Ukrainian.
- Difficulty: medium.
In almost all country-style recipes, spices and garlic are used for pickling. These products perfectly highlight the taste and even make it more pronounced, and previously in the villages the salting of lard in brine with garlic was carried out in large barrels or boxes. There is a simpler option on how to prepare such a delicacy. A step-by-step recipe with photos will help you with this.
Ingredients:
- black pepper - to taste;
- garlic – 5-6 cloves;
- lard – 1 kg;
- salt - also to taste.
Cooking method:
- Rinse the main product, let it dry, and then cut it into smaller portions (with skin).
- Cut each clove of garlic into 4 parts. Stuff them with lard. Next, rub it with a mixture of salt and pepper.
- Place the prepared pieces into a bag. Sprinkle with more salt and transfer to a saucepan or bowl.
- Leave for 24 hours at room temperature and another 5 days on the refrigerator shelf.

Ukrainian tuzluk is very tasty
- Preparation time: 7 days.
- Number of servings: 7 persons.
- Calorie content of the dish: 812 kcal.
- Purpose: for lunch / dinner / holiday table.
- Cuisine: Ukrainian.
- Difficulty: medium.
This method has one undeniable advantage: the finished delicacy has a longer shelf life, and yellow spots do not appear on it. Taste qualities also change slightly; salt is a preservative. For this recipe, it is better to take a piece with streaks of meat. It is believed that lard in brine is more tasty.
Ingredients:
- water – 5 tbsp.;
- peppercorns – 5-6 pcs.;
- bay leaf – 3-5 pcs.;
- garlic – 5-8 cloves;
- sea salt – 1 tbsp.;
- lard – 2 kg.
Cooking method:
- Boil a mixture of water and salt and leave until cool.
- Cut the product into medium slices, place them loosely on the bottom of a 3-liter jar, adding pepper, garlic and bay leaf between the layers.
- Pour the cooled marinade over everything.
- Leave for a week at room temperature, covered.

In Ukrainian
- Preparation time: 3 days.
- Number of servings: 4 persons.
- Calorie content of the dish: 820 kcal.
- Purpose: for lunch / dinner / holiday table.
- Cuisine: Ukrainian.
- Difficulty: medium.
This recipe is a classic. There are many variations of it. This is a masterpiece of Ukrainian cuisine, although now it has become the property of other nations: the Czech Republic, Romania, Poland, Hungary, Russia - these and other countries use pork lard as a traditional snack. There are even secrets, knowing which, it is easy to prepare a truly real culinary miracle.
Ingredients:
- water – 1 l;
- allspice peas – 8 pcs.;
- bay leaf – 3 pcs.;
- coarse table salt - to taste;
- lard with skin – 1 kg;
- salt - as much as needed;
- cloves – 3 inflorescences;
- garlic – 3 cloves.
Cooking method:
- First rinse the main product, then let it dry, cut into medium pieces 5x8 cm.
- Place them in a clean jar, add the garlic halves there, and add the spices.
- Add enough salt to the water so that a raw egg can float to the top. Next, boil, cook for 3 minutes, cool and pour into a jar.
- Cover with a lid, place in a cool place, and after a day move it to the refrigerator shelf. Leave for another 2 days.

Under pressure
- Preparation time: 3 days.
- Number of servings: 3 persons.
- Calorie content of the dish: 786 kcal.
- Purpose: for lunch / dinner / holiday table.
- Cuisine: Ukrainian.
- Difficulty: medium.
According to one of the dry salting methods, you need to keep the lard under pressure for several days. You will be able to try a piece in three days. The method itself is much simpler, because you do not need to cook the marinade. Instead of oppression, you can use a liter jar of water or a heavy stone, stored in advance for such a case. Try this quick recipe, and learn how to prepare the snack itself using the instructions with photos.
Ingredients:
- coarse salt - to taste;
- allspice – 2 tbsp. l.;
- crushed garlic - 2 tbsp. l.;
- pork lard – 1 kg.
Cooking method:
- Rub the lard into pieces with salt, then pepper and garlic. Place the slices in a bowl for salting.
- Cover the top with a plate or plastic lid so that there is not a very large gap left.
- Press with pressure, keep at room temperature for 2 days, and then keep on the refrigerator shelf for another couple of days.

There are many methods for preparing marinade. A properly selected composition allows the product to be better soaked, which is why the taste and aroma of the delicacy become pronounced. You can use onion brine: for this, the product is first boiled, and the brine consists of the same water, salt and pepper, paprika and peels from 1 kg of onion. When cooking, you can add not only garlic and spices, but also other vegetables, sugar and even berries. Herbs include cumin, coriander, and dried basil.
Video:
Found an error in the text? Select it, press Ctrl + Enter and we will fix everything!
Pork lard... Cool, tender, fragrant, homemade, with pepper and it melts in your mouth. Salting lard has long been considered necessary and important. The phenomenon of pork lard has long been of interest to scientists. It would seem that lard is almost 100% fat and contains a huge amount of cholesterol. But with moderate consumption there is no harm, only benefit. The secret of lard turned out to be arachidonic acid. This acid is involved in the body's cholesterol metabolism, hormonal and cellular activity. And this acid is found only in lard. That’s why the cholesterol in lard is “correct” and is not deposited on the walls of blood vessels.
Salting lard can be done in a very different way: in a “wet” way (in brine), a “dry” method (just with spices), and a “hot” method (first the lard is boiled in boiling water).
How to choose
You will be able to pickle lard well only if you choose the right lard. Good, non-wiry lard is very easy to choose. Firstly, this lard is quite homogeneous in appearance, a solid white-pink-white mass, with a thin pork skin. Secondly, it’s easy to cut into good lard; a sharp knife goes in almost effortlessly. If the knife enters with jerks, this means that there are many veins in the lard and you will not be able to salt the lard.
So, salting lard using the “dry” method:
You will need: Coarse rock salt, ground red or black pepper, allspice peas, bay leaf, dried aromatic herbs - marjoram, cumin, cardamom, etc.; garlic.
Salting lard is done using this dry mixture: for 1 kilogram of lard, take 4 tablespoons of coarse salt, add half a spoonful of ground red pepper or a tablespoon of ground black pepper. Aromatic herbs are added to the salt. Salting lard is an individual matter, so everyone can choose the herbs at their own discretion.
If the lard is thicker than 5-6 cm, then it must be cut into layers; if it is thinner, you can simply take it in one piece. You will be able to salt lard if the thickness of the layers is at least 4-5 centimeters. If you like lard with a garlic flavor, then stuff each layer of lard with garlic slices. But salting lard with garlic has one drawback - such lard has a slightly shorter shelf life than lard without additives, keep this in mind!
Pour some of the pickling mixture into the bottom of the dish, add a little peppercorns and a couple of chopped bay leaves. Place one layer of lard there, sprinkle it with a mixture of pepper and bay leaf, then place the next layer and so on.
If you salt thin lard, then place the first layer skin side down, the second layer skin side up, the third layer skin side down again, etc. Those. Salting of lard is done as follows: lard to lard, skin to skin. On the first day, salting of lard is carried out at room temperature. And the next 3-5 days - in a cool place, but not in the cold. After this, the salting of lard is completed, it can already be eaten. Store this lard wrapped in parchment paper in the refrigerator.
Salting lard using the “hot” method
For hot salting, take a thick soft piece of white-pink lard, about 3 centimeters thick. Then cut it into pieces of such a size that they easily fit into the pan in which we will cook them. If the pieces are not well covered with water, then you will not be able to salt the lard evenly.
Hot salting of lard will require:
1 kg of lard, 1.5 liters of water, one glass of coarse salt, one head of garlic, 15 crushed black peppercorns, 5 bay leaves, one teaspoon of spicy adjika, 6 liquid smoke and 100 grams of onion peels.
The lard skin should be thoroughly scraped with a knife until white. You will succeed in hot salting only if you prepare the brine correctly: add salt, bay leaf, adjika, and pepper to boiling water. As soon as the water boils again, add liquid smoke - without it, hot salting of lard will not work.
Place pieces of lard into the boiling brine and when the water boils again, reduce the heat and cook for about 5 minutes. Then turn off the heat and leave the pan to cool in a warm place for 12 hours.
Then take out the lard, dry it, rub it with paprika and garlic. Now we put it in the refrigerator for a couple of hours - that’s it, the salting of lard is completed, you can start eating!
Salting lard using the “wet” method
Salting lard using the “wet” method in brine can be carried out according to various recipes. Lard prepared using the “wet” method does not age or turn yellow for a long time, while maintaining excellent taste.
Here is an example of salting lard using the “wet” method in “Ukrainian” brine:
Prepare the brine: take 5 glasses of water, 1 glass of coarsely ground salt, boil together, then cool to room temperature. At this time, cut the lard into small pieces so that they can be easily removed later and place them loosely in a three-liter jar.
If you cut the lard too large, then all your salting of lard will be overshadowed by the fact that you will have great difficulty getting it out of the jar, and the lard will simply “suffocate” there. Between layers, add 4 bay leaves, black peas, 5 cloves of garlic and pour brine over it all.
Then cover the jar loosely with the lid. Keep it at room temperature for a week - that’s all, the salting of lard is complete! Usually a three-liter jar takes about two kilograms of lard.
Salting lard using the “wet” method in “spicy” brine.
And this recipe is perfect for those who don’t mind indulging in something spicy. Salting lard goes like this: Take 7 glasses of water and one glass of coarsely ground salt, add a handful of onion peels, bring the mixture to a boil and cook for 5 minutes.
Then we put lard there (the water should completely cover it) and boil it for 10-20 minutes, depending on how old the pig was. Then we leave the lard in the cooling brine for a day. After that, rub it with red pepper and garlic and put it in the freezer. The good thing about salting lard this way is that the resulting lard comes out spicy and goes great as an appetizer with alcohol!
Lard in tuzluk brine.
1.7 cups of water - 1 cup of table salt, boil for 10 minutes, cool to room temperature, small pieces of lard and place loosely in a jar, add 3-5 bay leaves between layers, black peppercorns, a few cloves of garlic and pour brine on your finger above the layer of lard, cover loosely with a lid. Keep in a room in the dark for a week, then in the refrigerator. Do not pack tightly in the jar, otherwise the lard will “suffocate”. Lard prepared according to this recipe does not age, does not turn yellow and is stored for a long time, maintaining excellent taste.
Spicy lard.
4.23 pints water, 1 cup coarse salt, a handful of onion skins, bring to a boil, simmer for 10 minutes. Then put lard there (the water should cover the lard!!). Boil for 10-20 minutes (if the pork is from a supermarket - 20 minutes, if young and market - 10). Leave in brine for a day. Remove from the brine and let the water drain. Rub with garlic and red pepper. Place in the refrigerator, preferably in the freezer (it tastes better this way). Wait a week before tasting.
Express - lard.
Lard (cut to size for a sandwich), salt, garlic and other ingredients to taste are placed in a glass jar. Pour boiling water, close the lid and cool. In a couple of hours, it's ready. If you have any leftovers, keep in the refrigerator for a week. This recipe, as you understand, is for extreme cases.
Classic lard.
Sprinkle 300 grams of lard pieces generously with salt and leave in the cold and in the dark for two days. After two days, place the onion skins and lard (do not shake off the salt) into boiling water.*) Add 5-6 pcs. bay leaf, peppercorns, 1 teaspoon of black pepper and 2 grams of red pepper, salt and grated garlic (2-3 heads). Cook for 7-8 minutes from the moment of boiling. Allow to cool, peel, then place in a plastic bag and into the freezer. The lard is ready in a couple of days.
Salo is easy!
Lard is cut into pieces the size of a fist, garlic at the rate of 1 clove per 1 piece of lard and this garlic is cut into thin slices. Suneli hops, pepper, ground dill (dry), etc., to taste. Take a large pan for lard. Add some seasonings, pepper and garlic to the bottom of the pan. Next, rub our lard with a mixture of salt and pepper and other seasonings. After this, place the lard in a pan, skin side down, and repeat the operation with another piece of lard, sprinkling the whole thing with spices and garlic. There is no need to save salt... When the lard reserves are depleted, it should be compacted a little in a vessel, covered with a lid of a smaller diameter or a plate, with a small spoon on top - for example, a 3-liter jar of water), and at room temperature for 1-2 days without light access. After this, the lard is almost ready - all you have to do is remove it from the pan, shake off the juice, wrap it in a cotton cloth and put it in the refrigerator for several days. If guests arrive earlier, then, really, this is not a problem either. An hour in the freezer and that's it! That's the whole recipe!
Salted lard.
Prepare the brine - 1 glass of salt per liter of boiling water, if there is enough salt - a folk sign - a raw egg does not sink. Let's cool our brine. Add spices to your taste. Keep small pieces of lard in brine for 2 or 3 days. Next, to increase the shelf life and, just in case, boil our preparations for 25-30 minutes. You can make holes with a knife and insert pieces of garlic. Rub with black or red pepper, hops-suneli, etc. We put our pieces in a plastic bag. Bon appetit!
Salt the lard in a jar.
Cut the lard into small cubes about 4 x 4cm, including the skin. Grate the garlic on a fine grater and dilute with a little water. Dip each piece of lard into grated garlic on all sides. Next, grate with 6th grade salt, place very tightly in a clean, dry jar and put in the refrigerator. Ready in a week.
Lard in marinade for long-term storage.
Prepared lard, that is, cut into large pieces, scalded and with the weathered parts removed (just scrape it with a knife if you have market lard), place it in a prepared vessel and pour in strong (at the rate of one kilogram of salt per five liters of water), which has already cooled after boiling. brine. After three days we change the brine. And we lovingly rearrange the pieces of lard. On the sixth day, change the brine again, transfer the lard again and add salt. Day nine. We get a semi-finished product, which we sprinkle with salt, wrap in a linen cloth, put in a plastic bag and put in the refrigerator. Please note that there are no spices in this recipe. This lard retains its taste very well. There is information that up to a year. Personally, I did not have the opportunity to verify this. Some of it went into cooking, some I stuffed with garlic and carrots and sprinkled with red pepper (garlic gives off a rancid taste after a while, so you have to eat quickly), I froze some in the freezer, gave some as a gift, in other words, it’s time to buy lard again! Pickled lard is a thing!
Important.
The question of choosing lard is not the easiest. If you find at home that lard smells like urine, it is boar meat. The way to deal with this is simple. Soak the lard in water with garlic juice.
Shelf life.
Boiled lard can be stored in the refrigerator for three or four months. Lard cooked in marinade can be stored for up to a year. Dry salted lard lasts for about a month, then the taste is no longer the same, but you can eat it and use it in cooking. Please note that the dates indicated above are provisional. The main assistant in determining freshness is the nose.
If it is fundamentally important for you to prepare lard with a maximum shelf life, then you can follow the more expensive route of pasteurization and then seal it in a jar. Sometimes a little vinegar and sugar are added to the brine. But this way of preparing lard is not for everyone.
Baked lard or lard.
Soak well-washed pieces of lard in cold water for 6 hours. Drain the water and repeat the procedure. Add salt at the rate of a couple of tablespoons per 1 kg of lard. Pour a little water into an enamel pan with a thick bottom so that it just covers the bottom. The entire procedure takes place over the lowest heat. Place the first portion of lard into the pan. We begin to stir with a long spatula. Not in a hurry, but constantly. Gradually add the remaining lard as it melts. If the heat on the stove is too hot, use a flame breaker. Cook until all the fat is rendered. In the meantime, heat up clean, dry jars in the oven (so that they don’t burst), into which we will drain the fat through double gauze. We fill the jars, let the fat settle in a warm place (for example, in the same oven that is turned off) and drain the sediment through fresh double gauze. We get rendered lard, which we store in a cool, dry place, protecting it from light.
Vodka in lard.
Here is the transcript of the text:
“It is done as follows: for 1 pound of Polish unsalted lard take 2 lots (2×12.8 g) of salt, 1 spool (4.3 g) of marjoram, 1 spool of saltpeter, 2 spools of crushed pepper, 2 spools of English pepper, with half a pound of garlic, 10 - 12 spools of granulated sugar, 1 spool of citric acid, a few drops of lemon oil, pass everything through a meat grinder, then place it in a spacious bottle of good white glass and pour 4 bottles of wine alcohol into it. For extra softness, add half a pound of honey and a quarter of a pound of blackcurrant leaf and leave, tightly securing the bottle, in a cool, dark place. After a month, strain the resulting infusion through a thick cloth several times. After this, in a thoroughly washed bottle, it is mixed with six bottles of cold raw water, placed on ice for three
days and then bottled.”
Salo and fishing.
What is written below most likely refers simply to the advice (found on a fishing site) from an “experienced” person:
Pork lard is considered one of the best animal baits among Dnieper fishermen. Fresh lard removed from the belly is used: it is securely held on the hook and is easily pierced with a sting. Hard lard is not suitable for fishing: the fish will take it, but will not be caught. Before fishing, the lard is cut into cubes 0.5 centimeters thick and placed in cold water, in which it hardens and turns noticeably white. You can fish with lard with both donks and float rods. Chub, carp, bream, silver bream, ide, and large roach bite well on it. Although lard is used mainly in warm weather, it is possible that in winter roaches, silver bream and rudd will also take it if you put lard on a jig.
Fragrant, pickled salsa.
Recipe from Nikitich (Odessa-mother)
Salo - as much as your heart desires.
Garlic - decent.
Salt - 1 tbsp. l. per liter of brine.
Spices: (peppercorns, white pepper, finely chopped dried sweet pepper, cumin).
We buy fresh lard at the market, with meat streaks - undercuts or without streaks (someone likes what). We clean the skin with a knife and wipe it. Cut into bars smaller than your palm. Using the edge of a knife, we make holes in the lard all over the surface and put halves of a clove of garlic without the core (!) into them. Roll each piece of salsa in a mixture of your favorite spices and rub in, pressing down. In a saucepan (6 liters) with plain water, add coarse salt (5-6 tablespoons), laurel leaves, and favorite spices. Bring the brine to a boil. Turn it off. Cool to 30-40 degrees Celsius and very carefully pour (so as not to wash off all the spices and so that the brine covers the salsa by 2-3 cm) into a tall container, where pieces of salsa are previously tightly placed on their sides. After the brine has cooled at room temperature, put the salsa in the refrigerator (not the freezer!) After 6-7 days, remove it from the cold brine. We wrap each block in paper (not newspaper or magazine) and put it in the freezer...
PySy: Before putting the bars in the freezer, I rub them again with the above-mentioned seasonings...
Lard and soup.
Lard - 200 grams, onion, tomatoes - 2 pcs., garlic -4 cloves, parsley, salt, black pepper, fry with flour, parsley and spices in fat. Add brown broth (see French cooking), boil and add small croutons. You can serve it on the table, turning on Tyrolean melodies, since I saw this recipe performed by an Austrian friend, who assured everyone that after such soup in the Alps it is customary to sing before each glass.
A very old and famous recipe
After boiling the lard in onion skins, it looks like smoked lard.
For this recipe, it is best to use lard with layers of meat (brisket), since such light cooking is the optimal treatment for meat.
COMPOUND:
1~1.5 kg brisket or lard, 1 small head of garlic
BRINE
1 liter of water, 0.5 cups of salt, 1 handful of onion peels (from 5~7 onions), if desired - 3 bay leaves, 15 black peppercorns
Place onion skins, salt, bay leaf, pepper in a saucepan and add water.
Bring to a boil, add lard so that it is all covered with brine, and boil for 10 minutes.
Remove the pan from the heat and leave the lard in the brine for a day. (After the brine has cooled, place the pan in the refrigerator).
Remove the lard from the brine and let it sit in a plate for ~15 minutes to drain off the excess brine.
Press the garlic through a press and coat the lard with it on all sides.
Place in the refrigerator for a day. Then transfer to the freezer.
We smoke the lard ourselves
Because it's very simple! I’ll tell you point by point and you yourself will understand that there are no difficulties.
1. We buy a piece of lard with layers of meat at the market. Ask for brisket, it turns out tastier, let there be ribs on the brisket, it’s okay, you can make an awesome roast or soup from them.
2. We buy onions, garlic at the Liquid Smoke store (almost nothing else is needed)
3. We bring the lard home, wash it, cut it into pieces so that they fit into the pan.
4. Prepare the brine. For a liter of water we take 6 tablespoons of salt, a handful of onion peels or one large onion straight with scales and 6 tablespoons of “Liquid smoke”
5. Place pieces of lard into the brine and cook for 30-40 minutes over moderate heat.
6. While the lard is cooking, mix red and black pepper, you can add paprika and crush 2 large peeled heads of garlic there.
Remove the finished lard from the brine, let it cool for 5 minutes and rub with a mixture of peppers and garlic.
We wrap each grated piece in foil or plastic and put it in the freezer.
You can try it in an hour if you can bear it, because the smells in the air are unimaginable, believe me.
Series of messages " ":
Part 1 -
Part 2 -
...
Part 14 -
Part 15 -
Part 18 -
Part 19 -
Almost all food products have some amazing, special properties. The hero of our story today, lard, is no exception. Myths about the dangers of this tasty product have already been debunked, and today any nutritionist will be happy to confirm to you that the arachidonic acid contained in lard is important for cellular and hormonal activity, that in terms of the content of essential amino acids lard is close to vegetable fats, and in addition, lard contains considerable the amount of important vitamins such as vitamin A, E, D, carotene. But our distant ancestors were well aware of the amazing properties of lard, who not only enjoyed eating it, but also actively used lard in medicine and cosmetology. But, of course, we are primarily interested in lard from a culinary point of view.
 What could be more beautiful than on a frosty winter day, returning from a walk, pouring yourself a plate of fiery borscht, accompanied by a glass of ice-cold vodka, and snacking on it with a slice of fresh rye bread, decorated with a thin, tender, fragile piece of salted lard with garlic? And the lard must be fresh, melting in your mouth, with a thin pink streak. Where can you get this, you ask? You can take the path of least resistance and buy salted lard in a store or market, fortunately today it does not represent the slightest difficulty, and the variety of varieties literally amazes the imagination with its splendor. There is only one misfortune that awaits you on this path - it is not always possible to trust the seller in order to be one hundred percent sure of the quality and freshness of the product. We've all had cases when purchased, much-desired salted lard turned out to be rancid, not salty enough, old, and simply tasteless. But it’s very easy to avoid disappointment! A little work, a couple of days of waiting, and your table will be decorated with the most delicious, most tender homemade lard, made taking into account your personal culinary preferences. And today we invite you to learn and remember with us how to salt lard at home.
 There are a huge number of options for salting lard. Even today, in many village houses, recipes for preparing this delicious snack, carefully passed down from generation to generation, have been preserved, and until quite recently, such recipes were literally in every family. Starting from the simplest lard, sprinkled with salt, wrapped in oiled paper and hidden in a cold cellar, and ending with the most delicate boiled lard, flavored with a fair amount of garlic, herbs and spices. And they never spared spices when salting lard, because they gave the salted lard real individuality, the finest shades of taste, and a special aroma. Black pepper and cumin, bay leaf and allspice, cloves and dill seeds - all these and many other spices allowed housewives to feel well-deserved pride, and guests and household members to admire and enjoy the taste of real home-made salted lard.
 Today “Culinary Eden” has collected and prepared for you a selection of tips and recipes that will easily tell even novice housewives how to salt lard.
1. When choosing lard for salting, you should be especially careful, because this is a product that will not undergo heat treatment. Try to buy fresh lard from trusted sellers, never hesitate to ask for a certificate of veterinary inspection, carefully check the date of its issue. It’s even better if the piece of lard you choose has a veterinary stamp on it. And under no circumstances buy fresh lard from suspicious places - on the street or from a car. Do not forget that lard that has not been veterinarily tested can be a source of such unpleasant diseases as trichinosis and pork tapeworm. Be careful and careful!
 2. Before purchasing, carefully inspect the piece of lard you have chosen. The best lard for salting is at least three centimeters thick, soft and pliable. Carefully inspect the skin, it should be clean shaved and carefully burned, there should be no stubble left at all. The skin should be thin, soft, light yellow, almost white. And the lard itself must certainly be snow-white or slightly pink. The yellow or grayish color of the lard will tell you that it is not the first of its youth and freshness; it is better to refuse such a purchase. Be sure to press the lard with your finger. Good fresh lard will leave a small dent, but if the lard is old and hard, the dent from your finger will disappear immediately. Don't forget to smell a piece of lard before purchasing. The smell should be pleasant, slightly sweet, characteristic of fresh lard, without the slightest admixture of foreign odors, which cannot be removed by salting. In order to make sure that they are not trying to sell you harsh and tasteless boar lard, ask the seller to cut off a tiny piece of lard and hold it over the fire of a lighter - boar lard will immediately betray itself with an unpleasant, pungent smell of urine.
 3. Fresh lard should be stored only in the freezer, and salted lard should be stored both in the freezer and in the refrigerator. But do not forget that lard very quickly absorbs surrounding odors! Remember how it often happened that salted lard, having spent only a week in your refrigerator, became not at all as appetizing and tasty as it was at first. That is why try to keep only a small piece of lard in the refrigerator, one that you can eat within the next couple of days. Store the rest of the lard in the freezer, after wrapping it tightly in oiled paper and placing it in a plastic bag.
4. Now let's pop  Let's try to pickle our first piece of lard! Cut one kilogram of lard into 4 cm thick pieces, rinse carefully with cold water and dry with a paper towel. Do not place pieces of lard too tightly into glass, plastic or enamel dishes for salting. Place your favorite spices between the pieces of lard. This can be bay leaf, fresh or dried garlic, black or allspice, any spicy herbs. In a separate bowl, boil 1 ½ liters of water, dissolve one glass of salt in it, cool and filter the brine through cheesecloth. Pour the prepared brine over the lard and leave at room temperature for a couple of days. Then put the lard in the refrigerator for another 3 to 4 days. Lard prepared in this way can be stored in the refrigerator directly in brine for a long time - it will always remain tender and tasty.
 5. Dry-salted lard is also very tasty. With this method of salting, lard should not be washed with water. To remove possible dirt, carefully scrape the lard on all sides with a sharp knife, not forgetting the skin. Cut the peeled lard into pieces 4 cm wide, and then thoroughly rub with salt on all sides. Don’t skimp on the salt; lard will never take on too much and it won’t turn out too salty. It is best to use coarse salt, called rock salt. After you have rubbed the lard with salt, sprinkle it with black or red pepper, and then rub some chopped or crushed garlic into your lard. At the very end, you can add a little cumin or any other spices to your taste. Wrap the lard prepared in this way tightly in oiled paper and put it in the freezer. In just a week, your lard will be ready.
6. Another method of dry salting will allow you to taste your snack in three days. Peel and cut into pieces one kilogram of lard, generously rub it with coarse salt, black and allspice, crushed garlic and place tightly in a bowl for salting. Place a plate or plastic circle on top of the lard that fits tightly into the salting dish, leaving a gap of no more than a few millimeters between itself and the walls of the dish. Place the weight on a plate. This could be a liter jar filled with water, or a heavy stone specially stored for such cases. Leave the lard under pressure at room temperature for 2 days, and then put it in the refrigerator for another one or two days. Store the lard prepared in this way in the freezer, tightly wrapping it in oiled paper.
 7. Lard salted in brine turns out to be very tasty, strong and can be stored for a long time without turning yellow or losing its taste. In order to properly prepare a strong salt solution, brine, small portions of salt are dissolved in hot water until the next portion of salt settles to the bottom, unable to dissolve in the water. This will mean that the water has absorbed the maximum possible amount of salt. To prepare lard in brine, cut the lard into small pieces and place in a glass jar. Between the pieces of lard, place a few bay leaves, black peppercorns, and a few cloves of garlic, cut into thin petals. Pour the lard prepared in this way with previously prepared and cooled brine so that the brine covers the lard by about one centimeter. Cover the jar of lard loosely with a lid and leave in a dark place at room temperature for one week. Store the finished lard in the refrigerator.
 8. Do you like spicier lard? Nothing could be easier! Thoroughly clean one kilogram of lard from contaminants using a sharp knife and cut into pieces about 4 cm thick. Mix one hundred grams of salt with 1 tsp. a spoonful of ground red pepper, 1 teaspoon of ground black pepper and 1 teaspoon of cumin. Thoroughly rub the pieces of lard with the resulting mixture, top with chopped garlic petals, and place your lard in a bowl for salting, skin side down. Cover the lard with a plate or plastic circle, place a weight and put the lard in the refrigerator for 14 - 20 days. Wrap the finished lard in parchment paper and store as usual.
9. A little onion peel  will help you easily prepare lard at home, its taste reminiscent of smoked lard. Bring 5 glasses of water to a boil, add to them one glass of salt, 1 teaspoon of black peppercorns, 4 cloves of garlic, 3 bay leaves and onion peels from 5 - 6 onions. Mix everything thoroughly, bring to a boil again, and then drop a piece of lard weighing 500 - 600 grams into the boiling brine. Cook the lard in the brine for 20 minutes over low heat, then remove from the heat and leave the lard in the brine for 8 hours. Remove the finished lard from the brine, drain, wrap in parchment paper and put in the freezer.
10. I really want homemade lard, but I don’t want to wait even two days? Try making quick salted lard! Cut 200 gr. lard in thin slices, such as you will serve at the table. Place lard in a glass jar, add 3 tbsp. spoons of salt, four finely chopped cloves of garlic, one teaspoon of black peppercorns, a couple of bay leaves. Pour boiling water over the lard prepared in this way so that the water completely covers your lard, cover with a lid and let cool to room temperature. In just two to three hours your lard will be ready. Such lard should not be stored for longer than two to three days!
And on the pages of “Culinary Eden” you can always find even more tips and recipes that will always tell you how to salt lard.
Step 1: cut the lard.
For this recipe, use fresh, slightly chilled lard. Possibly with streaks of meat. First of all, the product must be washed in running water. Then, using a sharp knife, cut the lard into pieces approximately 10 cm wide and no more than 2.5 cm thick. The length of the pieces can be arbitrary, it all depends on the size of the container in which you are going to salt.Step 2: grate the offal.
 Generously rub salt, pepper and spices into the lard. Don't be afraid to oversalt - lard is an amazing product, it will take as much salt as it needs!
 Step 3: put the lard in a bowl.
 Be sure to take enamel dishes. In my case, it's a large saucepan. Pour about 0.5 cm of salt onto the bottom. Then lay the lard so that there is a distance of slightly less than 1 cm between the pieces. Cover the layer with salt so that the spaces are also filled with it. Then add more lard. Place a couple of bay leaves between the layers. As soon as all the product is laid, cover everything with salt. Take a plate of suitable diameter and cover our pan tightly with it. Place a weight on top; a three-liter jar of water will be enough. In this state, leave the lard for a day at room temperature. After the time has passed, the lard will need to be turned over, covered with a lid (now without a load) and put in the refrigerator for 5 days. During this time, the lard must be stirred periodically so that the salting is uniform.
 Step 4: Serve dry salted lard.
 When the time is up, remove the lard and rub it with a mixture of pepper and garlic. In this form the product is served to the table. Dry salted lard can be stored both in the freezer (this is for long-term storage) and in the refrigerator. Bon appetit!
 It is difficult to over-salt lard; it absorbs as much salt as it needs. But, if this does happen, just dry it for 2 days, and then scrape off the salt with a knife.
For preparations of this kind, use lard from the sides and back of the pork carcass. It's perfect for this.
To make the lard softer and more tender, soak it in water for 10 hours before salting.
Garlic is added only to ready-made lard, since it cannot be frozen during the salting process, otherwise it will acquire an unpleasant odor.
![]()
![]()
It is quite possible that summer will come someday in the middle zone. This means that it still makes sense to supply bread kvass. It will take at least a week to prepare a good starter, and as forecasters promise, by that time the air temperature should rise above 20 C (daytime).
How to prepare sourdough for
homemade bread kvass
Ingredients:
- 2 liters of cold water;
- 0.5 loaves of Borodino bread or 100 grams of rye flour + 100 grams of rye bread;
- 4 tablespoons granulated sugar;
- 3 grams of yeast.
- Preparation time - 5-6 days
How to put kvass:
And insist again for a couple of days.
Drain again, add the remaining crackers (or flour with crackers) and sugar. And fill it with fresh water again.
During this time, the sourdough will lose its insolent yeasty taste and unpleasant bitterness and it will be possible to use it for drinking kvass. To do this, once every 1.5-2 days, you will need to add water, sugar to taste and a large handful of fresh rye crackers to a three-liter jar with the prepared starter, first removing some of the old soggy ones that have sunk to the bottom. For taste you can add raisins, mint, ginger, honey...
![]()
Snacks
Ingredients
- 0.5 kg lard
- 3 tbsp salt
- 4 cloves garlic
- Black pepper
Cooking method
- Stuff pieces of lard with cloves of garlic cloves.
- Roll in pepper and sprinkle thickly with salt.
- Place in a deep container, cover with parchment or cellophane and press down with pressure.
- After 3 days, put it in the refrigerator, after another 2 days you can eat it.