Antipyretics for children are prescribed by a pediatrician. But there are situations of emergency care for fever, when the child needs to give the medicine immediately. Then the parents take responsibility and apply antipyretic drugs. What is allowed to give to infants? How can you bring down the temperature in older children? Which medications are the safest?
If you have not yet decided which way to lay the cable in the ground, we recommend following our simple advice. There are many ways to accomplish this task. Professionals still can not decide which way is better - earthly or airy.
We suggest you give preference, all the same to the earthly way. This is easy to explain. Usually the distance from the post to the house is large and most likely you will want to install outdoor lighting. In these cases, the earth way of laying the cable is ideal.
To lay the electrical cable underground, follow the simple operating instructions. First of all, an electric cable for laying in the ground at the dacha needs to be purchased. 
After that you can start to choose the most suitable way of cable laying. In this case, it is necessary to take into account certain features. The cable must be located in the 1m. from massive trees. Take note of this nuance.
Cable laying is not such a simple process as it seems at first glance. It should be ensured that the wires do not get tangled, and do not place it in places with high load.
Start with creating a simple markup, and then go to the excavations. The trench, where the cable will be located, should not be 70 cm.
Concerning depths, then cable lines up to 20 kV should be laid at a depth of 0.7 m, up to 35 kV - 1 m, with streets and areas - 1 m regardless of voltage, cable lines with oil filling should be laid to a depth of 1.5 m.
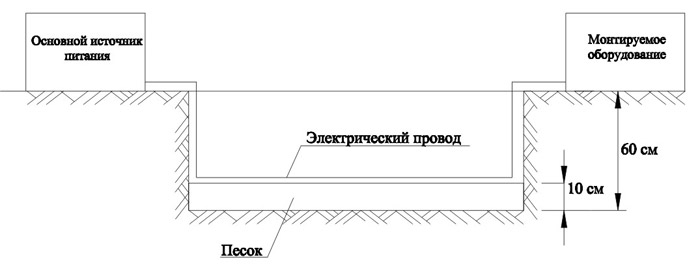
After you create the necessary trench, you can start filtering it. In other words, remove all stones and other objects. The next step is the creation of a pillow. It is better to make it out of such material as sand. ![]()
The depth of the cushion should be approximately 10 cm. We recommend that you give preference to the ABBg cable. This is a universal option. To ensure cable protection, we recommend that you use asbestos cement pipes. The cable should be laid loose so that there is no excess pressure on it. We advise you to create a separate cable layout.
After all preparatory phases, you can start falling asleep. This should be done with sand. Its layer must be at least 10cm. The final step will be the laying of the signal tape. The final stage will be the fall of the trench with earth.
Laying an electric cable under the ground
The installation of an electrical cable under the ground must be carried out in compliance with all technical regulations. You should know that it is better to plan the route initially, its radius should have clearly defined dimensions, which should not exceed the permissible norm for each individual cable.
You must consider the presence of distribution couplings. The cable must be delivered on cable drums, which in turn are delivered on special cars. 
You should consider that the drums should be unloaded very carefully. We recommend that you contact a specialist if you are in doubt about your capabilities. The laying of cables under the ground requires responsible preparation and the necessary knowledge.
Electrical cable laying in the ground
Pay attention to the choice of cable. The successful laying of an electrical cable in the ground depends primarily on its quality. We recommend that you give preference to copper cables.
They must be armored. The cable you must purchase must necessarily have technical documentation, in which it will indicate what it is intended for.
In our case - it's a gasket in the ground. To lay the cable it is necessary only from a special drum. You must take this into account.
The cable itself should also have some protection. Let it be a steel sheath. Such a cable will cost more, but you will not doubt its quality for a minute. 
Take into account all the above recommendations, and you will successfully make the laying of the electrical cable in the ground. Special attention should also be given to safety. Use special clothes and make the necessary calculations. The cable must go with a certain margin.
It is very important. Do not stretch the cable. The stock should be about 2%. To properly connect the cable glands, use couplings. Clearly determine the distance between the coupling and the cable. It should be approximately 250 mm.
And also you can see the video of the power cable laying
Do not frighten people. Pave a wiring much is not necessary, but you need a lot of health or a means of mechanization. Take the cable VB6Shv the desired section (usually more than 16 squares do not pull, it's about 20 kW load), it is sold in cable reels of 50 m or more. Digging a trench to a meter deep (it is better to do it with a dirt bridge (a tractor with a bar)), put geotextiles on the bottom (something that does not go off the sand to the ground) and wrap it up another 20 cm up the edges of the trench. Pour a 10 cm layer of sand onto it and throw a cable onto it, 10 cm more on top and cover with earth, screening out large stones, fragments of brick, concrete, etc. At the distances you need, you can place switching water resistant wells in the ground (the cable went to the shoe and went from the shoe farther, and you can connect additional equipment to the shoe.) There are street-switching switching boxes (if that is more convenient) and they can be hung directly on the screwed pile. you will need at the stage of commutation, selection and installation of protection devices, etc. I have such a scheme hundreds of meters of cable lie on a site of 40 acres.On the distribution electric wells are fed several pumps (borehole, autopow, drainage (septic tank and water intake well), outdoor lighting, etc., etc. In fact, within a radius of 5-10 meters, I can always find the point of connection of electrical equipment and dig these several meters deep into a pair of bayonets The cable is not a water pipe, it will not freeze in winter, the frosty strength of the drill is the most dangerous for it, but it does not have to be stretched in the trench, and the sandy backfill compensates these forces slightly. For more than 10 years, such a cable has been working, problems on the tracks there were no pairs of due to clogged livnevki flooded after all electricity distribution shafts (just cut down the machine). Now in all the racks I have removable baskets with cells about 8 mm, walked around the house and along the tracks, shook the baskets into a package from the package into the compost pile. Some of the trails are laid along with the water supply and sewerage in one trench (just the cable lies above the water pipe for several tens of centimeters.) On good it is possible to throw in the trench special protective and signal tapes (they are very strong and serve forever, they cost cheaply, they are made in Belarus), then there is a chance that a landing excavator will not cut the cables with a bucket, or carefully draw the tracks on a site with an exact link to the fence, the house, the large trees, the buildings. You plan to increase the power in the future or pull independent branches (for example from another phase or from the generator), then using a conductor and silicone grease, the cable is fairly easy to pull through these pipes in addition to the available ones, but it's better not to complicate the circuit (the second cable in that -a cable path "for security" you just will not help, because if for some mechanical or geological reason, one cable breaks, then they will be cut short). Do not bury the cable deeper than reasonable, where it can not get a plow, bayonet bayonet or any other mechanical effect, do not complicate your life and health.
P.S. under access roads, parking lots, etc. the cable must be tightened into the SN4 sewage pipe section (mostly they are sold in stores) or SN8 if you have a parking lot for loaded trucks on the cable track.
Everyone who ever came to mind to refine their suburban area, worried the vital question: how to make wiring in the garden, so that she led to a variety of outlets and lightbulbs in gazebos, to streetlights? I also had to deal with this difficult matter.
Immediately I warn that I am an electrician by profession, that's why I did everything myself, if someone does not have special knowledge - you can not start something "wiser" with the wiring and electricity yourself. In the best case, nothing can just work, on average - all the connected equipment will break, and in the extreme - one can harm yourself or someone from the madmen who agreed to deal with the "self-made" electrification of the garden. Electrification of the site should be carried out only by a specialist, no matter how simple it may seem. But at least in general terms to know how to do the wiring will not hurt anyone, at least to check the quality of the work of the same electrician - they also are different too. So, the topic of this article is how to build a wiring in the garden.
How to make wiring: materials and tools
For the installation of garden electrical wiring you need a standard set of tools:
- drill with a set of drills
- screwdriver Set
- good pliers
- pliers
- sharp knife
- a hammer
- voltage indicator
- protective gloves
This is the minimum required list, without which the work can and does not begin. If the wiring is underground (about this - below), then you can not do without a good shovel.
Selection of wiring type and installation methods
Garden wiring can be outdoor and hidden. The first is still temporary and stationary, the second is most often buried in the ground. Here the choice depends on the possibilities and needs. Temporary wiring is suitable for those who need electricity in the garden very rarely - it's cheaper than everything, but also less beautiful and safe. Such a system simply unwinds from the house and winds up when necessary - no problems. Stationary external wiring is mounted for permanent use and is conducted to the electrification sites by posts, trees and outside walls of buildings, stretched on ropes.

It will cost a little more (you need a better wire), but it does not always work out aesthetically - it all depends on the layout of the garden, the number of connection points and all that.
I'll tell you how to lay the wiring under the ground. Such electrification of the site is much more effective and safer than others, but you will need a special expensive cable with reinforced insulation. When connecting pieces of cable among themselves, the tape is no longer suitable - special sealed couplings are needed.
How to build the wiring: the order of work
All the work done can be divided into several stages in sequence.
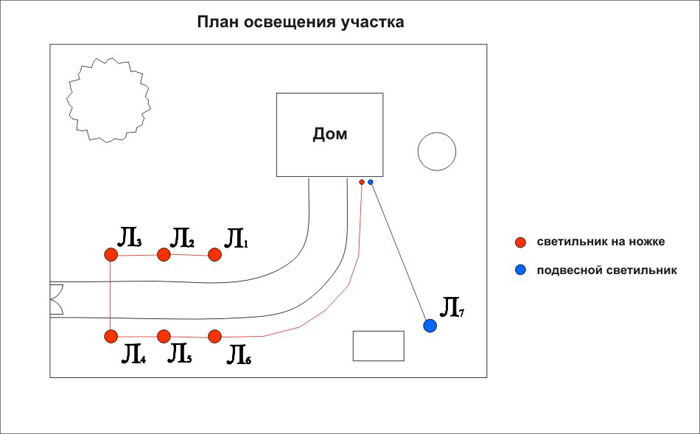
1. Development of the project, which clearly indicates all the fixtures, switches, sockets and so on. This is the most important stage, from the correctness of which the success of the whole event depends.
Even if you want to do all the work yourself, the project must be developed or at least approved by a good specialist. For example, you can order a detailed design of the electrification of the garden with exact specifications and detailed instructions and work on it, both on good instructions.
2. Further trenches are digging into which, according to the previously developed project, a cable will be laid. Stacking is simple, but time-consuming: the cable is laid in a trench not less than sixty centimeters deep on a ten-centimeter cushion of sand.

The wires are terminated from the ground to the places where the equipment is installed and connected to the mains.
3. Now you can mount all the lights, sockets and stuff. All switching fittings should be located in places completely inaccessible to atmospheric precipitation, even if the seller feared that it is in a moisture-proof design - it will still leak and eventually close. We know, we passed.

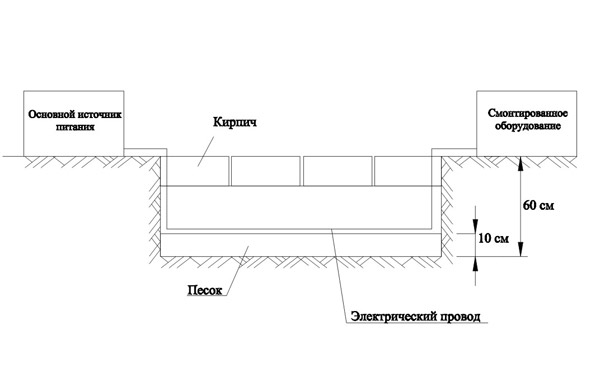
4. And only after this, it is necessary to install a protective automatic system and connect to a permanent electrical network. Trenches can be digested already firmly making sure that everything works. The cable is covered with sand and covered with bricks, tiles and other materials that protect against mechanical damage.
Job is done.
Selection and placement of sockets, lighting fixtures
Depending on the type of wiring, the lighting fixtures for the area can be hanging and ground, can give scattered and directional light that will illuminate a small area or the entire structure.
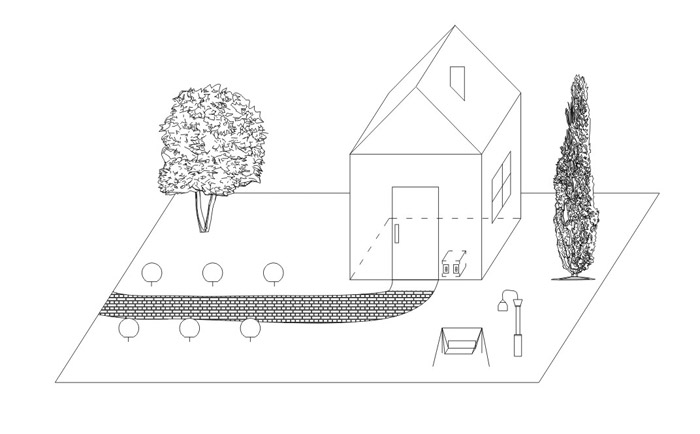
To illuminate garden paths, land lamps with soft, diffuser shades are most often used, that's how everything is done for me.

With the choice of fixtures, sockets and switches, there will be no problems - there are a bunch of species, the main thing is to safely place.
Security posting
The two main criteria for safe harnessing in the garden are a good cable and a qualified specialist working with it.
Many hope that in case of a circuit failure, they will be protected by a central automatic device, usually located near the meter. I put in my own additional APP (automatic power breaker), working only on the garden network. Why risk all the appliances in the house?
In order to temporarily conduct electricity to certain garden objects, it is reasonable to use the ready-made kit, which simply needs to be included in the electric grid. Such sets are also equipped with an APP block, and all junction boxes and the switches in them are made waterproof.
That's all. Science is simple, but it requires exactness of execution and vigilance in work, because curbed electricity is good, but when it "breaks off the leash," it almost always ends badly.