Antipyretics for children are prescribed by a pediatrician. But there are emergency situations for fever when the child needs to be given medicine immediately. Then the parents take responsibility and use antipyretic drugs. What is allowed to give to infants? How can you bring down the temperature in older children? What medicines are the safest?
If you have to carry out installation work that can damage the hidden wiring, then you need to find a place where no wires pass under the plaster. And if you are not a professional electrician, then it is not necessary to buy a special device at a time. You can make a hidden wiring indicator with your own hands from what you find at home.
You can come up with many options for the implementation of the hidden wiring detector. The schemes of some devices are simple and understandable for a student, the schemes of others are available for an experienced electrical engineer.
They differ in the number and types of elements: see what you have on hand, and based on this, choose a scheme.
Important! Keep in mind that some homemade products, if assembled incorrectly, may give a signal for no reason or not give it at the right time at all: it is not safe to use such devices.
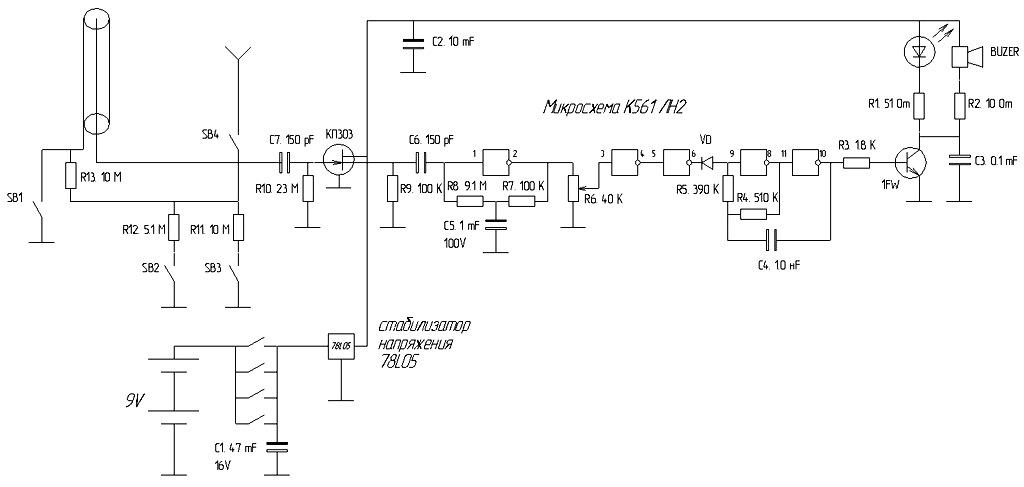
Diagram with sound indicator
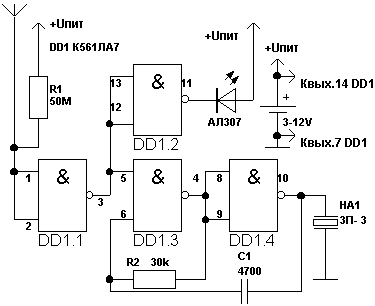
This non-contact hidden wiring indicator is based on a microcircuit K561LA7. To protect it from the high voltage created by static electricity, you need a 1 MΩ resistor (in the diagram R 1). The device is powered by a crown (9V). Copper wire or any metal rod 5 to 15 cm long is suitable as an antenna. The golden mean is 10 cm. It is important that the wire does not bend under its own weight.
If you bring the assembled device to a live wire, you will hear a sound resembling crackling. This is possible due to the presence of a piezo emitter (in the diagram ZP-3) to increase the volume. You can search with this detector not only for hidden wiring, but also for a burnt out light bulb in a garland. You can find out about its location by the fact that near it the crack stops.
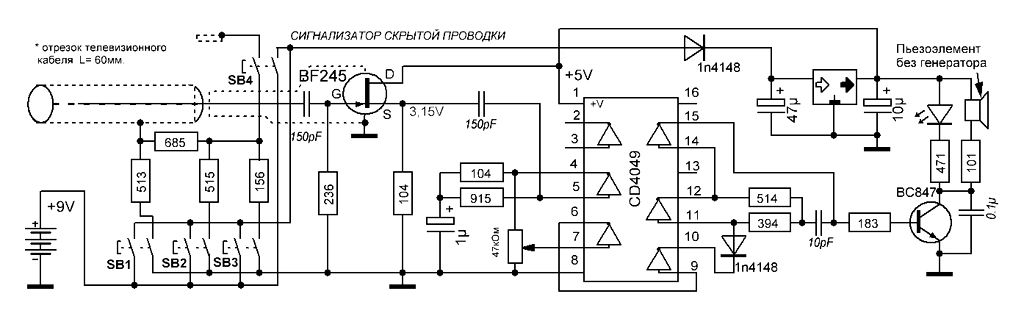
Scheme with sound and light indicator
This device can be powered by batteries with a voltage of 3 to 12 V. A resistor is used to limit the current. R1, the resistance of which should not fall below 50 MΩ. But for the LED (marked AL307) such a resistor is not provided: it is not needed, because the microcircuit used ( K561LA7) will do everything by itself.
When the finder approaches a live wire, not only noise will be heard, but the LED will also light up. Double indication is more reliable.
Dual element indicator

All you need is a chip and an LED. Suitable for assembly DD1 And HL1 respectively. The whole purpose of the work is to connect the pins of the microcircuit so that there are three inverters in the chain. Such a do-it-yourself hidden wiring finder amplifies the currents that the AC field induces on the device in the wires hidden by the wall. As a result, when approaching the wiring, the LED light comes on, and when the circuit is removed or broken, it goes out.
Execution options 2:
- Connect the conclusions: 3rd - with the 8th and 13th, 2nd - with the 10th, 4th - with the 7th and 9th, 1st - with the 5th, 11th - with the 14th;
- Connect the conclusions: 3rd - with the 8th, 10th and 13th, 1st - with the 5th and 12th, 2nd - with the 11th and 14th, 4th - with 7th and 9th.
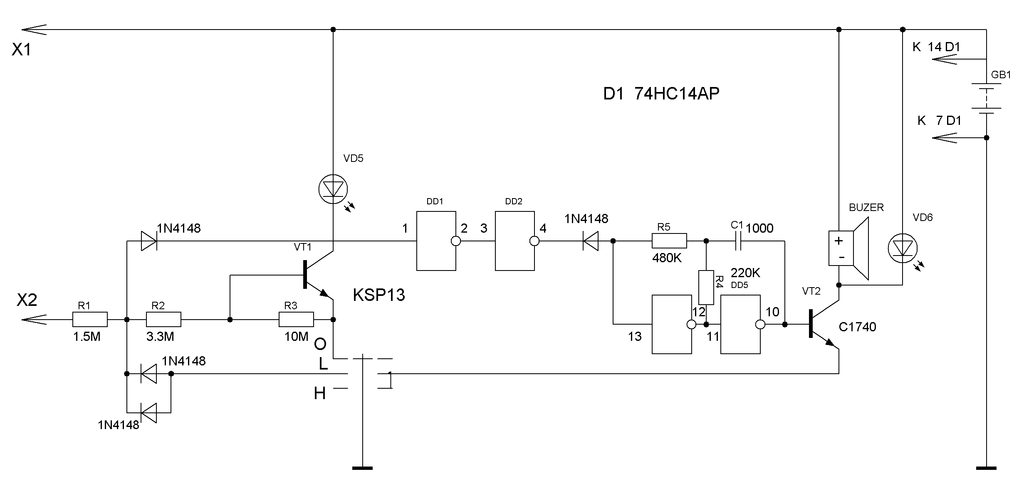
Detector on a microcontroller
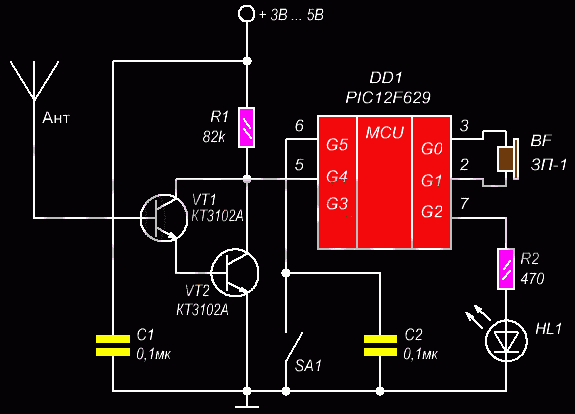
This diagram shows a hidden wiring finder on a microcontroller PIC12F629. Its action is based on sensitivity to the magnetic field created by the current with a conductor hidden in the wall. Depending on which indication method you prefer (light or sound), you can include a piezo emitter or an LED light bulb in the circuit. Therefore, you will learn about the detection of a magnetic field of hidden wiring by a lit light bulb or a characteristic cod.
This device has an undeniable advantage: it only responds to a frequency of 50 Hz - this is the frequency of alternating current. Erroneous triggering of the signal is excluded: a magnetic field from a source with a frequency less or more than the specified one will not activate the device.
Concealed wiring signaling device without batteries
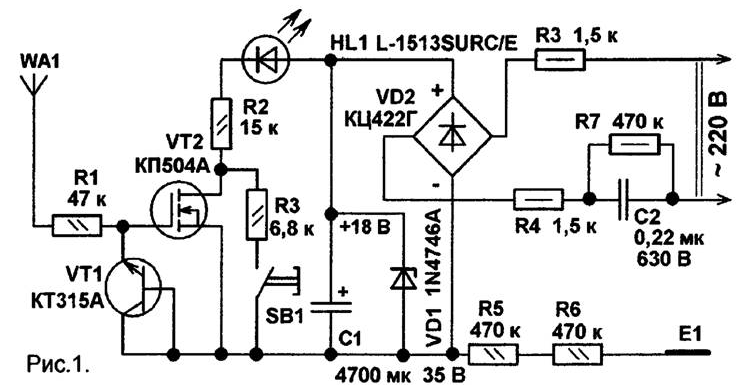 The do-it-yourself hidden wiring detector, the diagram of which is presented above, uses the network itself as a power source. This became possible due to the use of a capacitor with a large capacity (in the diagram C1). You can charge it by connecting the device to the network. A charged capacitor produces a voltage of 6-10 V. Moreover, only the brightness of the LED depends on its value, the sensitivity of the device does not fall from this.
Industrial circuits of professional detectors and their analogues for homemade products
Make "Woodpecker" at home? Can. But it is complex in an assembly that includes many elements. And the quality of the analogue work will depend on your attentiveness when reading the circuit and the accuracy of execution. Below are 2 schemes: the first is industrial, the second is for a home-made "Woodpecker" (click on them to enlarge).
You can play and YADITE 8848, the variants of which are also shown on two electrical diagrams (also increase by clicking).

Testing homemade hidden wiring alarms
Before using homemade products, it is necessary to test hidden wiring detectors. It will show if the device is working properly. Test order:
- Find an area in which 100% concealed wiring (sockets and switches) passes;
- Test a homemade alarm by running it along the wall around the outlet;
- If the signal comes only at the cable passage, you can use the device;
- If the signal appears and then disappears in different directions from the outlet, then the device is not working.
Attention! Before searching for hidden wiring, give it the maximum load. To do this, include in it a maximum of electrical appliances. This will help amplify the electric and magnetic fields that testers respond to.
In order not to get into a cable hidden by a wall with a puncher or a nail, you need to get acquainted with the wiring diagram in the apartment. But often it is lost, and the search for wires is difficult. However, with the help of a homemade electrical wiring detector, you will accurately determine the place where you can hang a shelf or a picture. To do this, you do not need to rush to the store: you will find all the elements at home in old electronics.